It's easy to keep adding new packages and lose track of the size of your Webpack, Parcel, or Rollup bundle. But large JavaScript files slow down your page not just because they take longer to download, but also because more time is spent parsing, compiling, and executing JavaScript code.
This article outlines some tips and strategies to avoid these performance problems by reducing the size of your JavaScript bundles. Reducing your bundle size can help your website load slower and improve Core Web Vitals metrics like Interaction to Next Paint.
Consider bundle size when adding new dependencies
When adding a new package, ask yourself how much extra code this will add. Libraries that seem small can end up pulling in their own dependencies and actually be quite big.
There are some tools that can help you here. For example, the Import Cost plugin for Visual Studio Code will show you the size of the imported package when you add it:

Another useful tool is BundlePhobia, a website that provides more detailed bundle size information. You can also upload your package.json file to view your largest dependencies.

Analyze your bundle to find out what packages contribute the most code
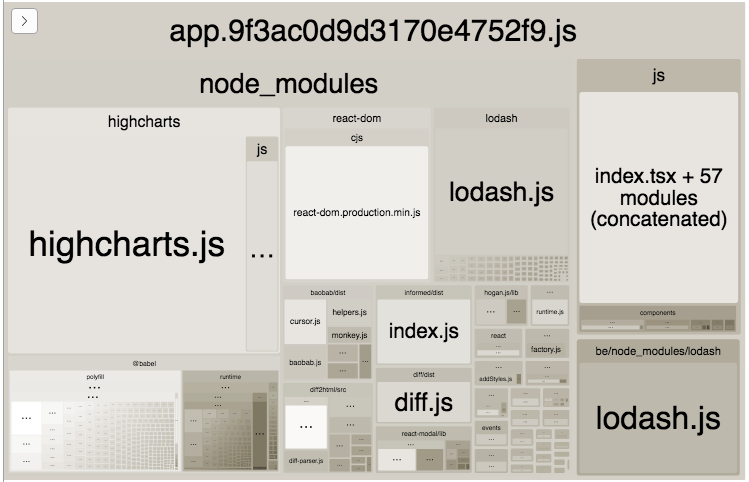
There's a great Webpack plugin called Webpack Bundle Analyzer that will visualize your bundles as a treemap.
Unlike the other tools mentioned so far this will also include all of your own code.
Compile your bundle just for the browsers you need to support
Compiling your code with Babel is needed to support older browsers, but it also makes your code much more verbose.
Let's take this ES6 one-liner as an example:
const doubleArray = (arr) => [...arr, ...arr];
After compilation it turns into this ES5 code:
function _toConsumableArray(arr) {
  if (Array.isArray(arr)) {
    for (var i = 0, arr2 = Array(arr.length); i < arr.length; i++) {
      arr2[i] = arr[i];
    }
    return arr2;
  } else {
    return Array.from(arr);
  }
}

var doubleArray = function doubleArray(arr) {
  return [].concat(_toConsumableArray(arr), _toConsumableArray(arr));
};
That's because some browsers don't support the more compact arrow functions or the ... spread operator.
However, if you only need to support the latest versions of Chrome, Firefox, and Edge, then the whole transformation is unnecessary.
This is where babel-preset-env is useful. You tell it what browsers you need to support and it will automatically enable the right Babel transformations.
Use code splitting
When a user loads your app, chances are they are only going to use a few pages and features. You don't need to load your entire front-end code.
Code splitting allows you to split your bundle into just the bits that are needed for each case. Instead of generating one large bundle, you generate a small bundle that contains all the essential feature code.
Then, when the user wants to use a more complex feature, that code is only downloaded when needed, for example after a user clicks on a button. (You can also prefetch extra bundles once your page has rendered.)
Webpack can also make sure that your dependencies are bundled together if they are required by multiple bundles. That avoids fetching the same package several times.
Manually look at your bundle
This technique is surprisingly effective. Just look at your compiled bundle file and see what's in it. Is there code or data that's repeated many times? Is there code you didn't expect to be there?
For example, one common issue you might discover is that you're including all Moment.js locales.
Dead code elimination with environment variables
When the minifier sees code like this it knows it can remove it, because it will never run:
if (false) {
  /* Do some stuff */
}
That's called dead code elimination. Now, normally you won't write code and then hard-code it to never run, but you might only need certain code in your development environment. In that case you can do this:
if (process.env.NODE_ENV === "development") {
  /* Do some stuff */
}
Normally process.env is only available in Node, not in the browser. But Webpack will replace it with the value provided in the mode configuration property. Then, depending on the value that property, the code will be removed during minification.
In addition to NODE_ENV you can also add your own environment values, for example using Webpack's environment plugin.
Reduce browser support
To support older browsers build tools need to add additional code to replace functionality that's not natively supported. This increase JavaScript file size.
Reducing the set of browsers supported in your build configuration can reduce bundle size by 5-15%. Libraries like @babel/preset-env can make this easy to do.
Make sure your code takes advantage of tree shaking
Tree shaking allows you to load only the parts of a package you need, rather than the whole package.
If you write _ = require("lodash") the whole of Lodash needs to be included in your bundle. But if you write import { find, throttle } from "lodash" Webpack can identify just the necessary code.
In the case of Lodash you can also use babel-plugin-lodash to automatically select the necessary exported functions.
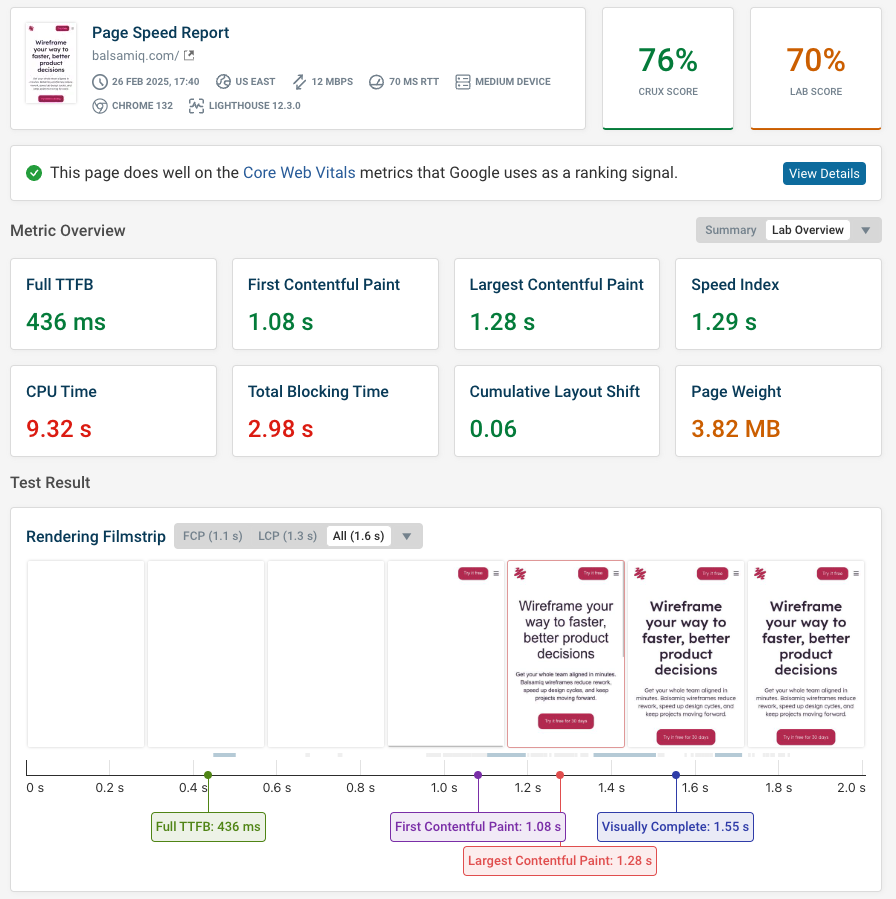
Test your website speed
Wondering if JavaScript bundle size is causing performance problems for you? Try our free page speed test to measure loading speed, JavaScript page weight, and CPU tasks for your website.
Monitor your website performance and bundle size
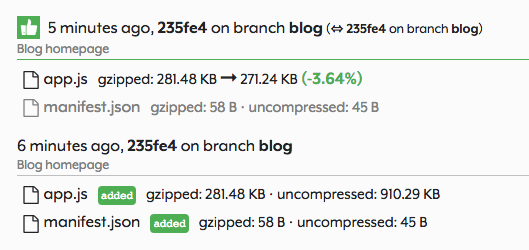
You won't always notice if a dependency you just added is bigger than expected – so you want to monitor your bundle and get alerts.
Ideally this should be part of CI. You can either build something yourself or use a service like BundleCop. Then your pull requests will include information on bundle size changes.
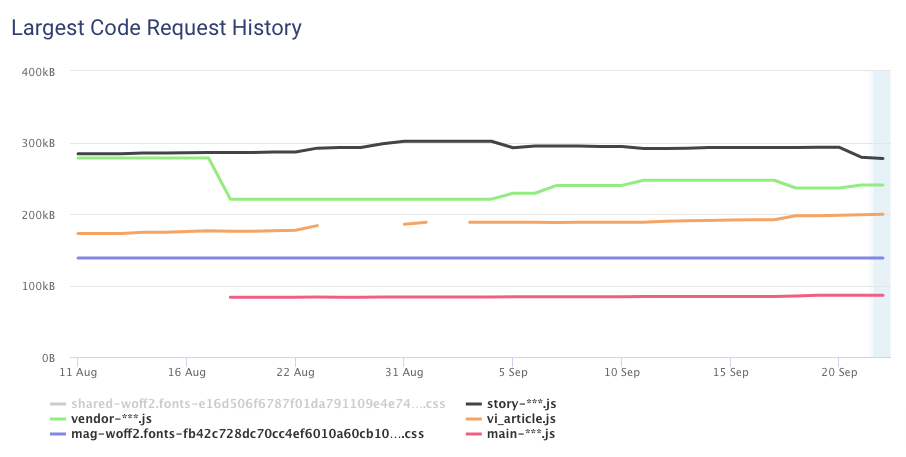
DebugBear can also show you how your bundle size changes over time. You can get notified when there's a file size increase, or see site speed changes as part of your GitHub pull requests.


Monitor Page Speed & Core Web Vitals
DebugBear monitoring includes:
- In-depth Page Speed Reports
- Automated Recommendations
- Real User Analytics Data