
Eliminate render-blocking resources is an important Lighthouse (LH) performance audit that many WordPress sites fail to pass. Render-blocking resources hurt web performance because they congest the critical rendering path and prevent the page from starting the rendering process until they're fully loaded.
While it's not possible to fully eliminate render-blocking resources (e.g., you'll still need to load critical CSS and JavaScript early in the rendering process), you can reduce their number and size, which will help you pass the Lighthouse audit, too.
We covered how to eliminate render-blocking resources in general before — check it out to better understand how render-blocking resources work and how they impact web performance metrics such as Core Web Vitals.
This article is specifically about how to eliminate render-blocking resources on a WordPress site.
Is It Hard to Eliminate Render-Blocking Resources in WordPress?
Eliminating render-blocking resources in WordPress is hard because you can't edit the source code directly.
The frontend of a WordPress site is mainly governed by your theme, complemented by plugins that insert content into the page (for functionalities such as eCommerce, newsletter, form, eLearning, etc.) and your custom code you can add in different ways to your page (i.e., by editing the template files using a child theme, adding custom functions to your theme's functions.php file, or using a code snippets plugin).
All the code coming from different sources needs to work together to have a fast-loading WordPress site. This means that if you add extra code to your pages, change the theme, or install a new plugin, you may introduce additional render-blocking resources, which will slow down page rendering and, in some cases, even break functionality.
Before starting to eliminate render-blocking resources in WordPress, back up your site, and test the changes either on a test site or in the staging area provided by your WordPress host before launching the optimized code on your production site.
What Resources Are Render-Blocking?
When eliminating render-blocking resources — whether on a WordPress site or not — you'll need to focus on removing as much CSS and JavaScript as possible from the <head> section of the page.
Render-blocking resources include:
- CSS in the
<head>tag - JavaScript in the
<head>tag, unless it has theasyncordeferattribute
However, the following types of resources are non-render-blocking:
- Font files (TTF, EOT, WOFF, WOFF2, etc.)*
- Images
- Videos
- JavaScript in the
<head>tag with theasyncordeferattribute - CSS in the
<body>tag - JavaScript in the
<body>tag
*While the font files themselves are non-render-blocking resources, the CSS that loads them using @font-face rules is render-blocking — this is why web fonts are still considered render-blocking resources in practice.
Now, let's see how to eliminate render-blocking resources in WordPress.
1. Locate Your Render-Blocking Resources
To eliminate render-blocking resources on a WordPress site, first you need to know where they come from.
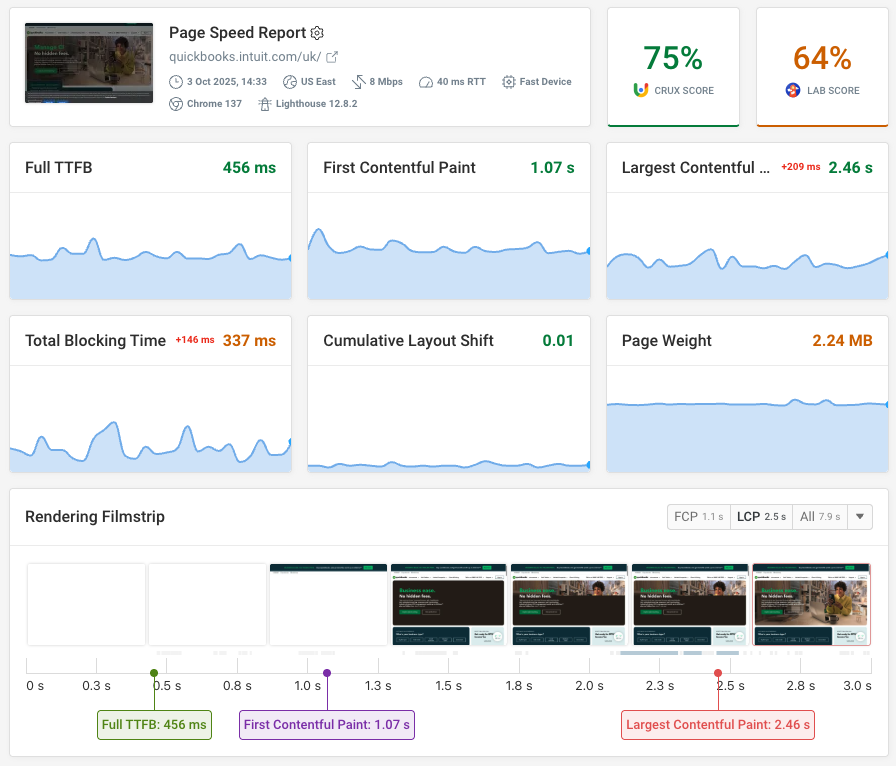
You can locate your render-blocking resources by using our free WordPress website speed testing tool.
Once the speed test completes, navigate to the Requests menu, which shows your request waterfall chart. To find your render-blocking resources, look for the Blocking labels next to the URLs of the resources:

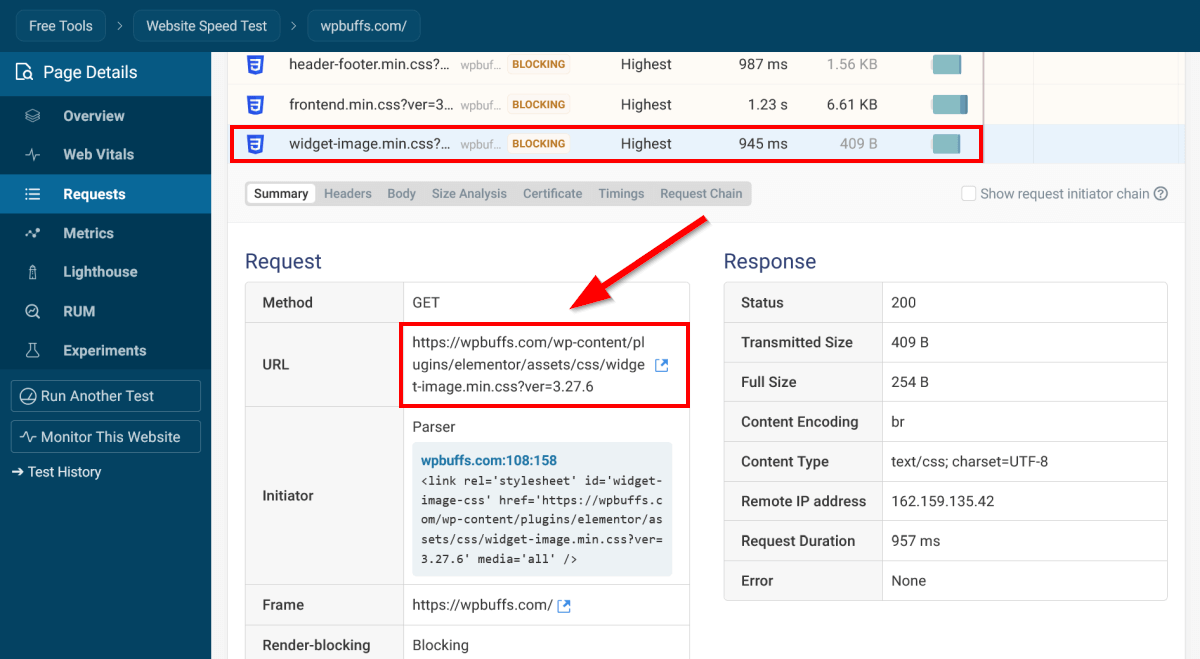
By clicking into a render-blocking resource, a details panel opens showing the full URL, the HTTP header, a size analysis, the related request chain, and more. This information enables you to locate the file and understand its impact on the total size of render-blocking resources on the page.
For example, in the screenshot below, you can see that the render-blocking widget-image-min.css file comes from the Elementor page builder plugin on the tested WordPress site (WPBuffs.com):
When locating render-blocking resources on a WordPress site, check all the key page types, as it depends on the content which files will download. For example, on a WooCommerce site with a blog and a contact form, you could test the homepage, a blog archive page, a single post, a single page, a catalog page, a single product page, and the Contact page to get a full view of the render-blocking resources on that website.
2. Use a Performance-Optimized WordPress Theme
If you're working on a new WordPress site, the best way to eliminate render-blocking resources is to use a performance-optimized theme.
As it's the theme that generates most (or all) frontend code on a WordPress site, if you use one that's been made with web performance optimization in mind, you have already eliminated many of your render-blocking resources without doing anything else.
A performance-optimized WordPress theme should eliminate its own render-blocking resources by applying some or all of the following best practices:
- minifying HTML, CSS, and JavaScript code
- using code splitting and bundling so that each page only loads the resources it really uses (look for the mention of module bundler tools such as Webpack, Parcel, Rollup, etc.)
- removing unnecessary scripts added by the WordPress core, such as the Emoji script
- extracting critical CSS and JavaScript
- deferring non-critical CSS and JavaScript, or loading them asynchronously
- preloading web fonts
- providing the option to load system fonts available on end users' computers
- ...etc.
Some examples of performance-optimized WordPress themes are Astra, GeneratePress, OceanWP, Blocksy, Sydney, Zakra, and Kadence Theme.
If you want to eliminate render-blocking resources on a live WordPress site, switching to a new theme is often hard and risky, especially if you serve a large amount of content or have different content types. If your site is very slow, it may still be worth the hassle, but you need to prepare for the issues that may arise during theme migration, as breaking a live WordPress site by installing a new theme is way easier than not doing so.
If you can't change the theme, the best advice is to install a web performance optimization plugin such as WP Rocket (premium), Perfmatters (premium), WP-Optimize (free), Autoptimize (free), or Asset CleanUp (free) — we'll look into them in detail below.
To read more about how to make a WordPress site faster, check out our How to Speed Up a WordPress Site: A Chef's Performance Recipe article, too.
3. Review Plugins that Load Content to the Frontend
While not all plugins add content to the frontend of a WordPress site, some do. Colloquially, we can call these plugins 'content plugins' (note that this is not a term officially used by the WordPress team).
Content plugins can insert the following types of elements into an existing WordPress site:
- widgets
- forms
- popups
- eCommerce pages
- online courses
- etc.
This also means that content plugins can add extra render-blocking code to your WordPress site. The easiest way to locate such content plugins is by using our free WordPress website speed testing tool and following the technique detailed in Step 1 above.
Then, review each plugin that inserts content into your WordPress site by responding to the following questions:
- Do you really need this functionality? If not, consider removing the plugin.
- What is the performance impact of the render-blocking resources introduced by the plugin? Content plugins that add more or heavier render-blocking files need more attention.
- Can you replace the functionality with a similar plugin that adds fewer render-blocking resources to the page? To compare different plugins, install them on your staging site one by one and run a WordPress speed test on each.
If you need to keep a poorly performing content plugin (e.g., it would be too risky to migrate the content it has added to your site), the best solution is to install a web performance optimization plugin that can mitigate its effect.
4. Install a Web Performance Optimization Plugin
As I mentioned above, render-blocking resources in WordPress should be eliminated primarily by the theme. However, if you have a live WordPress site with a theme you can't change, a web performance optimization plugin can help you eliminate render-blocking resources.
These plugins can also improve site speed if you have a performance-optimized theme, as they not only eliminate render-blocking resources, but also reduce initial server response times, optimize database operations, reduce page weight, and more. However, their usage on a poorly performing WordPress site where you can't change the theme is essential.
The best web performance optimization WordPress plugins are WP Rocket, Perfmatters, WP-Optimize, Autoptimize, and Asset CleanUp.
Since these plugins typically have overlapping functionality, using more than one on a WordPress site increases both the risks of plugin conflicts and the site's performance overhead. As a rule of thumb, try to install only one that allows you to perform all the web performance optimization tasks you need.
To eliminate render-blocking resources, your web performance optimization plugin should:
- Remove unused CSS*
- Defer non-essential CSS and JavaScript, or load them asynchronously
- Inline critical CSS in the
<head>section of the page
*While reducing unused JavaScript is also a web performance best practice recommended for eliminating render-blocking resources, it's something that's very hard to do on a WordPress site because of its modular structure.
As a result, reputable web performance optimization plugins don't remove unused JavaScript code, as they can't be sure if it'll be needed later. Instead, they only defer non-essential JavaScript or, in some cases, delay it until user interaction.
5. Limit the Number of Web Font Families You Use
While font files themselves are not render-blocking resources, the CSS files that include the related @font-face rules are. When you download a web font from the internet, the browser downloads the font-related CSS along with the font files.
There are a couple of ways to eliminate such CSS files. The easiest technique is to simply limit the number of web font families you load on a page, as each font family increases the amount of render-blocking CSS the browser must load.
Since most fonts come in different weights and styles, you can create beautiful designs using the same typeface in different variations. As a rule of thumb, don't use more than two web font families on a page — whether you're working on a WordPress site or not.
To learn more about fonts, check out our Ultimate Guide to Font Performance Optimization, too.
6. Use System Fonts Instead of Web Fonts
Another way to eliminate render-blocking CSS that the browser downloads with web fonts is to not use web fonts at all. The alternative to web fonts is system fonts, which are typefaces already installed on the user's computer.
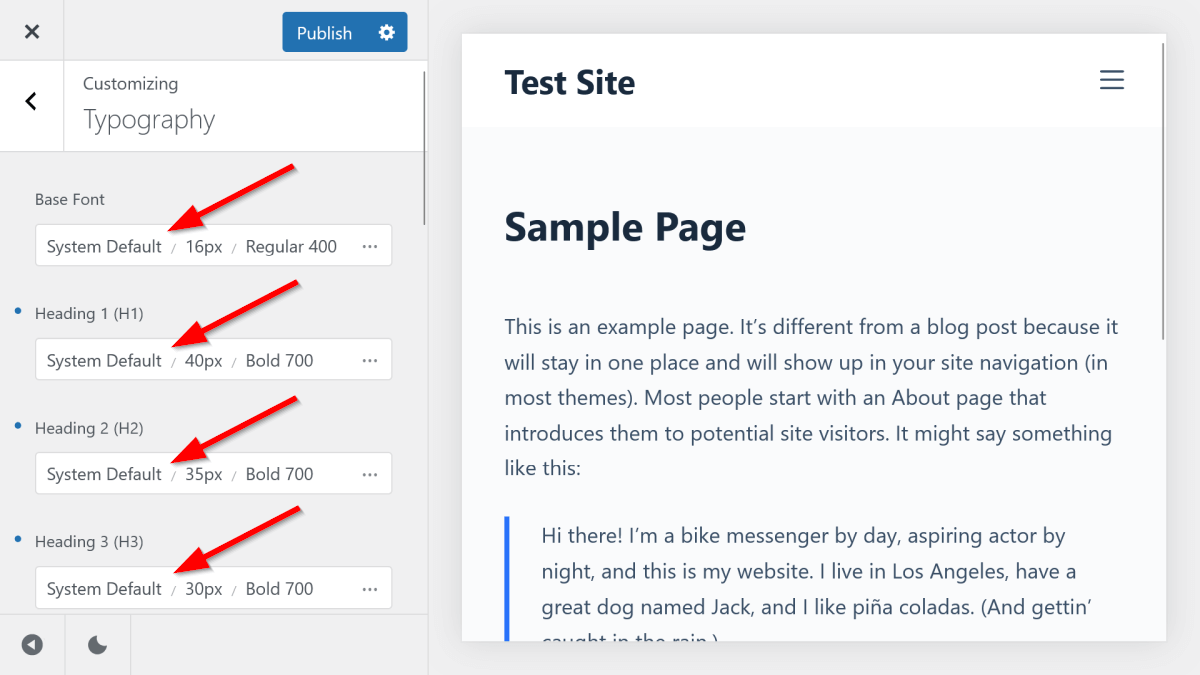
Performance-optimized WordPress themes (see above) typically allow you to set a system font stack from the Customizer.
In the screenshot below, you can see the typography options of the Blocksy theme, which uses the System Default value (referring to the default system font available on each user's computer) as the default font:
If you can't change the theme, you can still load system fonts instead of web fonts by adding the following line to your style.css file (on WordPress, it's recommended that you create a child theme before adding customizations to the CSS — partly to keep updates safe, partly because the child theme overrides the parent theme):
body {
  font-family: system-ui;
}
The CSS declaration above uses the system-ui value for the font-family property, which renders the page content in the default system font on the user's machine.
The system-ui value is widely available across major browsers, so you can safely use it.
7. Load Web Fonts Locally
If you don't want to use system fonts (e.g., you want to enhance your brand aesthetics with custom typography), you can still eliminate render-blocking resources in WordPress if you load your web fonts locally. This essentially means that you host the font files and the related CSS on your own server or CDN so that the user's browser can download them from your origin domain.
Self-hosting web fonts has the following web performance advantages:
- The browser doesn't have to connect to third-party servers (e.g., to download Google Fonts, it needs to connect to two external servers: one for the font files and one for the font CSS):
- This reduces Time To First Byte (TTFB) and the perceived render-blocking period.
- You can limit the character sets you download (e.g., you could only add the
@font-facerules for the Latin character set to your CSS, while Google's CDN sends the@font-facerules for all the character sets the typeface has, e.g., Latin, Greek, and Chinese):- This reduces the weight of your render-blocking CSS.
There are two simple ways to self-host web fonts in WordPress (or, you could add the @font-face rules and font files manually to your child theme):
- Some performance-optimized themes (e.g., Astra, OceanWP, Blocksy, Sydney, or Kadence Theme) allow you to either upload custom fonts or load Google Fonts from your own server.
- You can use a font optimization plugin that provides this feature (e.g., OMGF (Optimize My Google Fonts) or Custom Fonts).
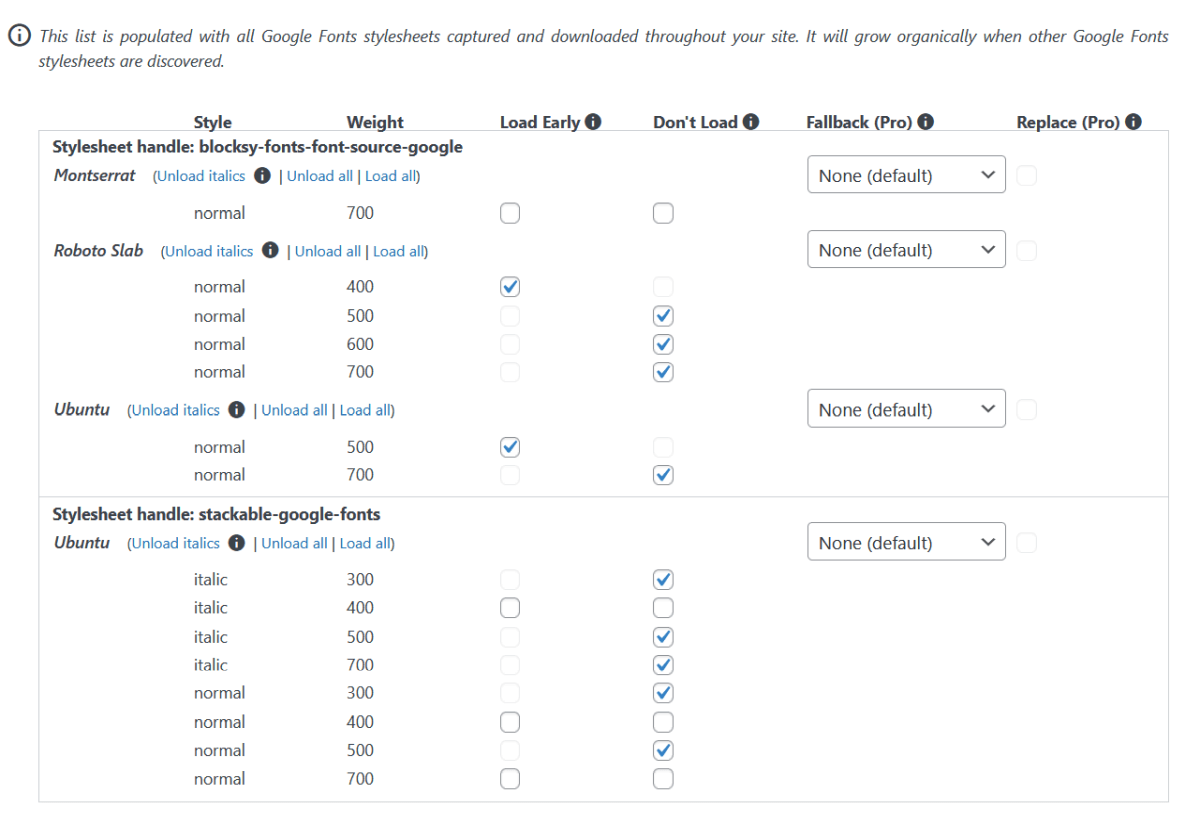
For example, the screenshot below shows the Local Fonts settings of the OMGF plugin — the plugin first downloads the Google Fonts you use on your website to the /wp-content/uploads/omgf folder on your server, then you can choose which styles and weights you want to load:
Start to Eliminate Render-Blocking Resources in WordPress
At first glance, eliminating render-blocking resources in WordPress may seem like a daunting task — however, thanks to the extensive WordPress ecosystem, many of the hardships can be mitigated, and you can eliminate render-blocking resources without having to write any code:
- If you are working on a new WordPress site, choose a performance-optimized theme, run a free WordPress speed test, and if you still find render-blocking resources that could be removed*, check if they were added by a content plugin (if yes, consider replacing or removing these plugins).
- If you are working on a live WordPress site and can't change the theme, you can still eliminate some of your render-blocking resources with the help of a web performance plugin and an optimized font loading strategy.
*Don't forget that not all render-blocking resources can be eliminated. For example, there will always be some render-blocking CSS in the <head> section of the page.
One of the most important things in WordPress development is to avoid overlapping functionality between your theme and various plugins, as this can lead to theme and plugin conflicts and further web performance issues (i.e., too many plugins can slow down the page). For example, if your theme has a feature that allows you to load Google Fonts locally, try to avoid installing a separate font optimization plugin.
Learn more about Wordpress performance optimization
To learn more about WordPress performance optimization, check out our tutorial about how to speed up a WordPress site. Nestify has also published a useful list of tips to speed up your WordPress website.
Or, if you'd rather use a professional service, take a look at our guide on how to choose a WordPress speed optimization service.
Monitor performance for your Wordpress site
If you want to see more web performance data than sign up for a free 14-day DebugBear trial.
Get in-depth technical reports with detailed recommendations on how to speed up your website. You can also run experiments to try out fixes without deploying code on your website.
Monitor page speed continuously with synthetic monitoring and real user monitoring. DebugBear alerts you to any new problems on your website, whether it's an increase in page load time, a new render-blocking request, or a new third-party script that's slowing you down.


Monitor Page Speed & Core Web Vitals
DebugBear monitoring includes:
- In-depth Page Speed Reports
- Automated Recommendations
- Real User Analytics Data