
Have you ever loaded a page with tons of content and noticed how slow it feels? The browser has to process everything at once—even the content you can't see yet! That's where the content-visibility property comes in. It's a CSS feature that tells browsers to skip rendering off-screen content until it's needed.
What is CSS Containment?
Before diving into content-visibility, let's understand CSS containment. CSS containment lets you tell browsers which parts of a page are separate from others. When browsers know this, they can make smart decisions about rendering such parts.
CSS containment is like putting content in separate boxes. Each box doesn't affect the others, so the browser can process them independently.
How content-visibility Works
The content-visibility property tells browsers they can skip rendering content that users can't see. This saves processing time since the browser doesn't need to calculate styles, layout, and paint for off-screen elements.
When you scroll and the content comes into view, the browser renders it just in time. This makes initial page loads much faster, especially for long pages with lots of content.
Values for the content-visibility property
The content-visibility property accepts three main values:
visible: The default behavior. Content is processed and displayed normally.hidden: Content is not displayed and not accessible to users (similar todisplay: none), but its rendering state is preserved for quick unhiding later.auto: Content is only rendered when it's needed (near or in the viewport). This gives the biggest performance boost.
When to use the content-visibility property
content-visibility works best with content that:
- Is below the fold (not visible when the page first loads): For example, it's outside of the initial viewport.
- Is self-contained (doesn't affect other parts of the page): For example, it doesn't change the layout when it's rendered and doesn't have styles that affect other elements.
- Has a substantial rendering cost (like complex layouts): For example, a long list of UI components, blog posts in a feed, a long comment thread, etc.
When Not to Use content-visibility
You should be careful when using content-visibility because it can have unintended consequences. Here are examples:
- Content in the initial viewport (what users see first): This feels like lazy loading your LCP image!
- Small elements with a minimal rendering cost: You should avoid premature optimization and only use
content-visibilitywhen it's effective. - Elements whose size might affect the page layout significantly: This can lead to unexpected results when the content is rendered.
Using contain-intrinsic-size
When you use content-visibility: auto, you might notice a problem: the browser doesn't know how big the content marked for deferred rendering is. In such a case, the browser assumes a height of 0, which can contribute to a confusing scrollbar state!
That's where contain-intrinsic-size comes in. It lets you specify a placeholder size for the content:
.content-section {
  content-visibility: auto;
  contain-intrinsic-size: auto 600px; /* Width and height placeholder */
}
Selectively Applying content-visibility
For long lists of content, consider applying content-visibility: auto like this, for example, with blog posts:
/* Apply to posts that are below the fold */
.blog-post:nth-child(n + 10) {
  content-visibility: auto;
  contain-intrinsic-size: auto 600px;
}
This ensures the first batch of posts renders normally, while later ones use the content-visibility: auto optimization.
Understanding the contain Property
The content-visibility: auto value applies several types of containment:
- Style containment: Prevents styles inside the element from affecting outside elements.
- Layout containment: Prevents layout changes inside from affecting outside layout.
- Paint containment: Prevents content from visually overflowing the element.
You can also use these containment types directly with the contain property:
.container {
  contain: style layout paint;
}
It's important you understand each type of containment and how they affect the rendering of your content.
Don't use content-visibility: auto; without understanding the implications of the contain property!
Browser Support
The content-visibility property is supported across all modern browsers, including Chrome, Firefox, Safari, and Edge. However Firefox and Safari may exhibit quirks with certain values.
The contain property has good support across modern browsers.
Measuring Improvements with DebugBear
At DebugBear, we offer tools to measure the impact of CSS containment on your site's performance. Consider the following example:
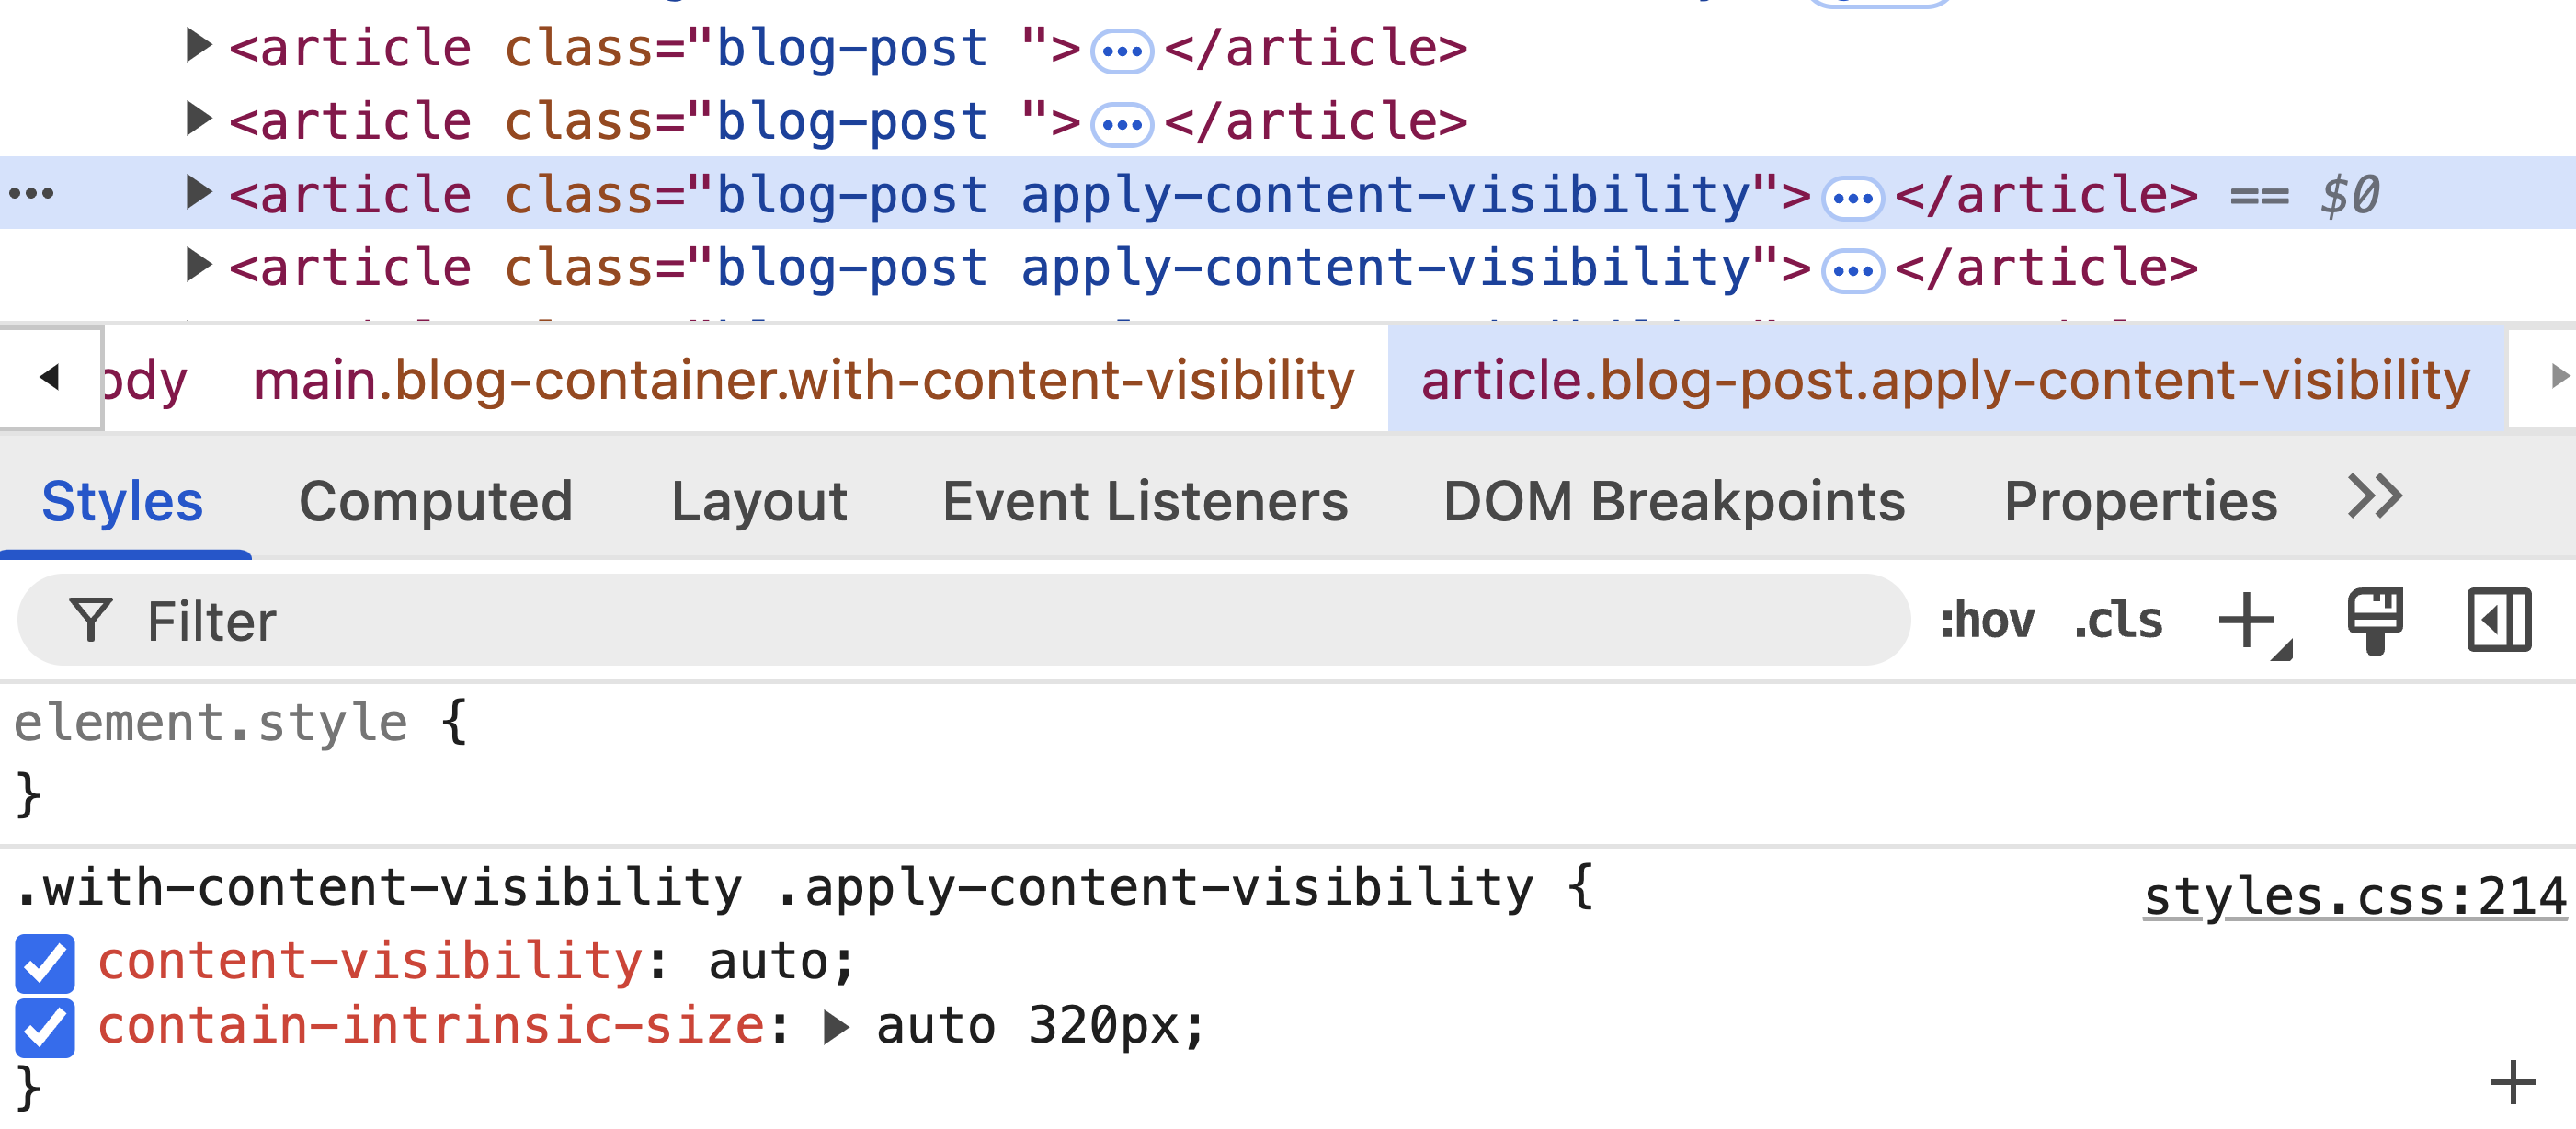
This DOM tree represents a page with hundreds of blog posts.
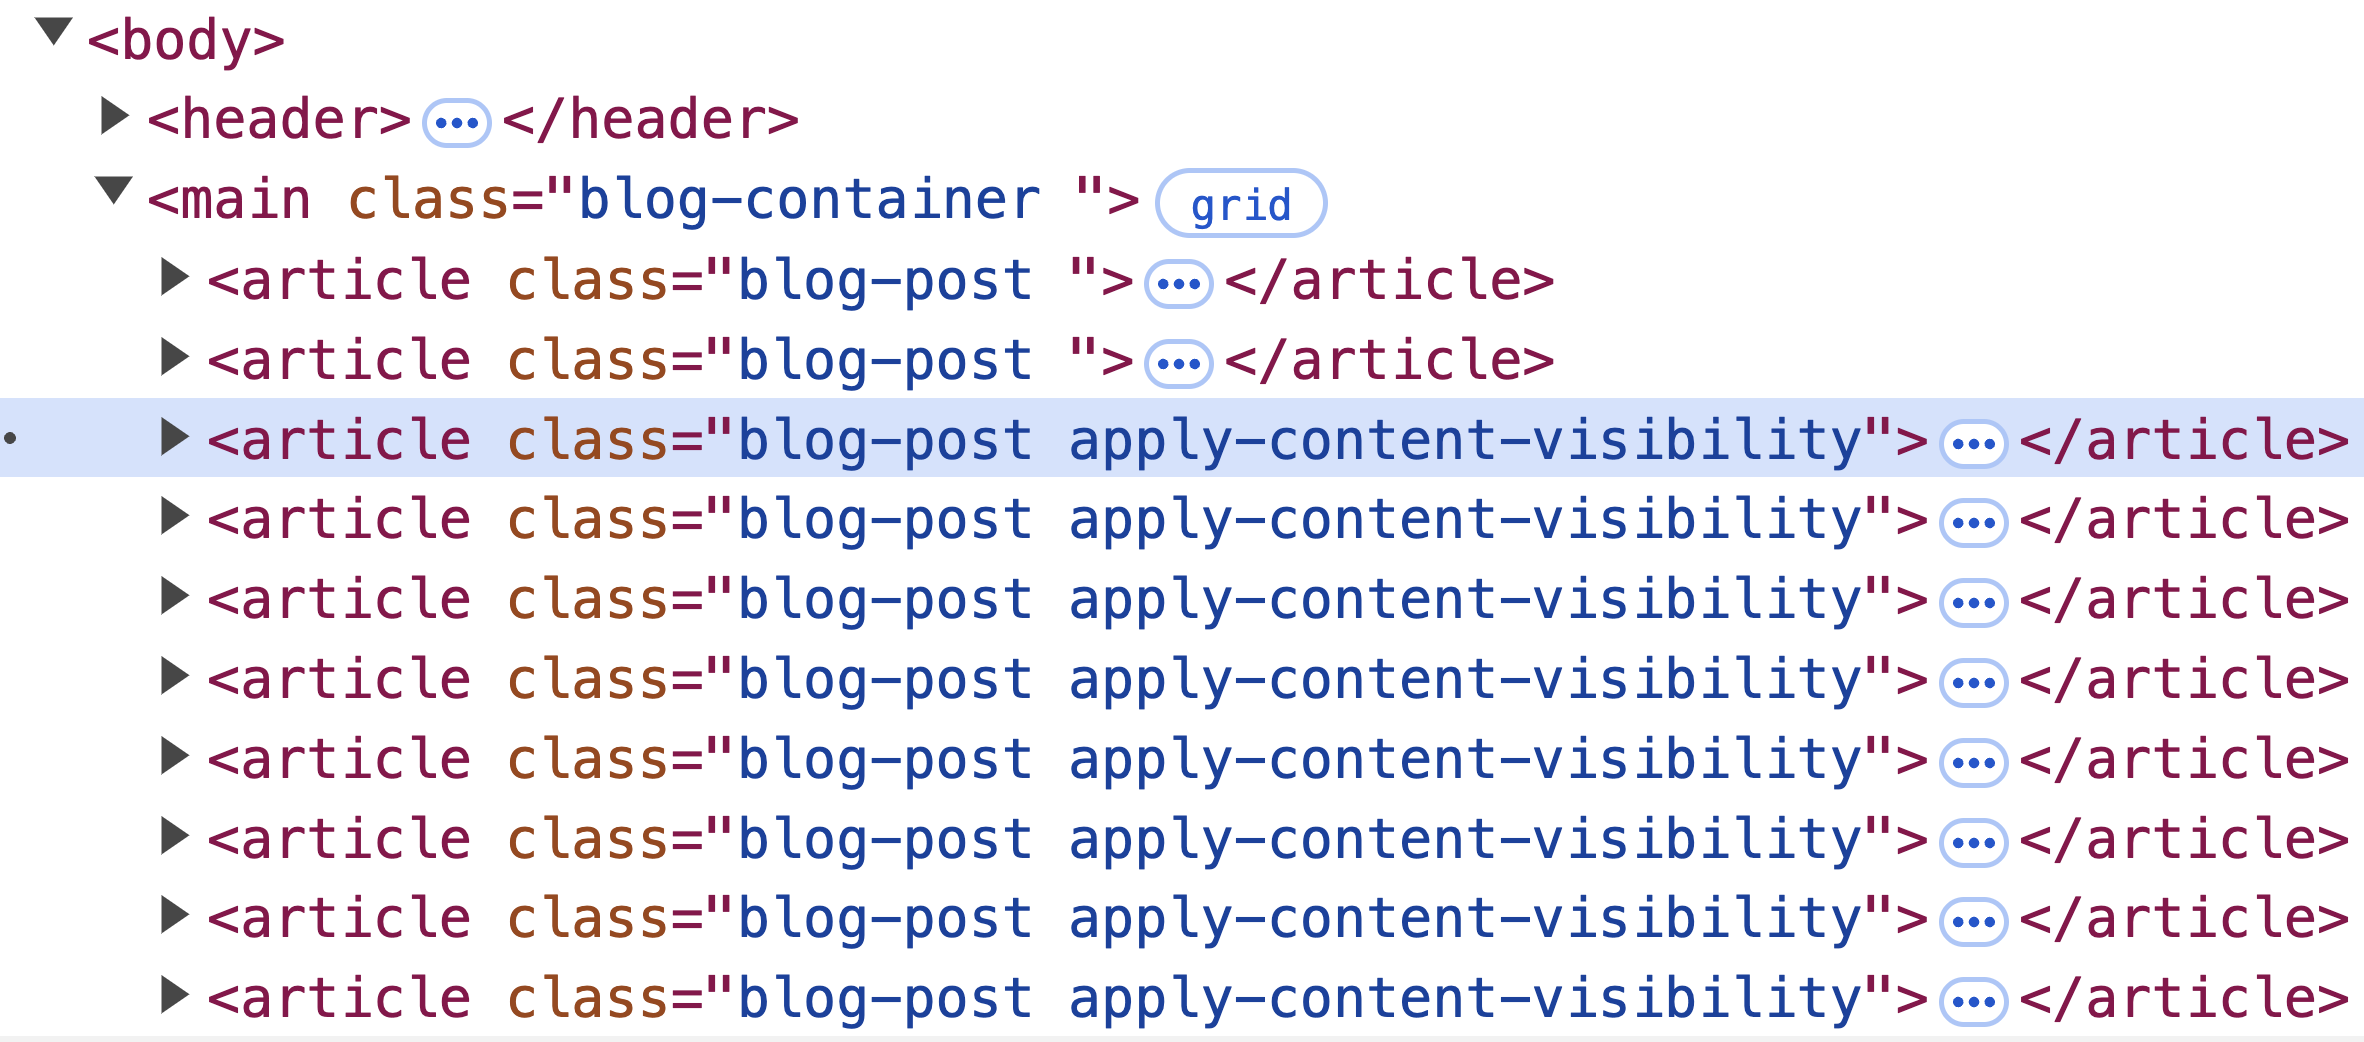
The .apply-content-visibility class applies CSS properties that you've learned about in this article:
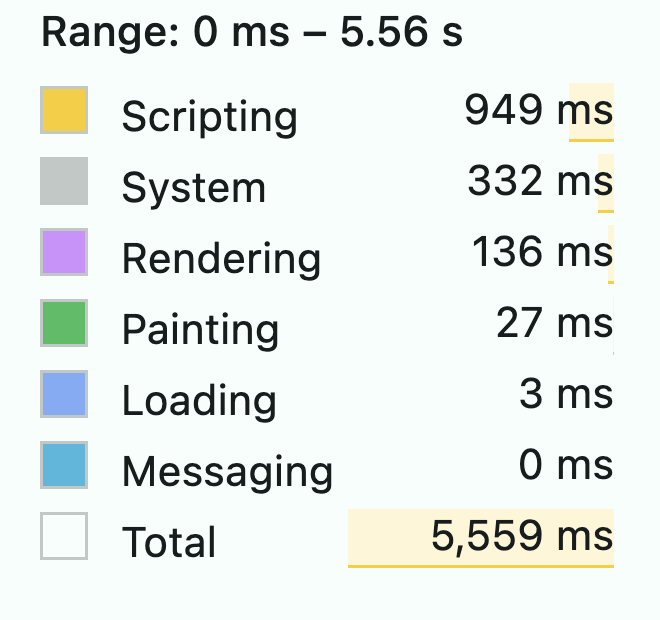
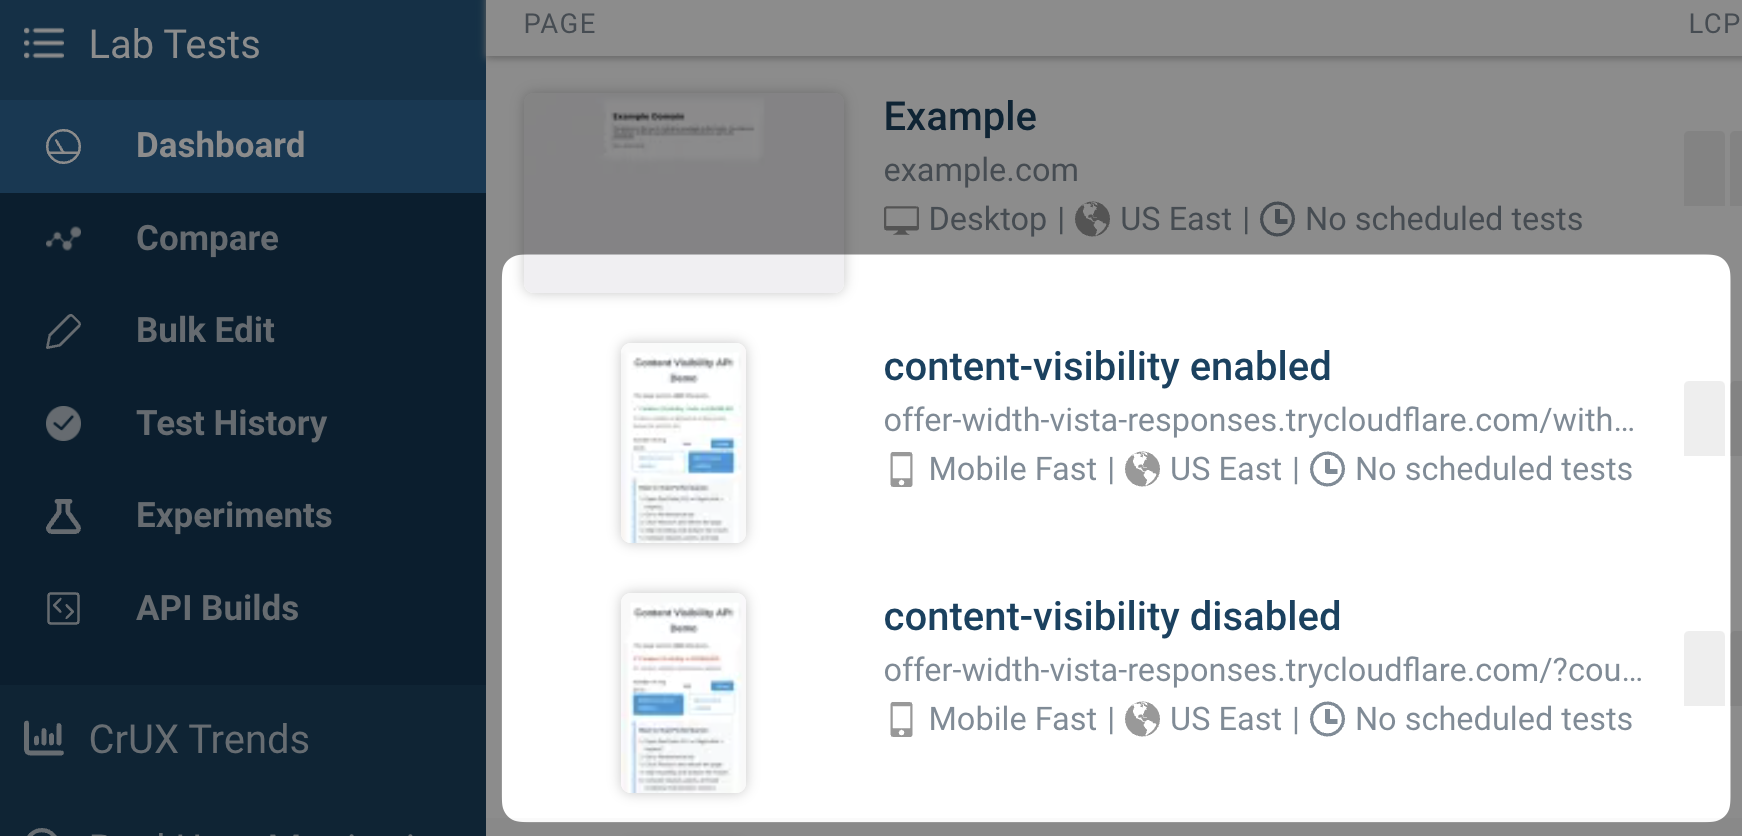
Toggling the styles for the .apply-content-visibility class lets us create a before-and-after comparison to understand the impact of content-visibility on rendering performance during page load. In this case, I set up two tests from DebugBear's dashboard:
I was then able to use the comparison view to see the performance improvements:
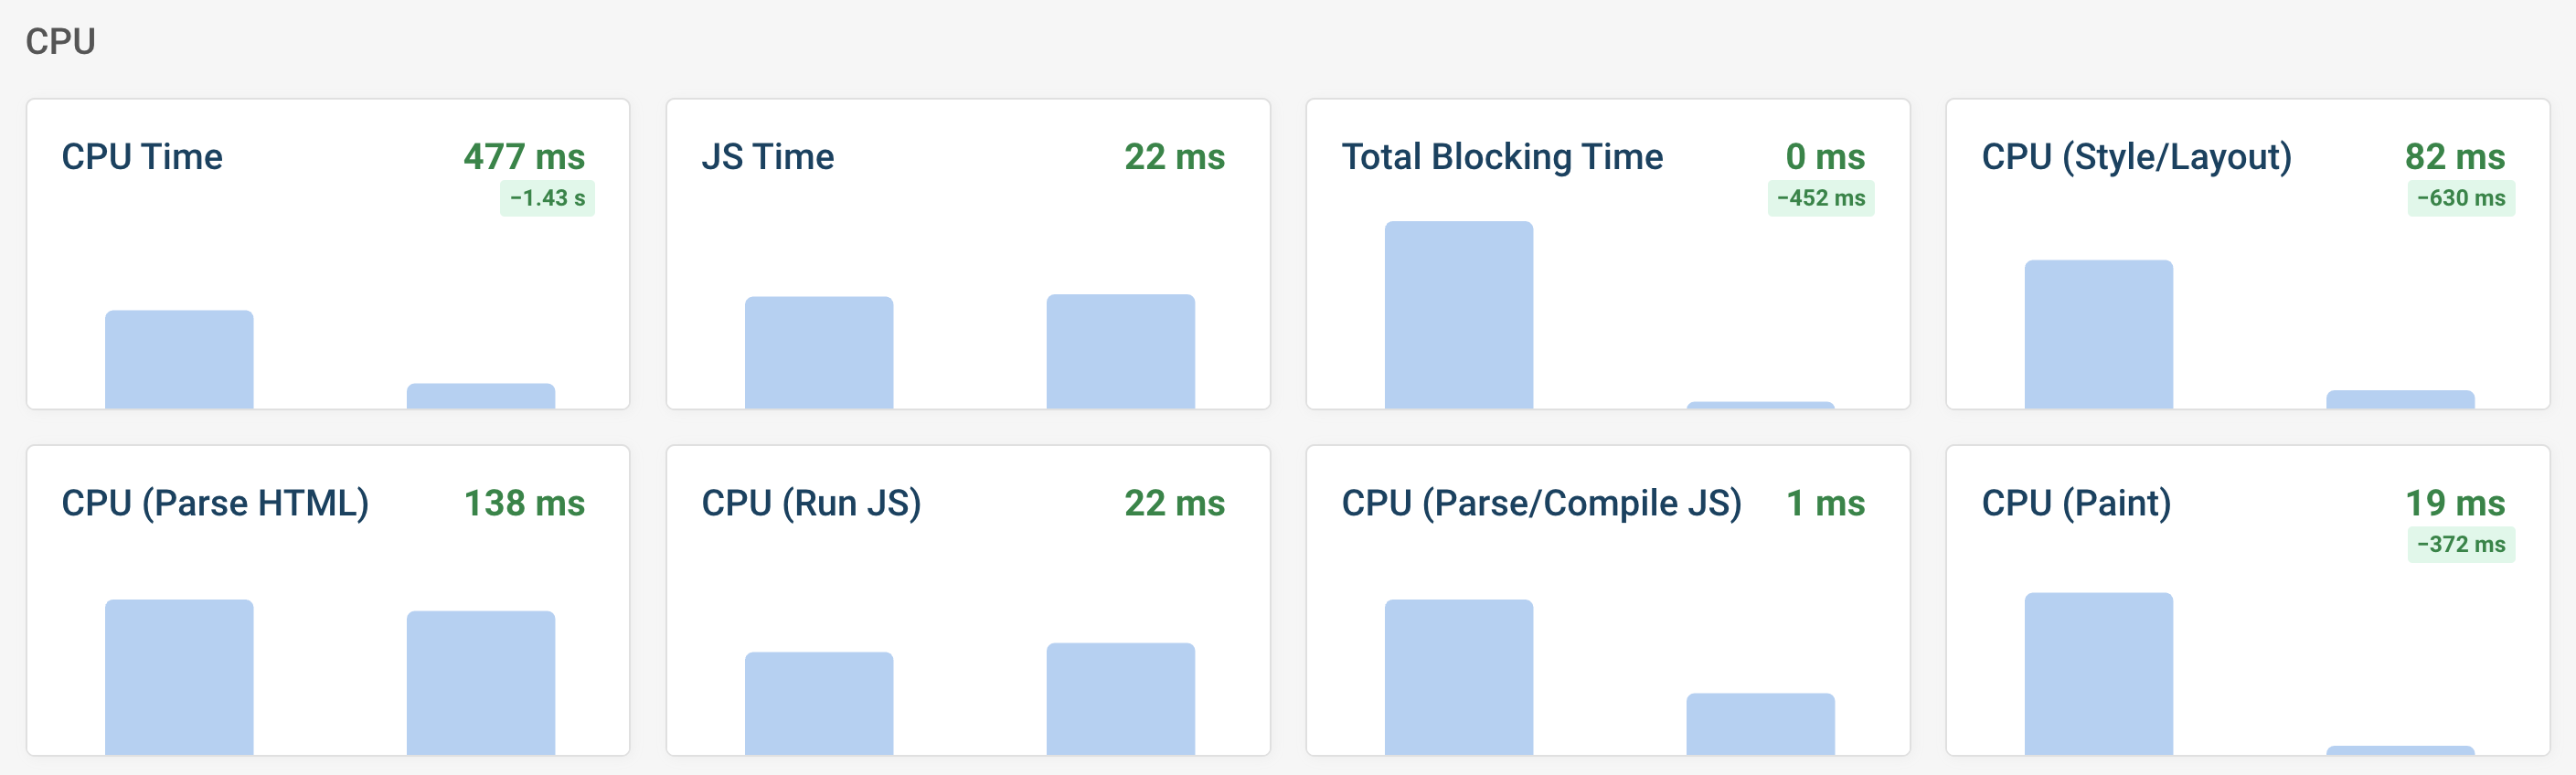
The previous screenshot shows the before-and-after comparison for performance metrics of the test page.
The CPU (Paint) time is very telling, as it has dropped significantly since there are hundreds of blog posts on the page that didn't need to be rendered immediately.
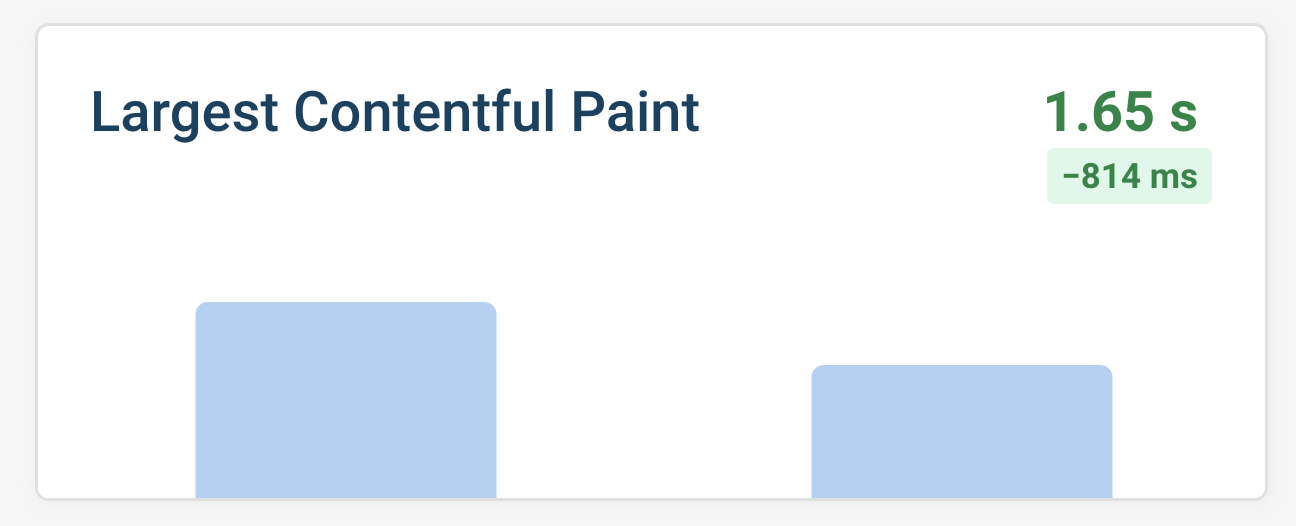
Interestingly, the Largest Contentful Paint (LCP) metric has also improved. Since most of the rendering work that a browser does happens on the main thread, the browser can now focus on rendering the most important content first—the LCP element.
DebugBear also offers a video comparison feature to see the visual impact of these changes:
While this approach of creating multiple DebugBear lab tests for a demo page is somewhat useful, it's more practical to use DebugBear's one-click experiments feature to test the impact of content-visibility on your site's performance.
DebugBear's own blog listing page currently displays the title and excerpt of each blog post. That's almost 200 posts as of March 2025. This makes for a perfect candidate to test the impact of content-visibility on rendering performance.
With the /blog page added as a new test in DebugBear, and then configured to be tested with a mobile configuration, I can then run a baseline test. This baseline test captures the page load performance without any optimizations.
Next, I create and configure a new experiment:

This experiment inserts a bit of CSS into the <head> of the page:
<style>
/* No significance to this `nth-child` value */
[itemprop="blogPost"]:nth-child(n+11) {
  content-visibility: auto;
  contain-intrinsic-size: auto 300px;
}
</style>
I then run the experiment:
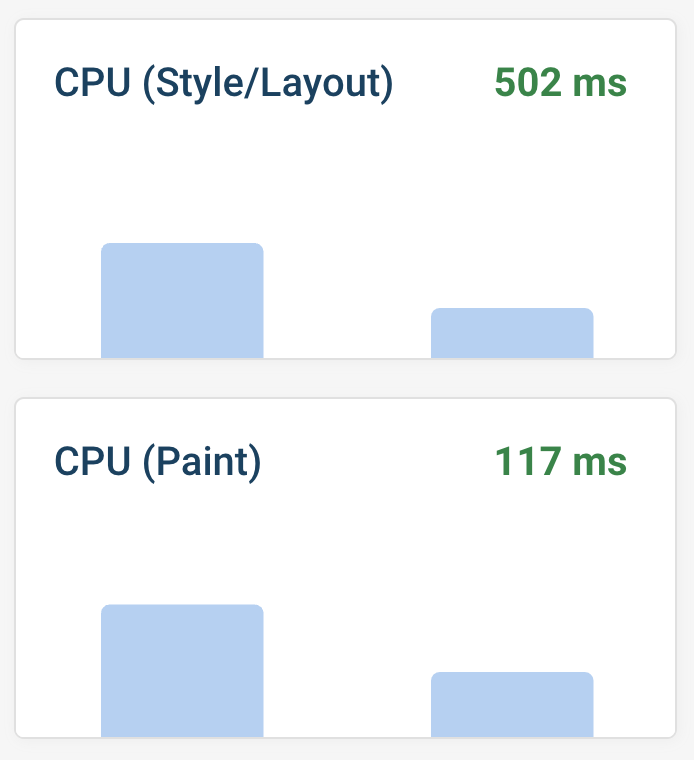
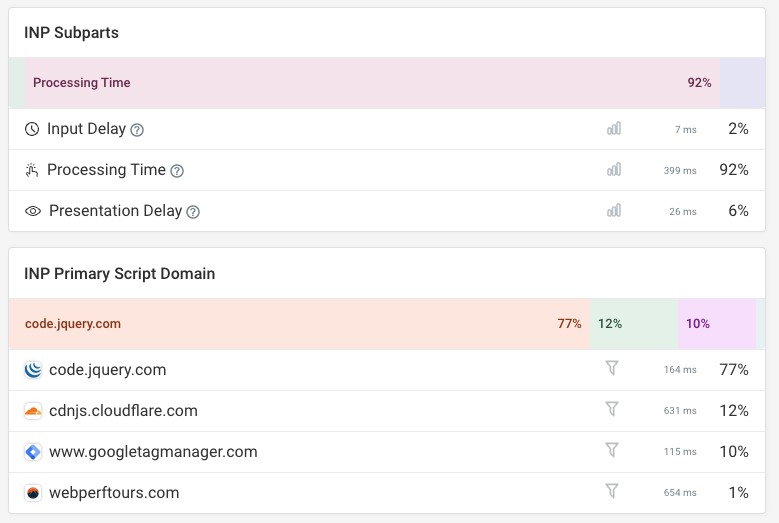
The DebugBear blog listing page has over 15 thousand words! The content visibility technique doesn't just defer rendering of most of that text but also its accompanying images, styles, etc.
While the improvements to some metrics are negligible, there's a noticeable improvement in the CPU-bound Style, Layout and Paint metrics, which are good indicators of the performance benefits of using content-visibility.
Accessibility Considerations
The content-visibility property can have implications for accessibility. It's an important topic that was not covered in this post, so please read the official MDN documentation.
Conclusion
The content-visibility property gives developers more control over how browsers render content. By telling browsers to skip rendering off-screen content, you can improve page load time and interactivity.
Remember these key points:
- Use
content-visibility: autofor off-screen content (but test the performance impact first). - Pair it with
contain-intrinsic-sizeto manage placeholder sizes for content not yet rendered. - Apply this technique selectively to avoid delayed rendering of important content.
- Test your changes manually in a variety of browsers, with tooling like browser DevTools and DebugBear, and with real users.
Track the impact of page speed optimizations
DebugBear can help you try out performance optimizations and test your website continuously using synthetic monitoring. Track how page speed is changing over time and get alerted when there's a new issue slowing down your website.
Wondering if the performance optimizations you're making are really helping your actual visitors? DebugBear real-user monitoring can tell you how real-world website performance changes over time.
You can also track long CPU tasks using the Long Animation Frames API. If they delay user interactions, you'll see poor Interaction to Next Paint scores.


Monitor Page Speed & Core Web Vitals
DebugBear monitoring includes:
- In-depth Page Speed Reports
- Automated Recommendations
- Real User Analytics Data