
This post introduces View Transitions: A modern web platform feature to improve the user experience and perceived performance of a website.
What are View Transitions?
View transitions offer a way to animate the transition between different views in a web application.
There are two parts to the View Transition API:
- Same-document view transitions: animations that occur when the user interacts with the same page, for example within a Single Page App.
- Cross-document view transitions: animations that occur when navigating between two different documents, e.g. from clicking on a hyperlink to navigate to a new page on the same website.
We explain this later, but generally speaking, for most websites, we recommend using cross-document view transitions with speculation rules.
This article primarily focuses on cross-document view transitions, as they are more compelling for multi-page websites, and offer a good alternative to single page apps that use heavy JavaScript frameworks.
This post is not a comprehensive guide to the View Transition API, but rather, a practical guide to help you get started. MDN has official documentation on the View Transition API that you should use as a reference during your implementation phase or prototyping phase.
Why use View Transitions?
View transitions offer several benefits:
Improved perceived performance: View transitions can help make your site feel faster, even if it's slow. This is because the animations can help mask the time it takes for the new content to load.
Improved user experience: Outside of performance, transitioning between page views and page components can help make your site feel more engaging and interactive. The continuity of the transition can help users understand the relationship between different views.
Offers a good alternative to single page apps: View transitions can help make multi-page websites feel more like single page apps, without the need for a JavaScript framework. For simple websites, or for web apps that do not have high levels of interactivity, cross-document view transitions can be a good alternative.
Cross-document view transitions
Cross-document view transitions build upon the same principles as same-document view transitions, but they are triggered when navigating between two different pages.
Cross-document view transitions are restricted to same-origin documents.
You can opt into cross-document view transitions by adding the @view-transition CSS at-rule to your website CSS file:
@view-transition {
  navigation: auto;
}
To implement view transitions across your website, the view transition code must be included on both the original and target pages. If your website uses a global style.css file, it makes sense to add the view transition code there.
By default, the transition effect is a cross-fade. Including the provided CSS snippet in your style.css file enables a cross-fade effect when navigating between pages.
Note, you may not see the effect if you have prefers-reduced-motion enabled via your operating system settings. If enabled, you can disable it to see the effect. You can also simulate this preference in Chrome DevTools.
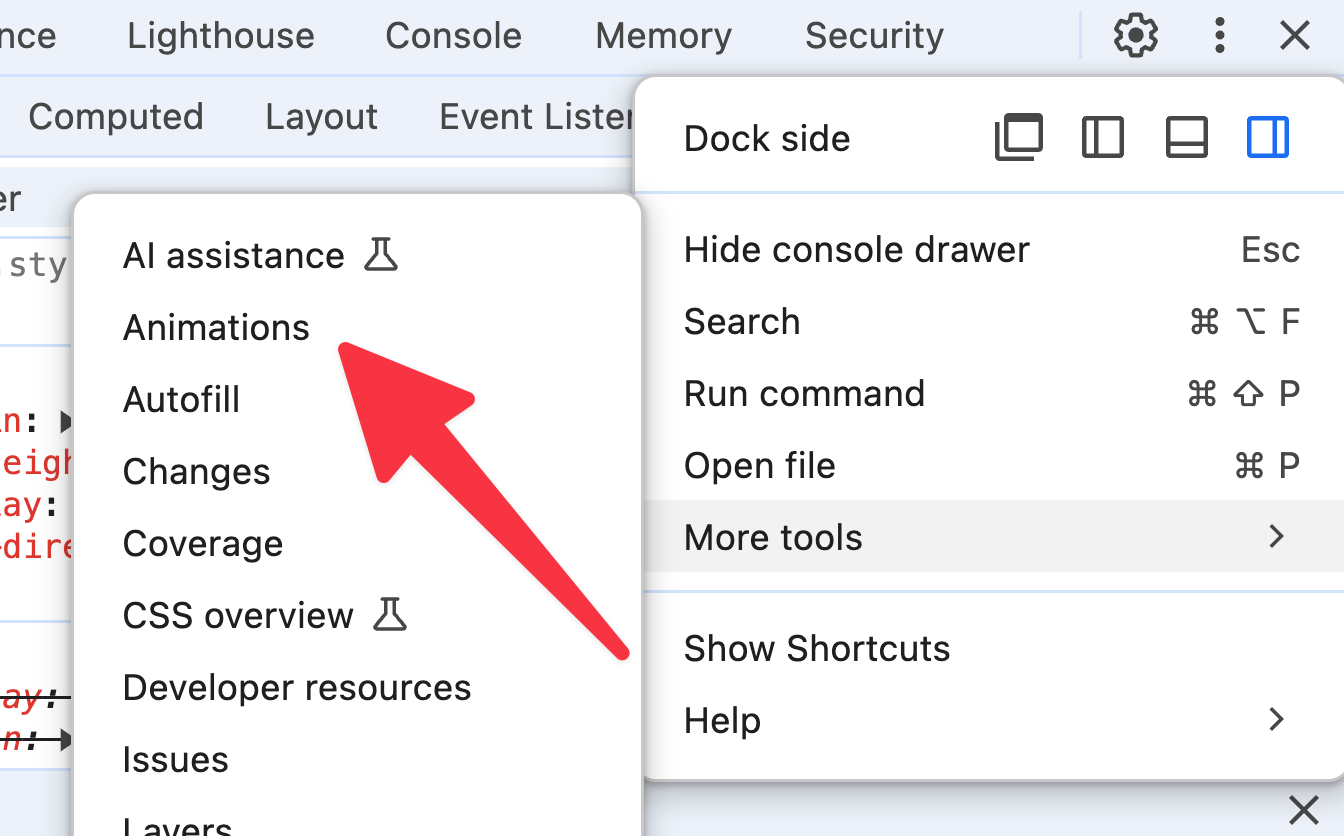
Quickly trying out view transition with Chrome DevTools
You can quickly try out cross-document view transitions on any website using Chrome DevTools. Here's how:
- Setup and configure Local Overrides in Chrome DevTools.
- Navigate to a typical multi-page website, such as the TED blog.
- Add the following CSS to a global CSS file within DevTools, and save the file with Overrides enabled:
@view-transition {
  navigation: auto;
}
If you've never used DevTools local overrides before, watch the video below to understand how to set it up and use it.
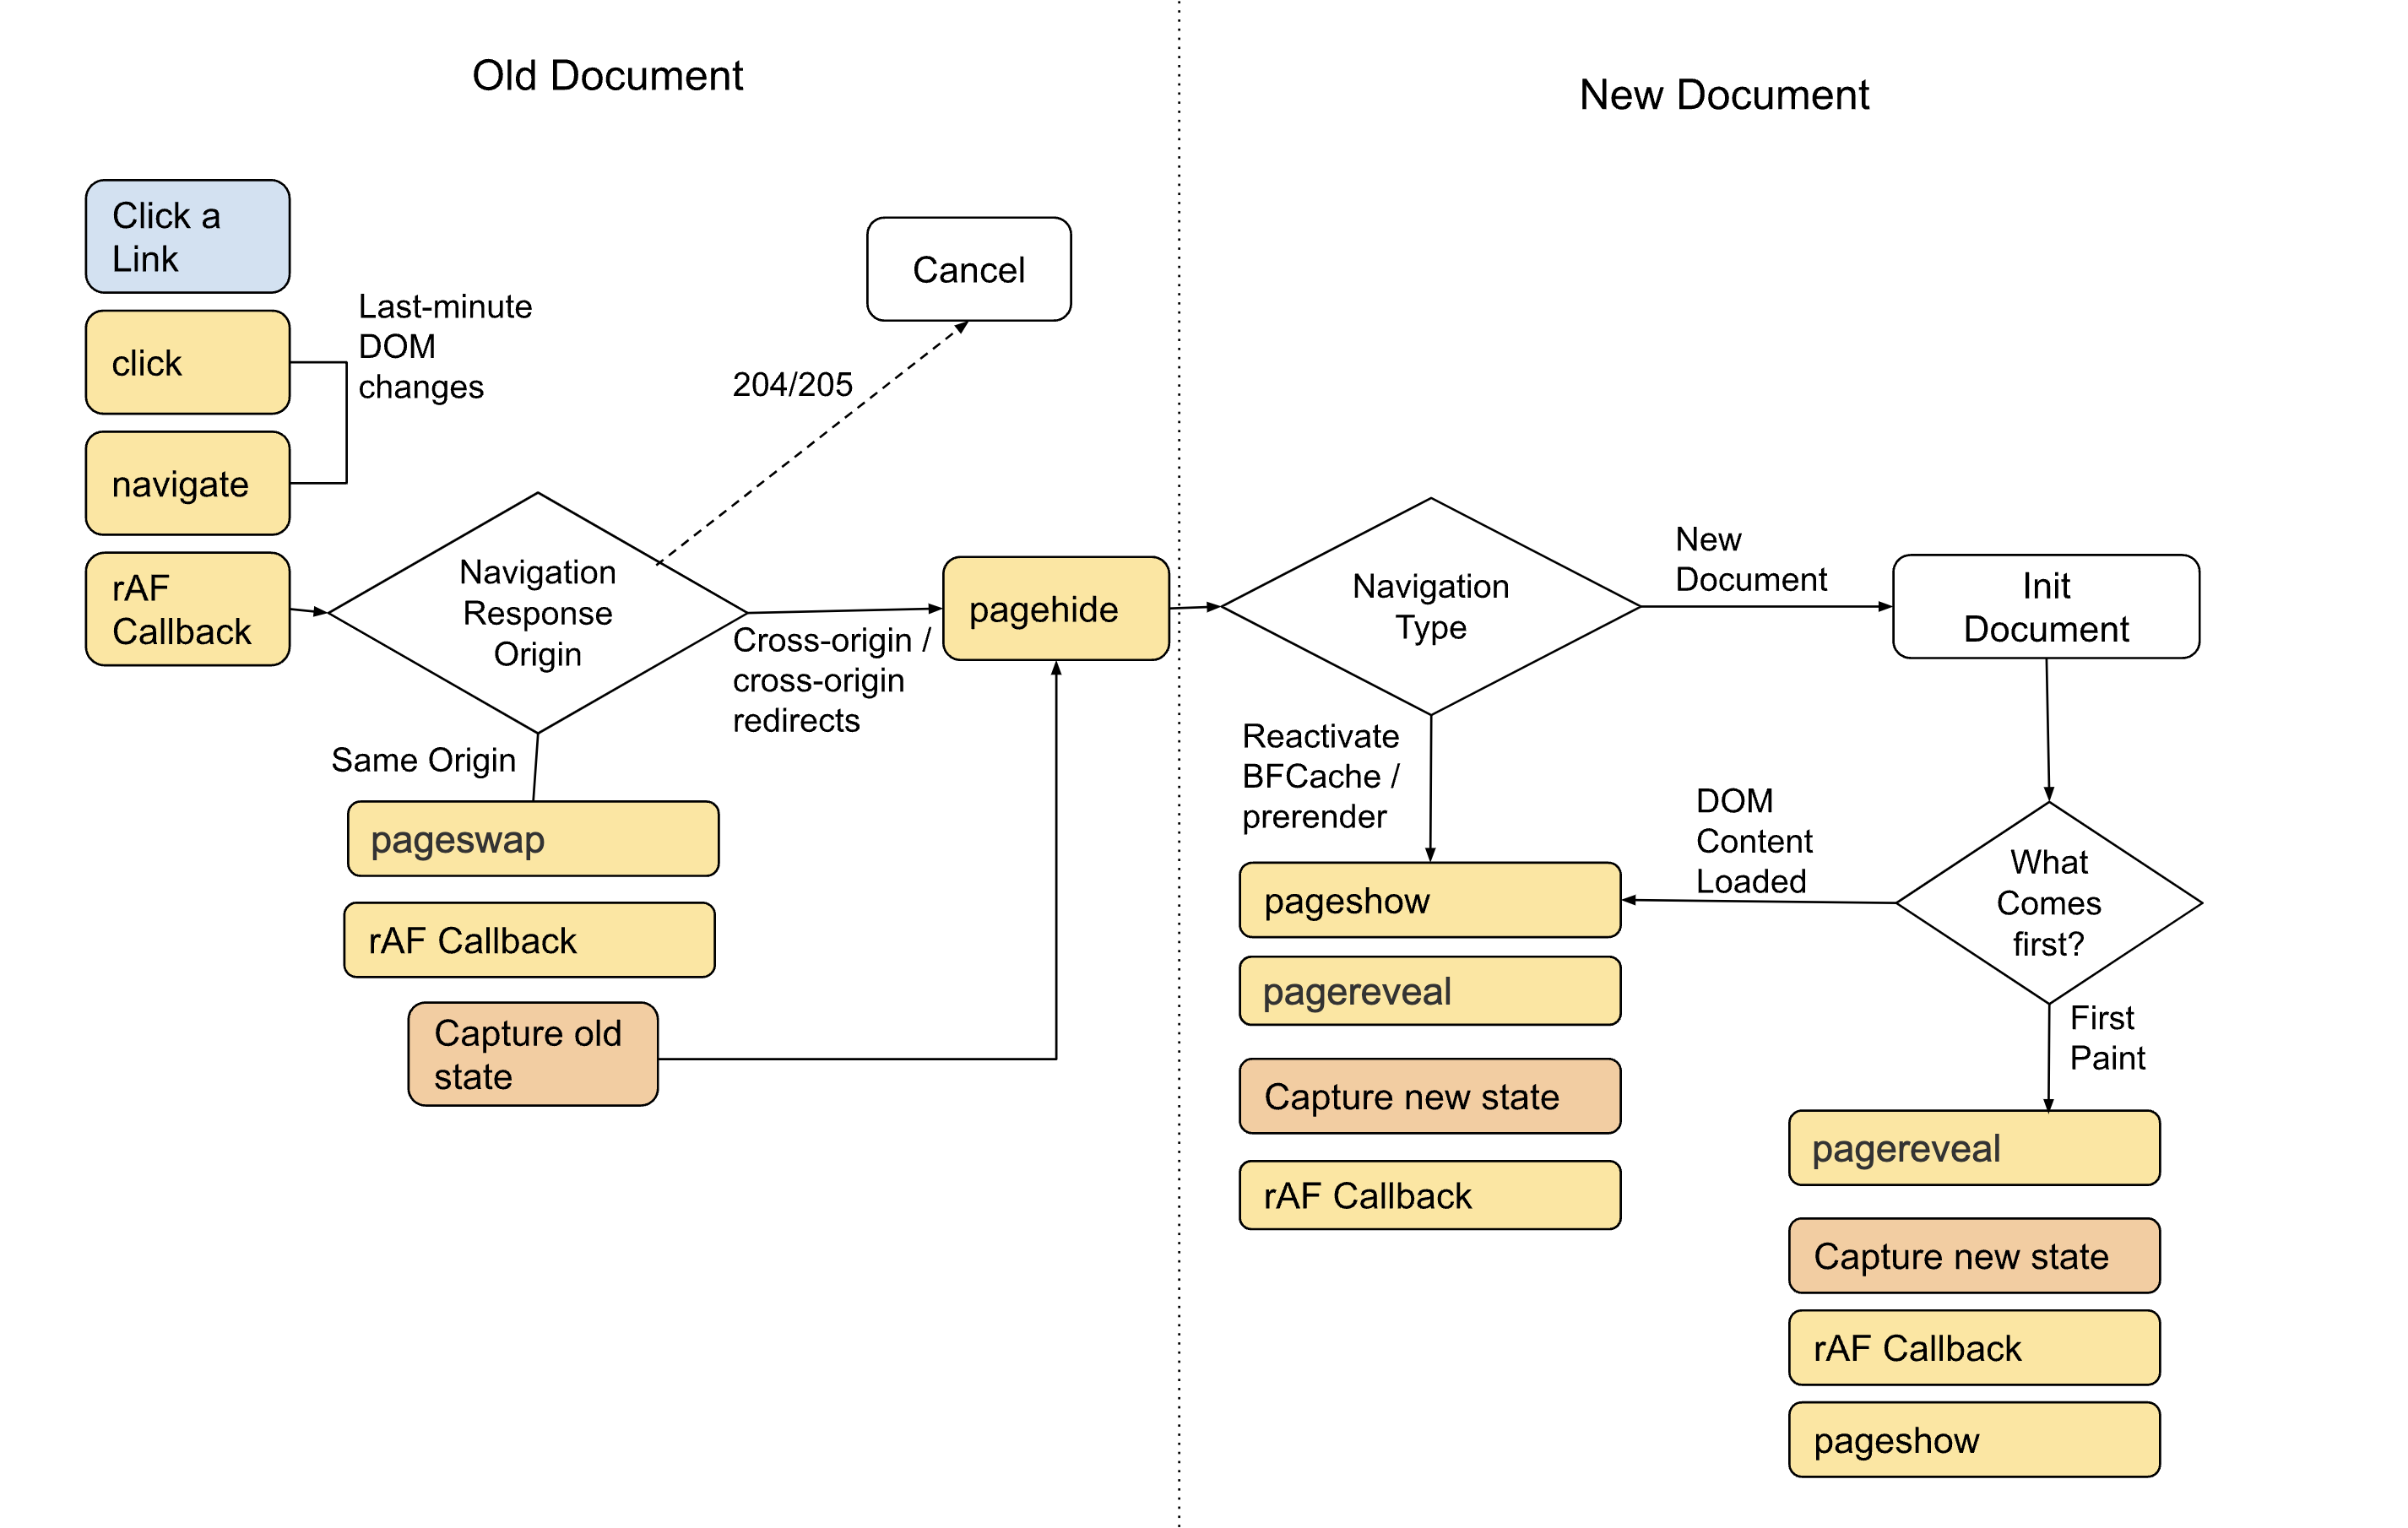
How View Transitions work
While this is not a deep dive into the View Transition API, it's useful to understand a bit more on how it works under the hood.
Imagine you're navigating from one page to another with view transitions enabled:
- The browser captures a snapshot of the current (old) page, similar to taking a screenshot.
- The new page is fetched and rendered offscreen.
- The browser captures a snapshot of the new page.
- The browser uses CSS animations to transition between the two snapshots while resuming rendering.
Snapshot lifecycle
The previous four step process is a simplification of the actual lifecycle of a view transition. The actual lifecycle is more complex, and involves a number of events and states. Here's a diagram of the view transition lifecycle. You should pay particular attention to:
- Capture old state: The browser captures the state of the old page, just as it's about to be hidden.
- Capture new state: The browser captures the state of the new page, just as it's about to be shown.
Interactivity of snapshots
Interactivity of snapshots
During view transitions, the snapshots taken are typically not interactive. However, you can maintain interactivity on the document by setting pointer-events: none on the ::view-transition overlay.
It's important to note that view transition groups are never interactive.
Be cautious with transitions that render the page non-interactive for extended periods, as this can make the page feel unresponsive.
Illustration of pseudo elements snapshots
Historically, when browsers implemented new features, their internal workings were hidden in a black box, making inspection difficult. Today, many modern web platform features are built using web technologies themselves. Since snapshots are exposed as pseudo elements, you can inspect them directly through browser developer tools.
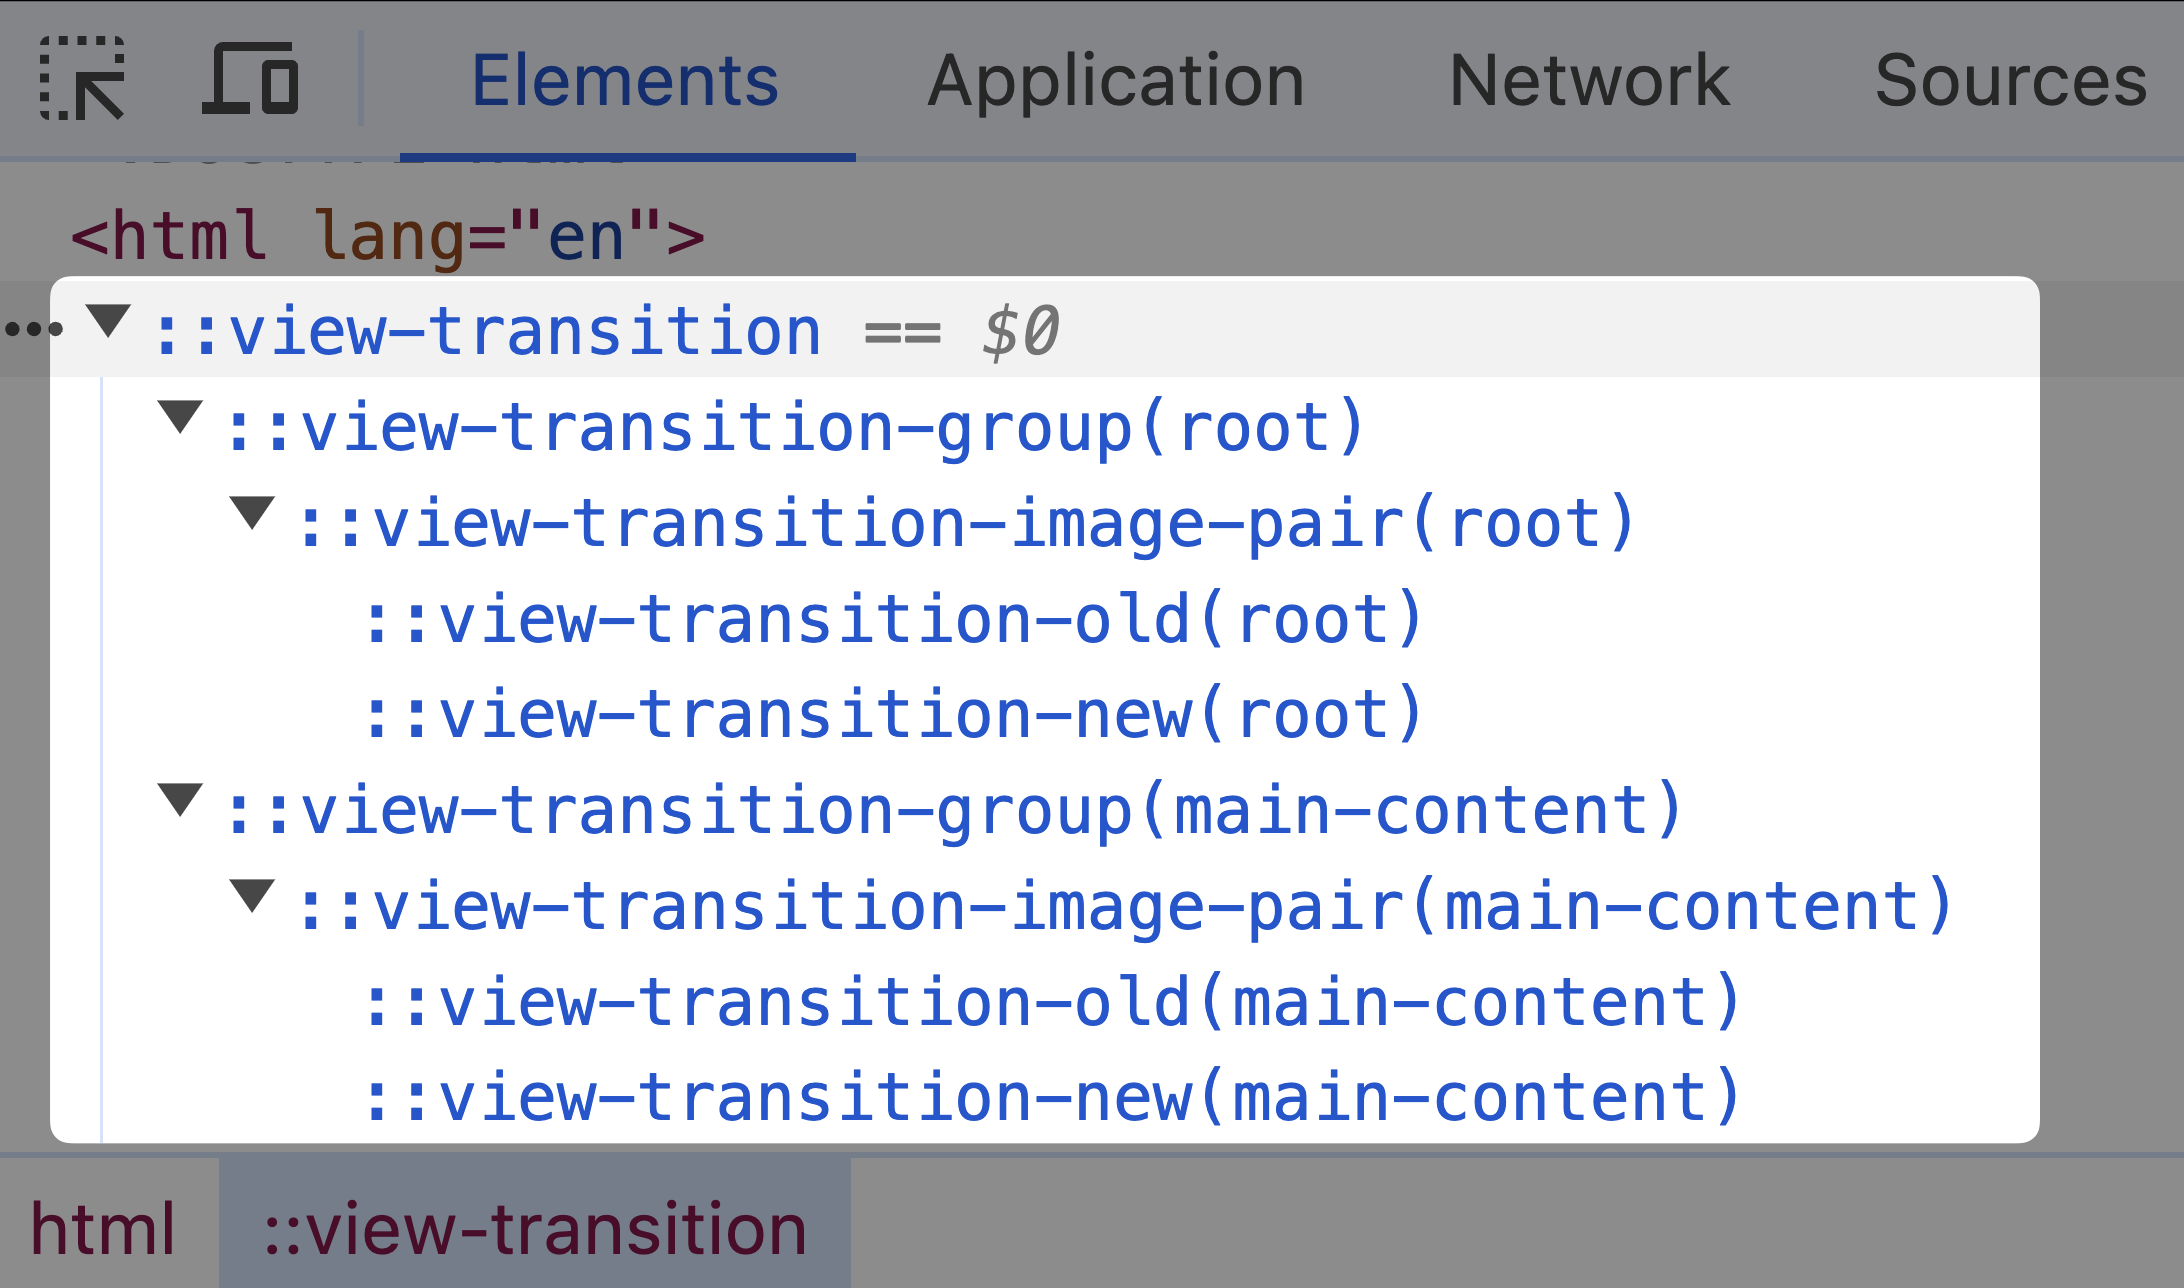
The pseudo elements are documented on MDN, see the following links for more information:
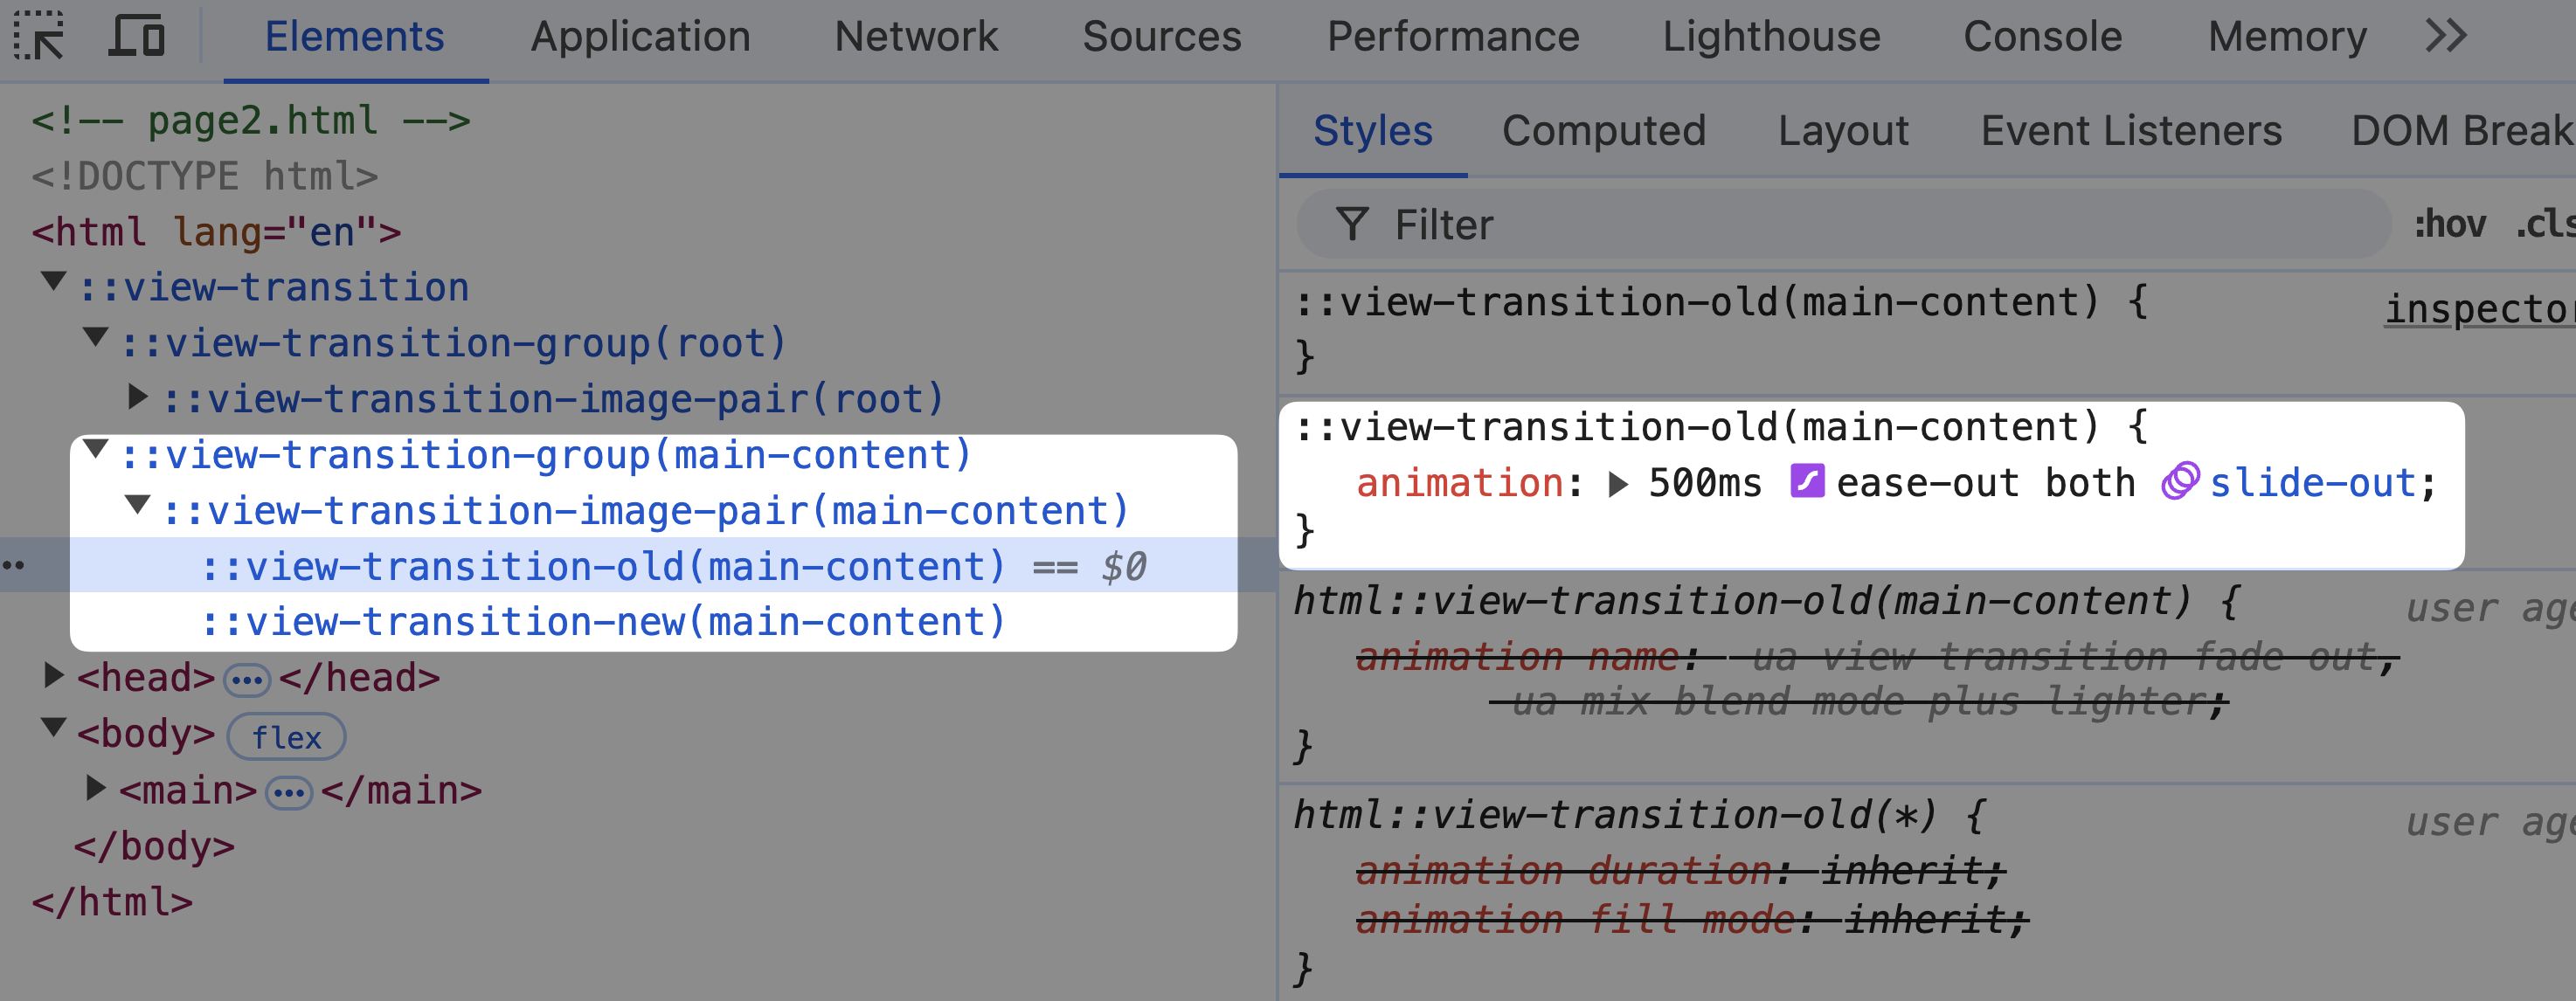
::view-transition-group: The pseudo element that represents a group of snapshots.::view-transition-image-pair: The pseudo element that represents the pair of snapshots - a pair is contained within a::view-transition-group.::view-transition-old: The pseudo element that represents the old page snapshot.::view-transition-new: The pseudo element that represents the new page snapshot.
You can inspect the styling of pseudo element snapshots in DevTools, including custom animations used for view transitions. This makes it easier to debug transition effects.
A brief guide to customizing view transition snapshots
The way we presented snapshots previously might have made it seem like they "just happen." So, how exactly might you "use" these snapshots, and why would you want to?
Since snapshots are exposed as pseudo elements in the DOM, you can use them to create custom animations or transitions.
The syntax or methodology for writing view transitions isn't particularly unique compared to other CSS code you may have written. However, it can be useful to have a strong mental model of how view transition snapshots work, especially since they're the building blocks for customizing view transitions.
Here's a screenshot showing the transition from one page to another:

The transition has been exaggerated for demonstration purposes, so you can picture each page as a separate snapshot.
This learning model helps in customizing view transition snapshots:
- Enable view transitions with the
@view-transitionCSS at-rule.
@view-transition {
  navigation: auto;
}
- Begin to style the old page snapshot. Note, this won't work, so make sure you continue reading!
/* This won't work yet, continue reading the article! */
::view-transition-old {
  rotate: -10deg;
  scale: 50%;
}
::view-transition-olddoesn't work as expected, because the browser doesn't know what to apply the styles to. You need to target the root element on the page, or rather, a custom view transition name namedroot. Therotateeffect is used for demo purposes only.
/* This now works! */
::view-transition-old(root) {
  rotate: -10deg;
}
- You can now style the new page snapshot. The
rotateeffect is used for demo purposes only.
::view-transition-new(root) {
  rotate: 10deg;
}
- You can now see the effect of the custom view transition snapshots in the browser.
You might be thinking that ::view-transition-new(root) can be changed to ::view-transition-new(.my-footer) to target a specific element with the class of .my-footer, but this won't work.
The reason it won't work is because the root in ::view-transition-new(root) references a view transition name that happens to have been defined in the default user agent stylesheet within a supporting browser:
:root {
  view-transition-name: root;
}
Fortunately, you can apply this same technique to other elements on the page:
.footer {
  view-transition-name: my-footer;
}

::view-transition-new(my-footer) {
  rotate: 10deg;
}
This gives you fine-grained control over which elements you want to apply custom view transition effects to and allows you to morph between two totally different elements (with different selectors) in each view. For example you can morph a h1 element into a .article-title element, if you "tag" them with the same view-transition-name.
Code examples of using snapshots from CSS
Earlier, you learned that the default transition is a cross-fade effect. You can customize this effect by adjusting the duration of the transition. For example, you can increase the duration to make the transition slower and more noticeable:
@view-transition {
  navigation: auto;
}

::view-transition-old(root),
::view-transition-new(root) {
  animation-duration: 2s; /* Increase duration to 2 seconds */
}
Note that instead of writing a selector for both the ::view-transition-old and ::view-transition-new pseudo elements, you could use ::view-transition-group to target the group of snapshots:
::view-transition-group(root) {
  animation-duration: 2s;
}
The previous code produces an effect as shown in the video below:
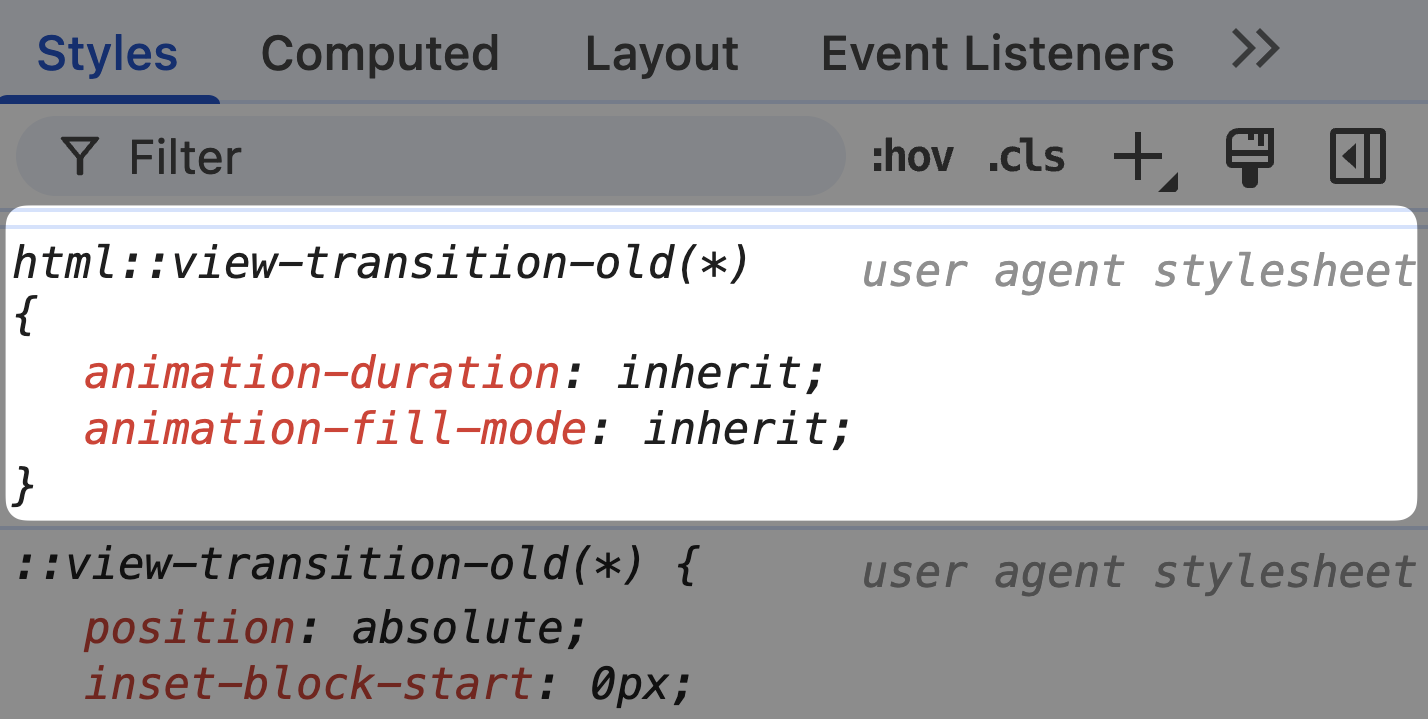
When targeting the ::view-transition-group pseudo element, the animation-duration property (amongst others) also applies to the:
::view-transition-image-pairpseudo element.::view-transition-oldpseudo element.::view-transition-newpseudo element.
This is because the user agent stylesheet has animation-duration set to inherit on those pseudo elements.
Many familiar CSS properties can be used to customize the view transition effect.
You can also create custom CSS keyframe animations to animate the snapshots. Here's an example of a custom keyframe animation that applies a slide effect to the snapshots, instead of the default cross-fade effect.
First, assume two basic HTML files like this:
<!-- page1.html -->
<!DOCTYPE html>
<html>
  <head>
    ...
  </head>
  <body>
    <main>
      <h1>Page 1</h1>
      <a href="page2.html">Go to Page 2</a>
    </main>
  </body>
</html>
And then page2.html:
<!-- page2.html -->
<!DOCTYPE html>
<html>
  <head>
    ...
  </head>
  <body>
    <main>
      <h1>Page 2</h1>
      <a href="page1.html">Go to Page 1</a>
    </main>
  </body>
</html>
Now, you can customize the view transition effect with the following CSS:
/* Enable view transitions, just like the previous example */
@view-transition {
  navigation: auto;
}

/* Specify a custom view transition name */
main {
  view-transition-name: my-main-content;
}

/* Apply animations to the snapshots */
/* Note, `my-main-content` is the view transition name specified in the previous CSS block */
::view-transition-old(my-main-content) {
  animation: 500ms ease-out both slide-out;
}

::view-transition-new(my-main-content) {
  animation: 500ms ease-out both slide-in;
}

/* Define the animations */
@keyframes slide-out {
  from {
    transform: translateX(0);
  }
  to {
    transform: translateX(-100%);
  }
}

@keyframes slide-in {
  from {
    transform: translateX(100%);
  }
  to {
    transform: translateX(0);
  }
}
With this approach, it's not the page that slides in and out, but rather it's the <main> element that slides in and out.
In this example, the main element appears to slide in and out of view.
The ::view-transition-old and ::view-transition-new pseudo elements are used to apply the slide-out and slide-in CSS animations respectively.
There are a few issues with the current example of transitioning between two pages, page 1 and page 2:
- When navigating from page 1 to page 2, the slide effect moves "forward," which meets most users' expectations. However, when navigating back from page 2 to page 1, the slide effect still moves "forward," which is not what most users would expect.
- Similarly, when using the browser's back button, users typically expect the page to slide "backwards." In this simple example, the slide effect still moves "forward."
To address these issues, you need to use JavaScript to determine if the user is navigating "backwards" or "forwards" and then customize the direction of the view transition accordingly. This is covered in the later code examples.
JavaScript events for view transitions
In a previous code example, you saw how the direction of a view transition slide effect could not accurately reflect the user's navigation direction.
This challenge can be solved by using JavaScript events that are fired during the view transition lifecycle. These events can be used to determine if the user is navigating "backwards" or "forwards", and then customize the direction of the view transition accordingly.
Here are two key events that are fired during the view transition lifecycle:
- The
pageswap(link): event is fired just before the "old" page snapshot is taken. - The
pagereveal(link): event is fired on the new page, just before the "new" page snapshot is taken.
Writing JavaScript to handle these events can be tricky, with many nuances and edge cases that are easy to miss. Make sure to read through the official documentation linked above to understand typical use cases and potential pitfalls.
The code examples in this blog post are simplified for educational purposes.
Check out this pagination example from the Chrome team. It shows how to use the pageswap and pagereveal events to create custom view transition effects. You can find the implementation details in the scripts.js file.
Combining view transitions with Speculation rules
Prerendering pages (or even prefetching) can help improve the performance of view transition, and closely resemble a single page app experience. We have a full guide on Speculation Rules, but here's a quick overview:
Speculation Rules work best with cross-document view transitions rather than same-document view transitions.
This is because same-document view transitions typically use the fetch() API to load new pages or fragments, and the fetch() API isn't compatible with Speculation Rules.
If you're using same-document view transitions, you can create your own version of speculation rules. For example, you can eagerly download the next page using JavaScript and store it in a variable for quick access.
Using both view transitions and speculation rules can work as follows:
In the CSS Code:
@view-transition {
  navigation: auto;
}
In the HTML Code:
<script type="speculationrules">
  {
    "prerender": [
      {
        "where": {
          "href_matches": "/*"
        },
        "eagerness": "immediate"
      }
    ]
  }
</script>
More techniques of adding speculation rules can be found in our Speculation Rules guide.
Using an eagerness of immediate prerenders pages immediately, which can be useful for smaller websites. For larger websites, you may want to use a different eagerness level. Be sure to test and measure the performance of your website with different eagerness levels.
Prefers reduced motion
To ensure your website is accessible to all users, you should consider users who may have a preference for reduced motion. How you might handle this in code is shown below.
Disabling view transitions for users who prefer reduced motion
You can use the prefers-reduced-motion media feature to disable view transitions for users who express a preference for reduced motion.
@media (prefers-reduced-motion) {
  ::view-transition-group(*),
  ::view-transition-old(*),
  ::view-transition-new(*) {
    animation: none !important;
  }
}
Only apply view transitions when no preference for reduced motion is expressed
You can also nest view transition styles within a prefers-reduced-motion: no-preference media feature to only apply view transitions when no preference for reduced motion is expressed:
/* Only apply view transitions when
no preference for reduced motion is expressed */
@media (prefers-reduced-motion: no-preference) {
  @view-transition {
    navigation: auto;
  }

  /* Customize your view transition styles here */
}

/* When reduced motion is preferred, no view transition styles are applied */
Force elements to have no view-transition-name
You can also force elements to have no view-transition-name, which effectively disables view transitions as there are no snapshots to transition between:
@media (prefers-reduced-motion) {
  * {
    view-transition-name: none !important;
  }
}
Expressing a preference for reduced motion does not mean the user requires no motion at all.
It's important to test your website with different levels of motion to ensure it's accessible to all users.
Debugging view transitions with Chrome DevTools
You can use Chrome DevTools to inspect view transition snapshots and debug your animations.
- Open the Animations panel in Chrome DevTools:
-
Trigger a view transition, for example, by navigating to a page on a website with view transitions enabled.
-
With the animation captured, click on it to inspect the animation timeline:
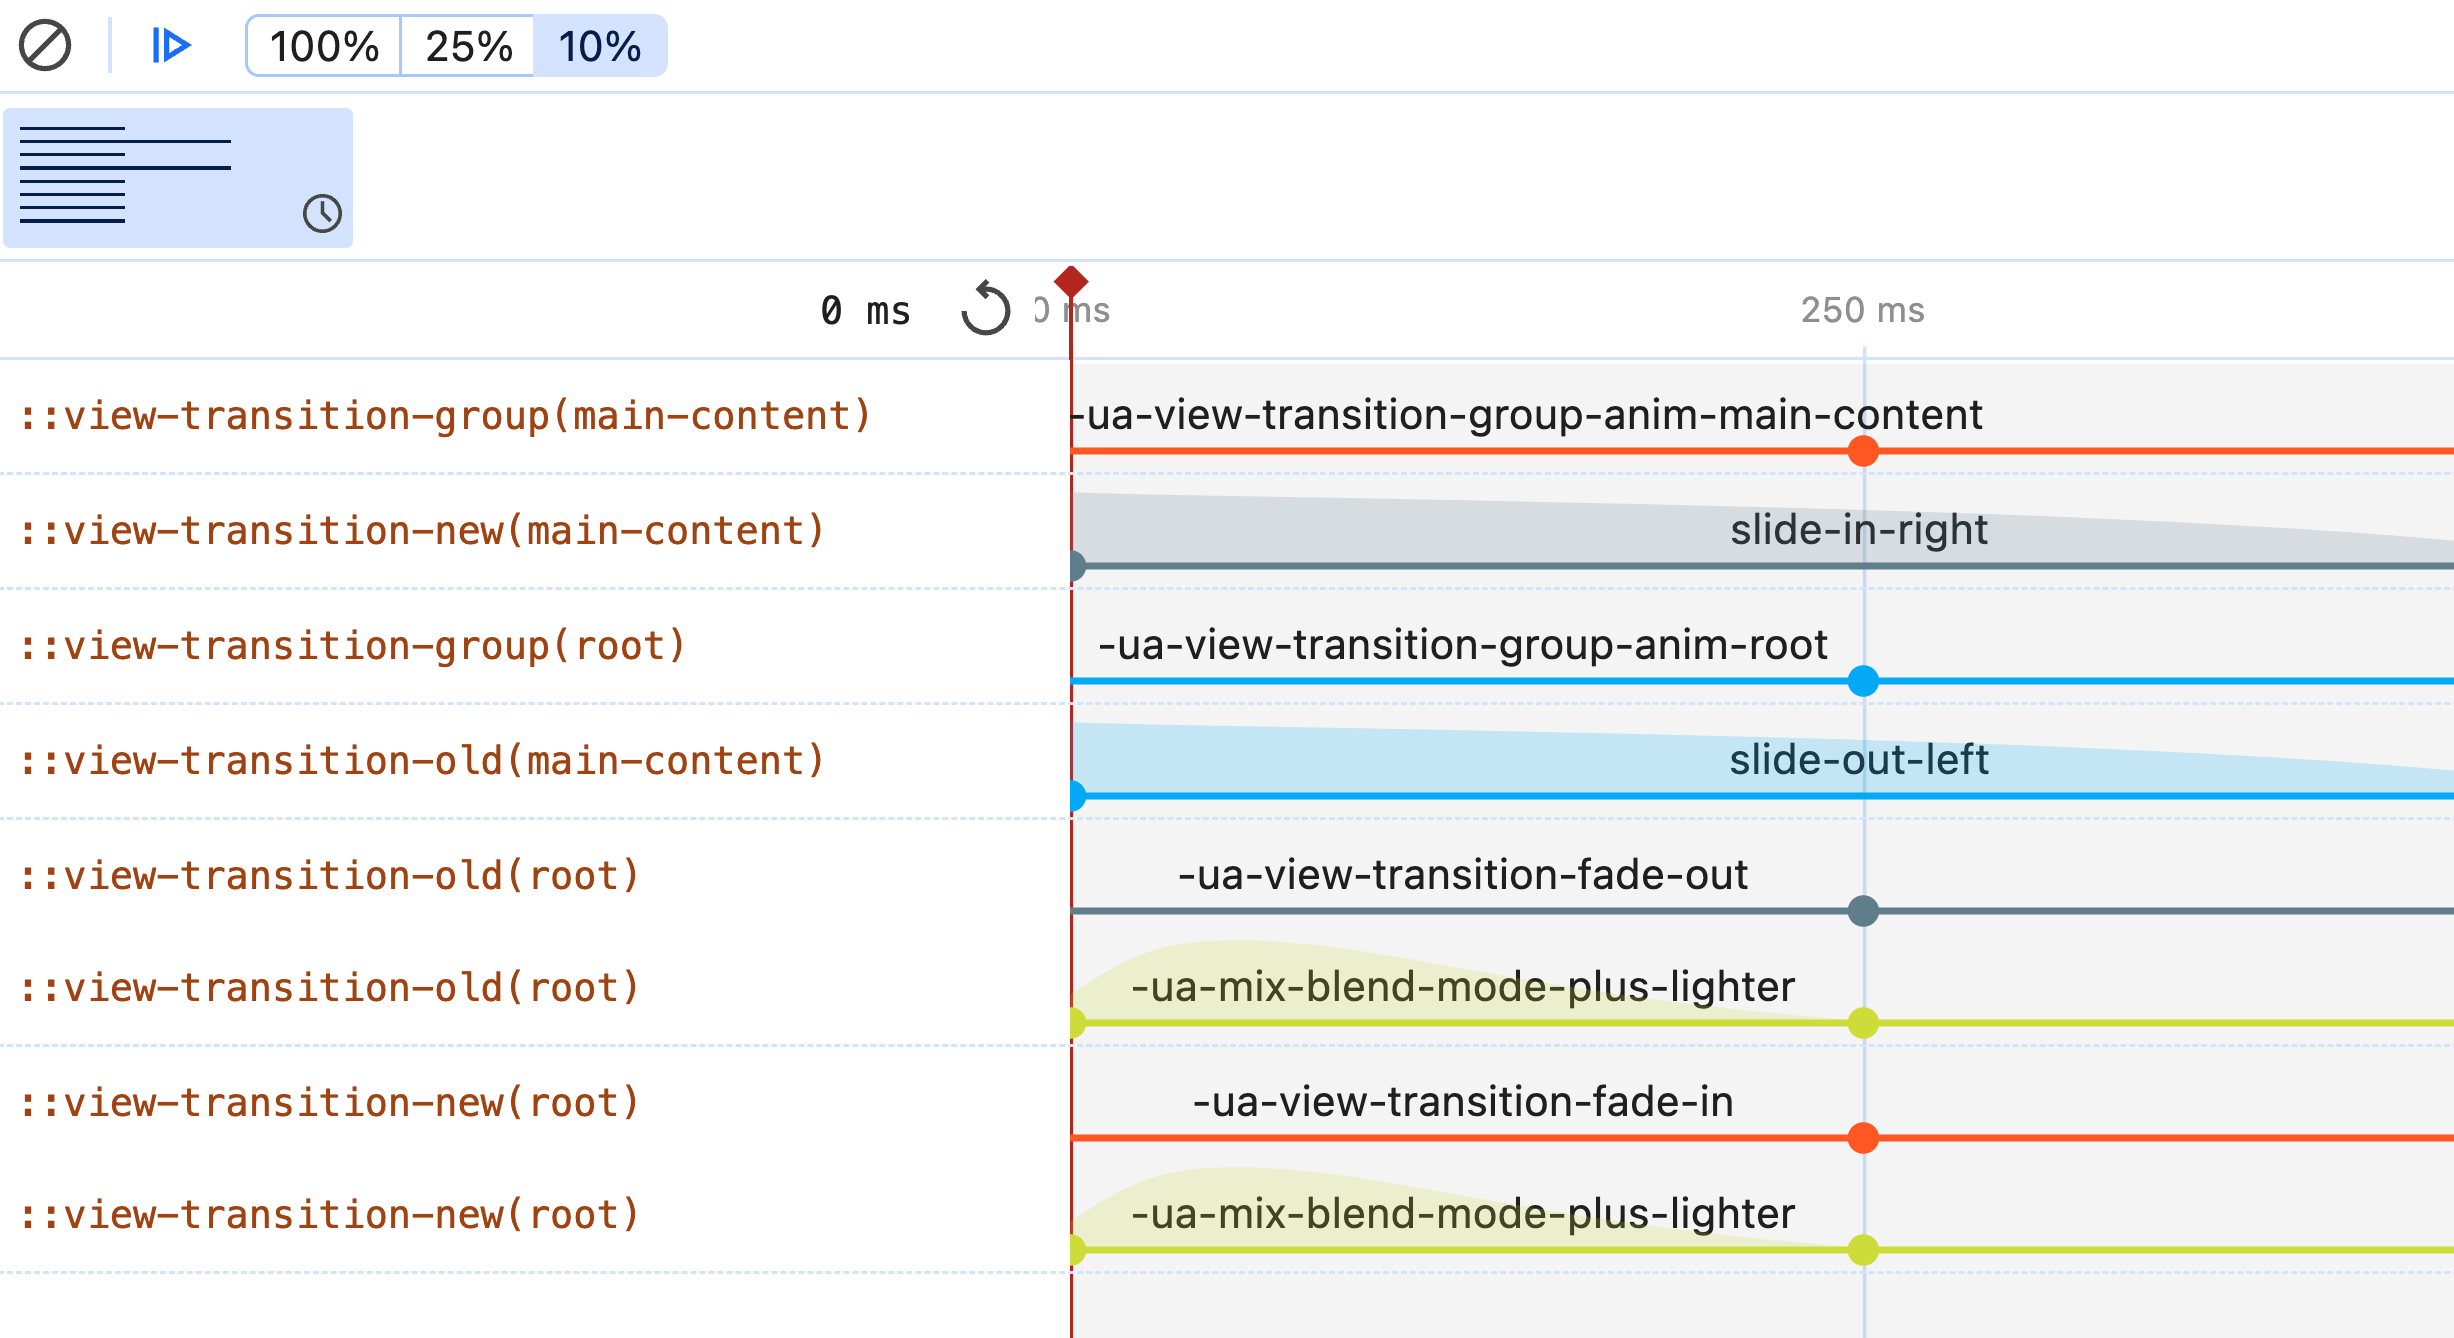
- Click on an individual pseudo element from the animation timeline to inspect it in the DOM tree and styles pane:
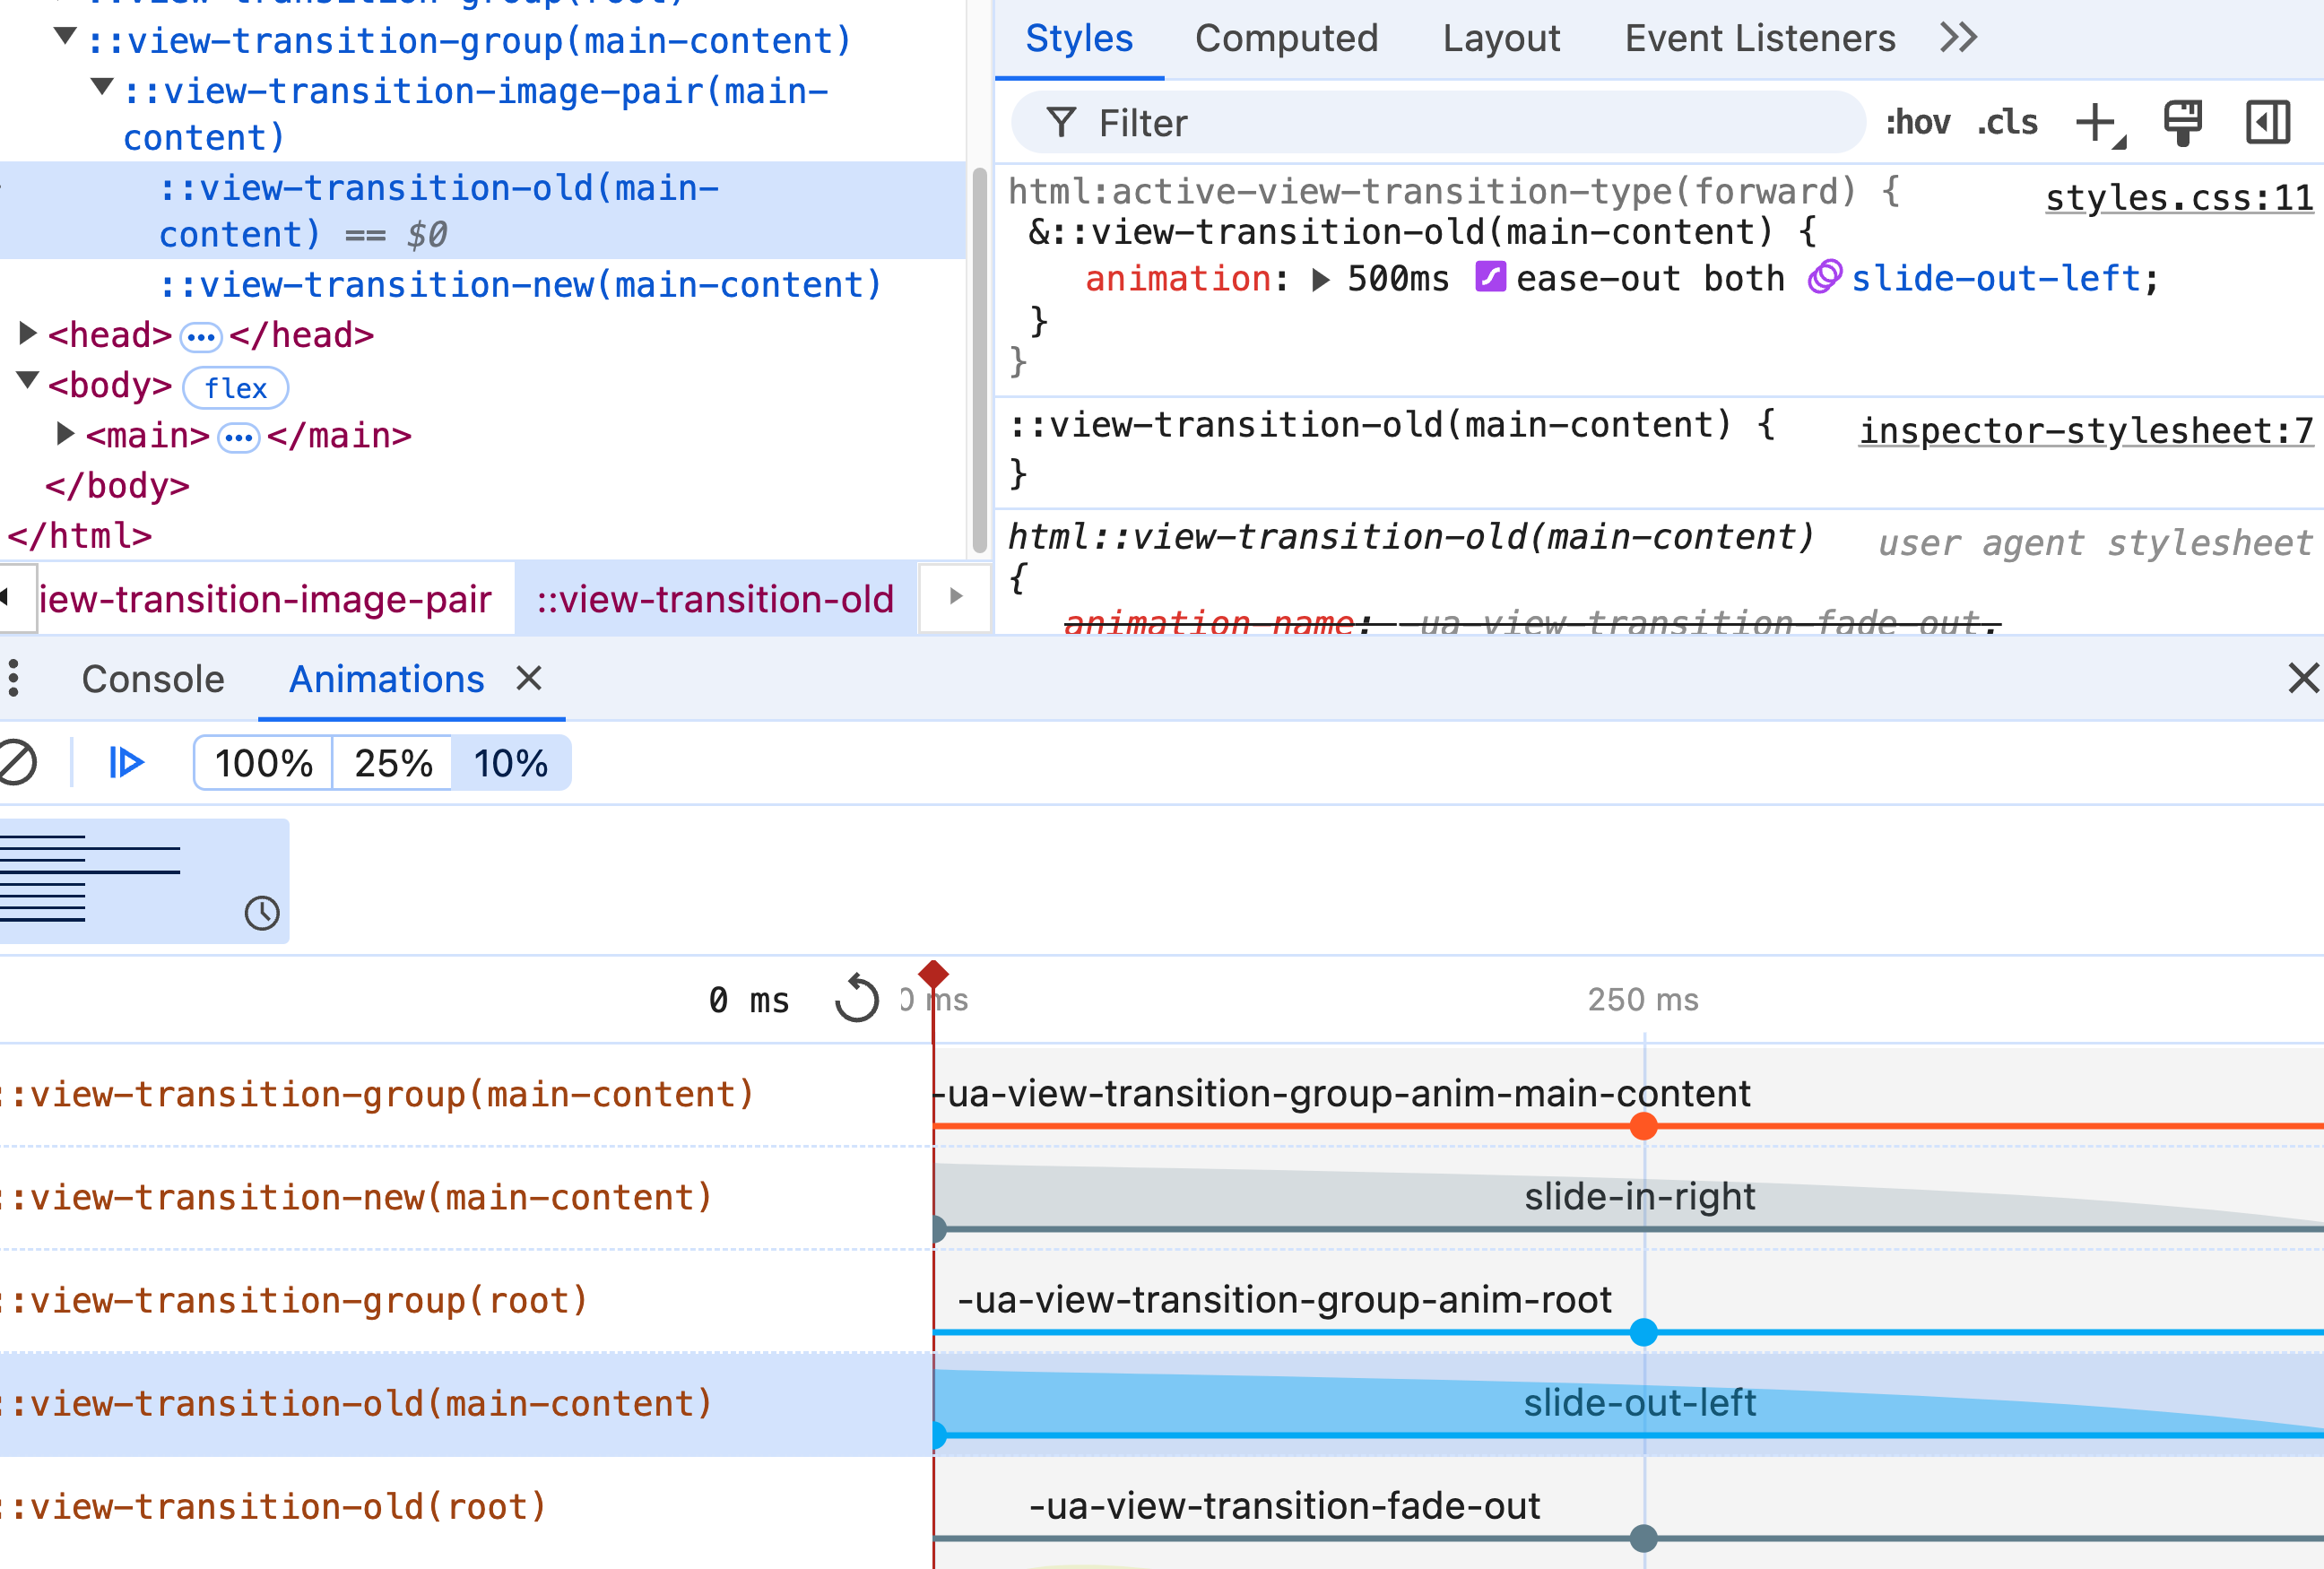
This helps you understand view transition animations.
Code examples: Customizing view transitions between page navigations
At this point, you have a high level understanding of how view transitions work. Here are some more code examples that you can use as a starting point, and there's also a video walkthrough of each example:
Minimal view transition example in a few lines of CSS
No JavaScript is needed for this example!
@view-transition {
  navigation: auto;
}
As discussed earlier, this code enables view transitions with the default cross-fade effect between page navigations. This produces the same effect shown in the earlier video:
The video shows a slower cross-fade effect than what you'd get by default, to help you see the effect more clearly.
Customize a view transition animation with just CSS
This example shows how you can customize the view transition effect with just CSS keyframe animations.
No JavaScript is needed for this example either!
When looking at this example, you should ask yourself: does the slide direction make sense if you're navigating from page 1 to page 2, and then back to page 1?
@view-transition {
  navigation: auto;
}

/* Assign view-transition-name 'main-content' to this element
so it can be captured as a snapshot pair */
main {
  view-transition-name: main-content;
}

::view-transition-old(main-content) {
  animation: 500ms ease-out both slide-out;
}

::view-transition-new(main-content) {
  animation: 500ms ease-out both slide-in;
}

/* Define the animations */
@keyframes slide-out {
  from {
    transform: translateX(0);
  }
  to {
    transform: translateX(-100%);
  }
}

@keyframes slide-in {
  from {
    transform: translateX(100%);
  }
  to {
    transform: translateX(0);
  }
}
There's a few things to note in this example:
-
The
view-transition-nameproperty is used to identify elements that should be captured as snapshot pairs during a view transition. This name can then be used to customize the view transition effect.tipEach uniquely named element creates a "snapshot pair" (an old snapshot and a new snapshot) within the single view transition.
-
The CSS
@keyframesrule is used to define the slide-out and slide-in animations. These animations are then applied to the::view-transition-oldand::view-transition-newpseudo elements respectively.
Customize the direction of a view transition with JavaScript
This uses JavaScript to determine if a browser backward or forward navigation is happening, and then customizes the direction of the view transition accordingly.
This uses the Navigation API to determine the navigation direction.
You can learn more about some useful Navigation API features later on in this post.
JavaScript code:
window.addEventListener("pagereveal", ({ viewTransition }) => {
  // Skip if view transitions aren't supported
  if (!viewTransition) return;

  // Uses the Navigation API
  const { navigationType, entry, from } = navigation.activation;

  // Check if this is browser back/forward navigation
  const isTraverseNav = navigationType === "traverse";
  // For traverse navigation, compare the order to determine direction
  const isBackward = isTraverseNav && entry.index < from.index;

  // Add the appropriate transition type
  // Continue reading to understand how the CSS uses `backward` and `forward`
  viewTransition.types.add(isBackward ? "backward" : "forward");
});
CSS Code:
@view-transition {
  navigation: auto;
}

main {
  view-transition-name: main-content;
}

/*
Consider this line from the JavaScript code:
viewTransition.types.add(isBackward ? "backward" : "forward");
*/
html:active-view-transition-type(forward) {
  &::view-transition-old(main-content) {
    animation: 500ms ease-out both slide-out-left;
  }
  &::view-transition-new(main-content) {
    animation: 500ms ease-out both slide-in-right;
  }
}

html:active-view-transition-type(backward) {
  &::view-transition-old(main-content) {
    animation: 500ms ease-out both slide-out-right;
  }
  &::view-transition-new(main-content) {
    animation: 500ms ease-out both slide-in-left;
  }
}

@keyframes slide-out-left {
  ...;
}
@keyframes slide-in-right {
  ...;
}
@keyframes slide-out-right {
  ...;
}
@keyframes slide-in-left {
  ...;
}
Notes:
- This code example uses
html:active-view-transition-typeto apply different animations based on the navigation direction. The type is set from the JavaScript:viewTransition.types.add('some_type_here'). - This is not a complete solution: This example is a starting point to expose you to new techniques and APIs. You should consider edge cases and browser compatibility when implementing this in a production environment.
- Keyframe animation definitions are omitted for brevity.
Account for the navigation hyperlink order with JavaScript
This code example shows how you can use JavaScript to customize the direction of a view transition based on both the browser history and the order of the pages in the navigation stack.
The CSS code remains the same as shown in the previous example.
The JavaScript code is below:
/*
Inspired, and adapted from
https://developer.chrome.com/docs/web-platform/view-transitions
*/

// Define the order of pages for determining transition direction
const PAGE_ORDER = [
  "main.html",
  "about.html",
  "blog.html",
  "shop.html",
  "contact.html",
];

function determineTransitionDirection(fromPath, toPath) {
  // Helper function to get the index of a page from PAGE_ORDER
  const getPageIndex = (path) => PAGE_ORDER.indexOf(path.split("/").pop());

  // Get indices of both pages in the PAGE_ORDER array
  const fromIndex = getPageIndex(fromPath);
  const toIndex = getPageIndex(toPath);

  // If going to a later index, move forwards; otherwise backwards
  return fromIndex < toIndex ? "forwards" : "backwards";
}

// Handle transitions when new page is being revealed
window.addEventListener("pagereveal", (event) => {
  if (event.viewTransition) {
    // Get URLs for the pages we're transitioning between
    const fromURL = new URL(navigation.activation.from.url);
    const toURL = new URL(navigation.activation.entry.url);

    const direction = determineTransitionDirection(
      fromURL.pathname,
      toURL.pathname
    );

    event.viewTransition.types.add(direction);
  }
});

// Handle transitions when old page is being swapped out
window.addEventListener("pageswap", (event) => {
  // Only proceed if this is a view transition
  if (event.viewTransition) {
    // Get URLs for the pages we're transitioning between
    const fromURL = new URL(event.activation.from.url);
    const toURL = new URL(event.activation.entry.url);

    const direction = determineTransitionDirection(
      fromURL.pathname,
      toURL.pathname
    );

    event.viewTransition.types.add(direction);
  }
});
Customizing multiple elements in the view transition with only CSS
This example animates multiple elements individually, from an old state to a new state, using CSS only. No JavaScript is needed.
To understand the before and after elements, take note of the following diagram:

CSS styles for the home page blog preview titles:
/* .blog-preview represents the blog previews on the home page */
.blog-preview:nth-child(1) h2 {
  view-transition-name: post1title;
}

.blog-preview:nth-child(2) h2 {
  view-transition-name: post2title;
}

/* And so on, for as many blog preview titles as there are on the home page */
CSS styles for the home page blog preview images:
.blog-preview:nth-child(1) img {
  view-transition-name: post1image;
}

.blog-preview:nth-child(2) img {
  view-transition-name: post2image;
}

/* And so on, for as many blog preview images as there are on the home page */
CSS styles for the individual blog page:
/* This is on an individual blog post page for blog post #2 */
.blog-post h1 {
  view-transition-name: post2title;
}

.blog-post img {
  view-transition-name: post2image;
}
Notes:
- Each view transition name must be unique on a page. When transitioning between pages, the browser matches the view transition names from the old page to the new page.
- In this example, the
h2from the home page transitions to theh1on the individual blog post page. - While the syntax might seem verbose, understanding this technique is key to getting it to work with just CSS.
- The
view-transition-nameis applied to the heading, the image, and the preview paragraph text (omitted from the previous code examples for brevity).
Customizing multiple elements in the view transition with JavaScript
This example offers a similar effect to the previous example, but with JavaScript to decorate the individual elements which need to be transitioned.
The effect of the following code is identical to the video from the previous example.
JavaScript code:
The following code is a lot more involved than the previous examples!
This is used for educational purposes, you do not need to understand every line of code to use the View Transition API.
/*
Inspired by:
https://developer.chrome.com/docs/web-platform/view-transitions
*/

const parseURL = {
  getPostNumber(url) {
    const match = url.pathname.match(/post(\d+)\.html/);
    if (match) {
      return match[1];
    }
    return null;
  },

  isIndexPage(url) {
    if (url.pathname === "/") {
      return true;
    }
    if (url.pathname.includes("main.html")) {
      return true;
    }
    return false;
  },
};

function getTransitionElements(container, postNumber, titleSelector = "h2") {
  if (!container) {
    return null;
  }

  const elements = [];

  const title = container.querySelector(titleSelector);
  if (title) {
    elements.push([title, `title-${postNumber}`]);
  }

  const image = container.querySelector("img");
  if (image) {
    elements.push([image, `image-${postNumber}`]);
  }

  const content = container.querySelector("p");
  if (content) {
    elements.push([content, `content-${postNumber}`]);
  }

  return elements;
}

function resolveTransitionElements(
  fromURL,
  toURL,
  postNum,
  isPageLeave = false
) {
  if (!postNum) {
    return null;
  }

  let elements = null;

  // Handle index page transitions
  const isLeavingIndex = isPageLeave && parseURL.isIndexPage(fromURL);
  const isEnteringIndex = !isPageLeave && parseURL.isIndexPage(toURL);

  if (isLeavingIndex || isEnteringIndex) {
    const blogPreview = document.querySelector(
      `.blog-preview:nth-child(${postNum})`
    );
    elements = getTransitionElements(blogPreview, postNum);
  } else {
    // Handle post page transitions
    let isPostPage;
    if (isPageLeave) {
      isPostPage = fromURL.pathname.includes(`post${postNum}.html`);
    } else {
      isPostPage = toURL.pathname.includes(`post${postNum}.html`);
    }

    if (isPostPage) {
      const article = document.querySelector(".blog-post");
      elements = getTransitionElements(article, postNum, "h1");
    }
  }

  return elements;
}

async function handlePageTransition(event, isPageLeave) {
  if (!event.viewTransition) {
    return;
  }

  const activation = event.activation || navigation.activation;
  const fromURL = new URL(activation.from.url);
  const toURL = new URL(activation.entry.url);

  // Get post number from either URL
  let postNum = parseURL.getPostNumber(fromURL);
  if (!postNum) {
    postNum = parseURL.getPostNumber(toURL);
  }

  const elements = resolveTransitionElements(
    fromURL,
    toURL,
    postNum,
    isPageLeave
  );

  if (!elements) {
    return;
  }

  // Apply transition names
  for (const [element, name] of elements) {
    if (element) {
      element.style.viewTransitionName = name;
    }
  }

  // Wait for transition to complete
  if (isPageLeave) {
    await event.viewTransition.finished;
  } else {
    await event.viewTransition.ready;
  }

  // Cleanup
  for (const [element] of elements) {
    if (element) {
      element.style.viewTransitionName = "";
    }
  }
}

// Event listeners
window.addEventListener("pageswap", (event) =>
  handlePageTransition(event, true)
);
window.addEventListener("pagereveal", (event) => {
  if (!navigation.activation?.from) {
    return;
  }
  handlePageTransition(event, false);
});
In this example, note that certain elements are decorated dynamically with JavaScript, rather than defined statically in the CSS.
Bonus: Same-document view transitions with the Navigation API
This example demonstrates how to use same-document view transitions with the Navigation API to create a smooth user experience, similar to a single-page application, without needing a JavaScript framework.
In the demo below, notice how the video playback continues uninterrupted even as you navigate between pages.
JavaScript code:
/*
Inspired by:
https://developer.chrome.com/docs/web-platform/view-transitions
*/
const basePath = "/view-transitions-spa";

function initializeNavigation() {
  const loadingIndicator = createLoadingIndicator();
  const { showLoading, hideLoading } = loadingControls(loadingIndicator);

  setupNavigationTracking();
  setupNavigationHandler({ showLoading, hideLoading });
}

function createLoadingIndicator() {
  const indicator = document.createElement("div");
  indicator.className = "loading";
  document.body.appendChild(indicator);
  return indicator;
}

function loadingControls(indicator) {
  return {
    showLoading: () => indicator.classList.add("active"),
    hideLoading: () => indicator.classList.remove("active"),
  };
}

function setupNavigationTracking() {
  // Keep track of the last successful navigation...
  // ...for transition direction logic
  navigation.lastSuccessfulEntry = navigation.currentEntry;
  navigation.addEventListener("navigatesuccess", (event) => {
    navigation.lastSuccessfulEntry = event.currentTarget.currentEntry;
  });
}

function isValidNavigation(event) {
  // Filter out navigations we don't want to handle:
  // - non-interceptable navigations
  // - hash changes (within the same page)
  // - file downloads
  // - form submissions
  return !(
    !event.canIntercept ||
    event.hashChange ||
    event.downloadRequest ||
    event.formData
  );
}

function getTransitionType(oldEntry, newEntry) {
  if (!oldEntry || !newEntry) {
    return "unknown";
  }

  const currentURL = new URL(oldEntry.url);
  const destinationURL = new URL(newEntry.url);

  // Remove the base path to get clean pathname comparison
  const currentPath = currentURL.pathname.replace(basePath, "");
  const destinationPath = destinationURL.pathname.replace(basePath, "");

  if (currentPath === destinationPath) {
    return "reload";
  }

  // Define the order of pages to determine navigation direction
  // This helps create appropriate transition animations
  const pageOrder = {
    "/main.html": 0,
    "/post1.html": 1,
    "/post2.html": 2,
    "/about.html": 3,
  };

  const currentIndex = pageOrder[currentPath];
  const destinationIndex = pageOrder[destinationPath];

  // Handle unknown pages not in the pageOrder mapping
  if (currentIndex === undefined || destinationIndex === undefined) {
    return "unknown";
  }

  // Determine if we're moving backwards or forwards in the page order
  if (currentIndex > destinationIndex) {
    return "backwards";
  }
  if (currentIndex < destinationIndex) {
    return "forwards";
  }

  return "unknown";
}

async function handleNavigation(url, event, showLoading, hideLoading) {
  try {
    showLoading();
    const video = document.querySelector("video");
    if (video) {
      // Use picture-in-picture API if desired
      // video.requestPictureInPicture();
    }

    // Artificial delay to show loading state
    await new Promise((resolve) => setTimeout(resolve, 500));
    const response = await fetch(url.pathname, { signal: event.signal });
    const html = await response.text();

    // Parse the new page's HTML and extract the main content and title
    const parser = new DOMParser();
    const doc = parser.parseFromString(html, "text/html");
    const newMain = doc.querySelector("main");
    const newTitle = doc.querySelector("head title");

    function updateContent() {
      document.title = newTitle.textContent;
      document.querySelector("main").replaceWith(newMain);
    }

    // Use browser's built-in transition if available,
    // otherwise fall back to custom
    if (event.hasUAVisualTransition) {
      updateContent();
    } else {
      const transitionType = getTransitionType(
        navigation.lastSuccessfulEntry,
        navigation.currentEntry
      );

      // This is where the view transition happens
      document.startViewTransition({
        update: updateContent,
        types: [transitionType],
      });
    }
  } finally {
    hideLoading();
  }
}

function setupNavigationHandler({ showLoading, hideLoading }) {
  // Intercept navigation events to handle them with custom transitions
  navigation.addEventListener("navigate", (event) => {
    if (!isValidNavigation(event)) {
      return;
    }

    // Only handle same-origin navigation
    const url = new URL(event.destination.url);
    if (url.origin !== location.origin) {
      return;
    }

    event.intercept({
      handler: () => handleNavigation(url, event, showLoading, hideLoading),
    });
  });

  // Ensure loading indicator is hidden after successful navigation
  navigation.addEventListener("navigatesuccess", hideLoading);
}

initializeNavigation();
The CSS is the usual View Transition CSS you've seen in the previous examples, e.g.:
html:active-view-transition-type(forwards) {
  &::view-transition-old(maincontent) {
    animation-name: slide-out-to-left;
  }
  &::view-transition-new(maincontent) {
    animation-name: slide-in-from-right;
  }
}

/* And so on (e.g. keyframe animations, 'backwards' animation) */
This post shows how you can use the View Transition API to enhance the user experience without relying on a JavaScript framework. However, when using same-document view transitions, you still need to handle the DOM updates and state management yourself.
A few points to highlight:
Navigation interception:
Navigation interception without a service worker! The browser's back/forward buttons continue to work as expected even as you intercept navigations.
Native loading indicator:
In addition, the browsers native loading indicator works correctly, even though a full page reload is not happening. Traditionally, this would be a challenge with a single page app.
Use the web platform:
As more browsers support the Navigation API, you can stop the practice of intercepting hyperlinks in the DOM, while having to manually synchronize the URL with the page content.
This demo highlights the following features:
- Same-document view transitions with slide effects, all within a multi-page server-side rendered website.
- Full state preservation during navigation. For example, an autoplaying video continues to play as you move between pages. Other states, such as form data, JavaScript variables, and websocket connections, are also maintained.
- Speculation rules are not used in this example, as the
fetch()API is used to load new pages or page fragments.
In the previous code example, you might have seen some interesting looking code that uses a signal:
fetch(url, {
  signal: event.signal,
});
This signal comes from the Navigation API's navigate event, which offers a signal that can cancel a fetch() request when the user navigates away from the page, or cancels the navigation.
Frameworks and the View Transition API
Some frameworks offer varying levels of support for the View Transition API, either through official channels or community plugins. One such framework is Astro, which provides official support for the View Transition API. With Astro, you can:
- Achieve smooth transitions between pages without a full page reload.
- Utilize built-in transitions like fade and slide.
- Respect user preferences for
prefers-reduced-motion. - And much more.
What flavour of the View Transition API should you use?
For most websites, we recommend using cross-document view transitions with speculation rules. This option has strong benefits:
- Performs well in most scenarios.
- Degrades gracefully in older browsers.
- Improves perceived performance, for most users.
For web apps that carry state and have lots of interactive components, we recommend using same-document view transitions with the Navigation API. This option:
- Preserves state between navigations.
- Offers a more seamless experience for users.
However note that using the same-document view transitions approach instead of cross-document view transitions means you lose the benefit that speculation rules.
Technically, you can use both cross-document and same-document view transitions on the same website - as they can serve different use-cases which don't affect each other.
Browser support
The Navigation API is supported in Chrome and Edge, and Safari Technical Preview.
Cross-document view transitions are supported in Chrome, Edge and Safari Technical Preview.
Same-document view transitions are supported in Chrome, Edge and Safari.
You should work to ensure that your users can navigate your website normally, even if view transitions are not supported.
In CSS, your view transitions code is ignored by browsers that do not support the View Transition API. In JavaScript, you should check properties like document.startViewTransition are available before using them.
When using pageswap and pagereveal events:
window.addEventListener("pagereveal", async (e) => {
  if (e.viewTransition) {
    // A viewTransition object is available
  }
});
When using document.startViewTransition:
if (document.startViewTransition) {
  // Update the DOM with a view transition
} else {
  // Update the DOM without a view transition
}
Does Firefox support the View Transition API?
Firefox does not support the View Transition API, however you can track the progress of the bug report to see if it will be implemented in the future.
Understanding perceived performance with DebugBear
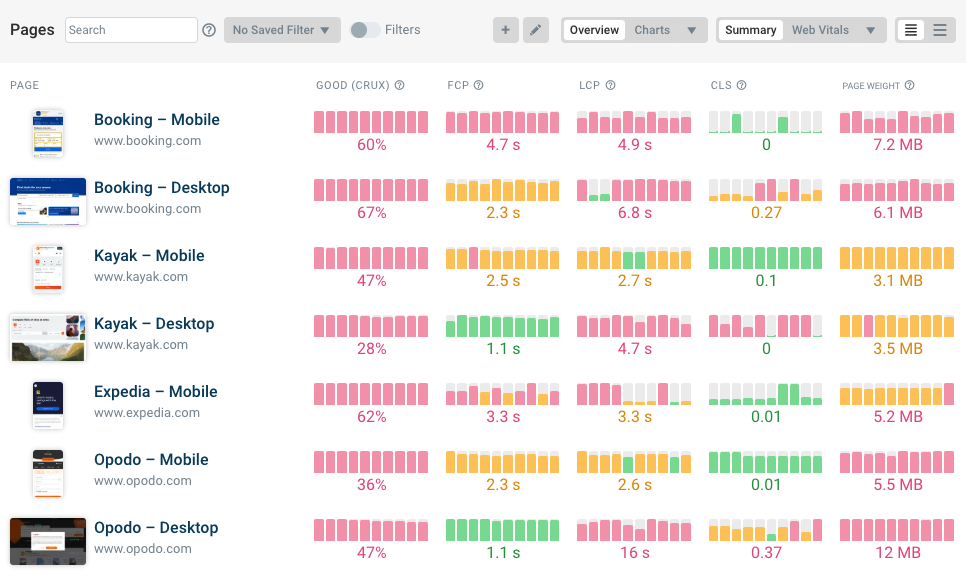
View transitions won't make your page loads faster, but they can make your website feel faster to users - this is known as perceived performance. If your usual web performance metrics like Largest Contentful Paint stays the same, how do you know if your view transitions are improving the user experience?
DebugBear offers a comprehensive suite of engagement metrics that can help you understand how users are interacting with your website, and how long they're spending on your website.
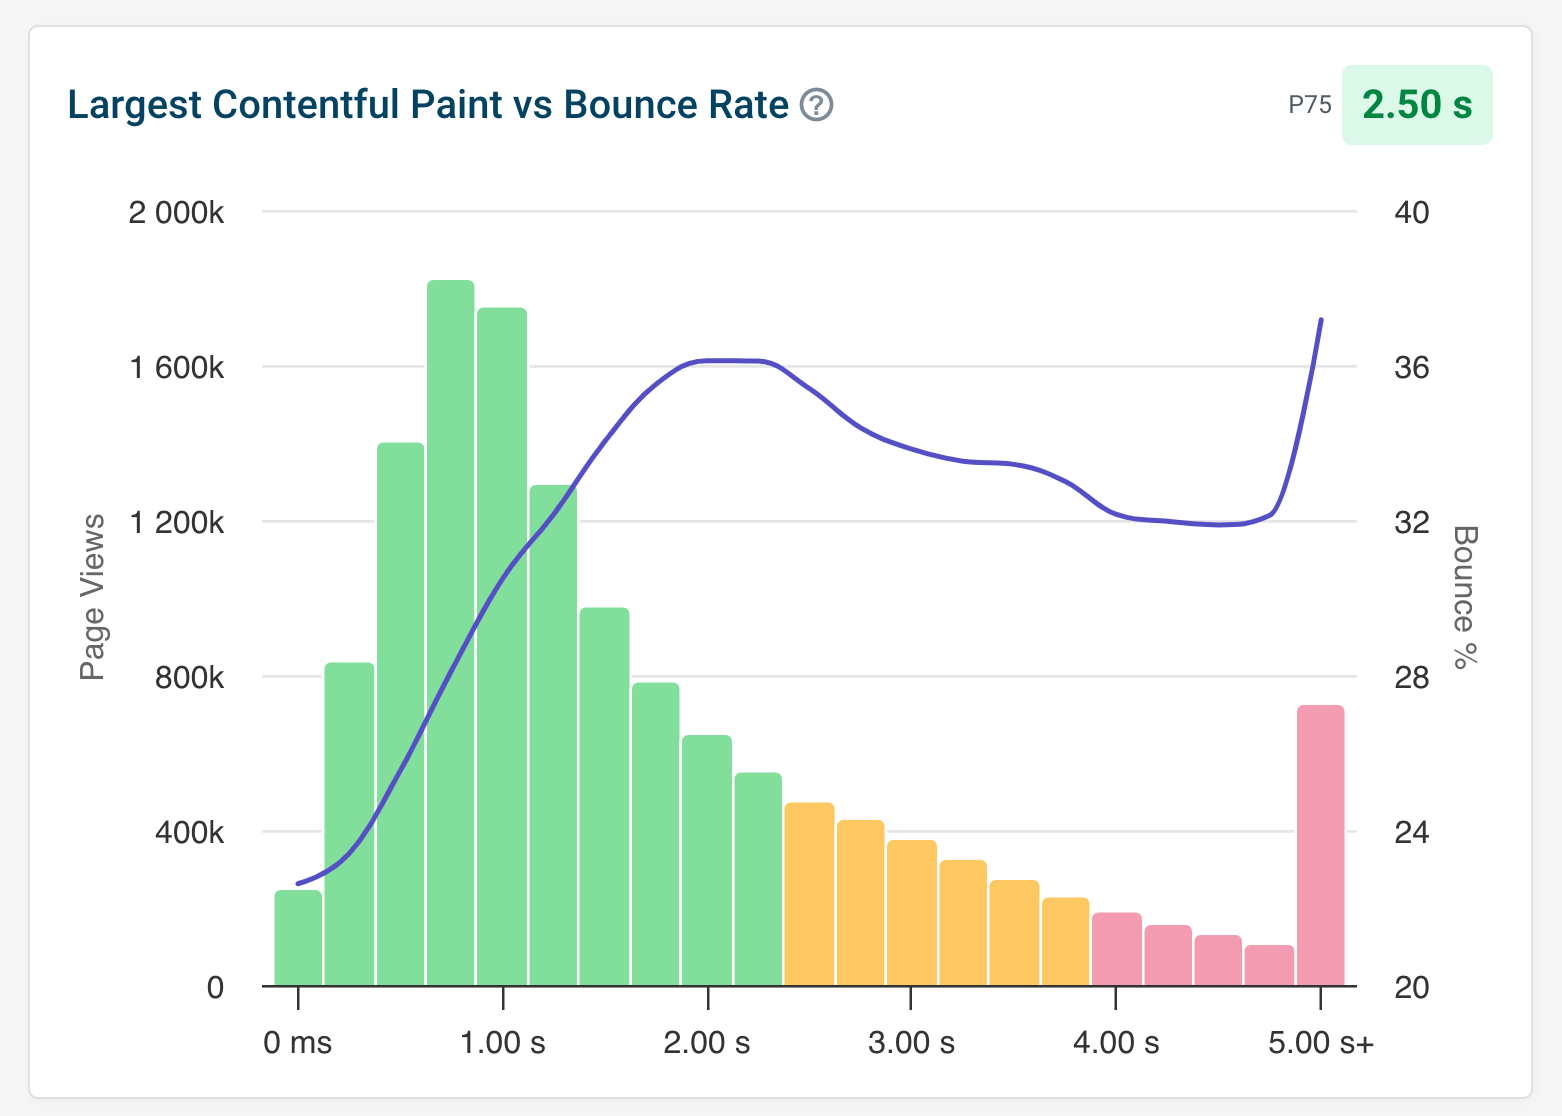
Such engagement metrics can indicate if your view transitions are improving the overall user experience of your website.
Fix your website's Core Web Vitals
Want to have a fast website? Measuring and monitoring your Core Web Vitals is a great starting point!
DebugBear produces in-depth performance reports based on synthetic data, tracks Google CrUX metrics that impact SEO, and surfaces real user experience issues with real user monitoring. Sign up for a free trial!
Conclusion
In this guide, you explored the View Transition API and how it can enhance your web application's user experience with smooth animations between different views.
Before implementing view transitions on your website, consider the following:
- Will view transitions enhance the user experience for your specific website?
- Do users actually want animations as they navigate your site?
- Are users aware of how to configure their reduced motion settings if needed?
- Does your website already have many animations, and could adding more be overwhelming?