
Text compression is a method that speeds up the download of resources like HTML, CSS, and JavaScript files on your website.
In some instances, compression lets you reduce file sizes by around 70%, resulting in faster page loads and a better user experience.
In this guide, we'll show you how to enable text compression for your own website and check your current compression status.
Should you use text compression on your website?
Yes! When someone visits your website, their browser needs to download all the necessary files - HTML, CSS, JavaScript, and more. These text-based files can get quite large, especially for modern web applications.
Text compression works by applying tools like Gzip or Brotli to reduce file sizes before they're sent over the network. The browser then decompresses these files on the user's device.
The benefits of text compression include:
- Faster load times: Smaller files download quicker, which can improve your Core Web Vitals
- Reduced bandwidth usage: Less data transferred means lower costs for both you and your users
- Improved SEO: Page speed is a ranking factor for search engines
These downsides of text compression are minimal and should not deter you from using text-based compression.
- Increased CPU usage on the server: Compression requires some extra processing power, but on almost any server, this is completely negligible
- Increased CPU usage on the client: Decompressing files on low-powered devices might take a bit longer (in milliseconds), but the overall impact is very small
We're not listing missing browser support for modern compression algorithms as a disadvantage. That's because browsers advertise their support for these compression algorithms with the Accept-Encoding header.
If the server determines that the browser doesn't support the specified algorithm, it can fall back to alternative compression methods.
Types of Text Compression
GZIP and Brotli compression are supported in both modern browsers and most server environments that run your website.
Consider these two tests, done on unminified versions of react-dom.js and animate.css:
In this example, Brotli compression reduces the size of script.js by 82.7%, while Gzip compression reduces the size of style.css by 88.9%.
This doesn't mean Gzip is always better than Brotli. Brotli is generally more effective at compressing files, but in this instance, the CSS file was more compressible than the JavaScript file.
Gzip Compression
Gzip is the most widely supported compression algorithm, compatible with virtually all browsers.
Gzip works by:
- Finding repeated strings within a text file
- Replacing them with pointers to the first instance
- Applying additional encoding for further compression
Brotli Compression
Brotli is a newer compression algorithm developed by Google that offers even better compression ratios than Gzip - typically 10-20% smaller.
Brotli uses more advanced compression techniques, including:
- A pre-defined dictionary of common web patterns
- Better entropy encoding
What is the difference between minification and compression?
Minification and compression are two different techniques for reducing the size of text files on your website.
Minification example in JavaScript
Minification removes unnecessary characters from text files, and depending on the file type, can even involve renaming variables to shorter names. Minification happens before compression.
Before minification: Regular JavaScript authored by a developer.
// Before minification
function add(argument1, argument2) {
  return argument1 + argument2;
}
After minification: Minified code, where variable names are renamed.
// After minification
const add=(a,b)=>a+b;
Compression example in CSS
Compression reduces the size of files by finding repeated patterns and replacing them with shorter representations. Compression happens after minification.
Before compression: Regular CSS authored by a developer.
/* Tiny CSS example */
.box {
  color: blue;
  padding: 5px;
}

.btn {
  color: blue;
  padding: 5px;
}
After compression: Compressed code that is not valid CSS but is smaller in size.
/* This is not valid CSS code */
.box { #CB; #P5; } .btn { #CB; #P5; }
Pattern Replacements: The client, for example a browser, is able to decompress the compressed file and replace the patterns with the original values.
| Pattern | Replacement |
|---|---|
color: blue; | #CB |
padding: 5px; | #P5 |
When should you use text compression?
Text compression should be applied at the server level during the response phase, before files are sent to the client.
In addition to using compression at the server runtime, you should also use a CDN that supports text compression.
Using compression during the server response phase and during the CDN delivery phase are the most common ways to use text-based compression. However if you have very specific requirements, you can also compress files during the build phase.
This method is similar to how images are optimized during the build phase.
This means you compress files before deployment as part of your build process. You can use the underlying gzip and brotli (refer to the installation instructions of those tools) to perform this compression.
How to Verify Compression is Working
Before and after enabling compression, it's important to verify that it's actually working. Here are a few ways to check:
As part of a website speed test
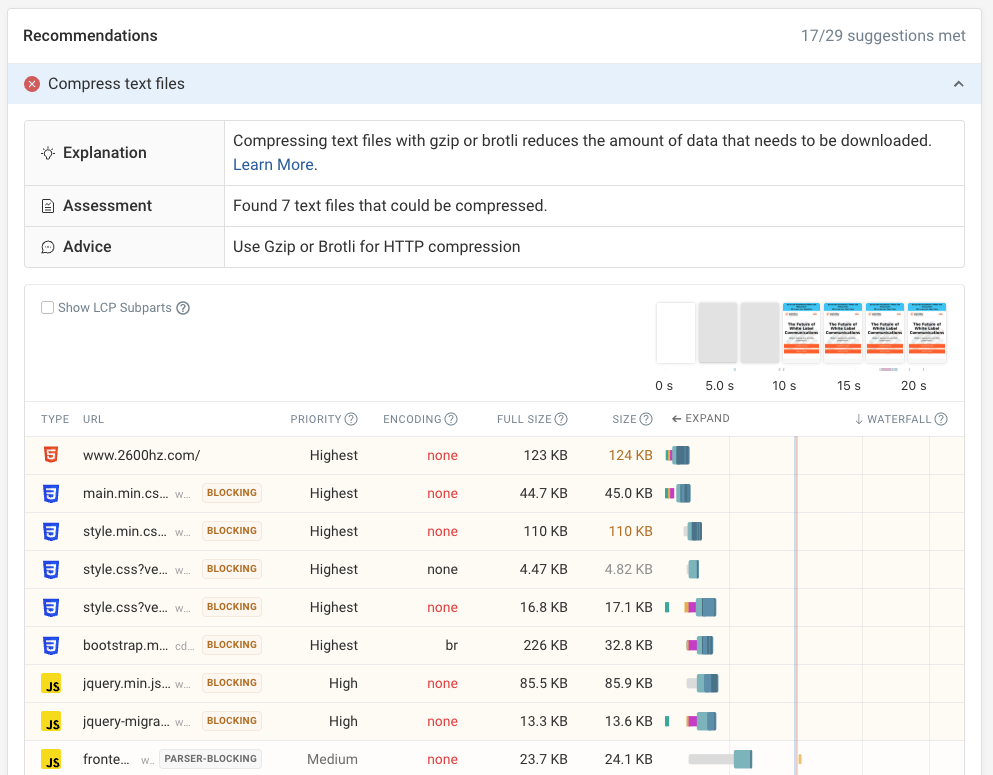
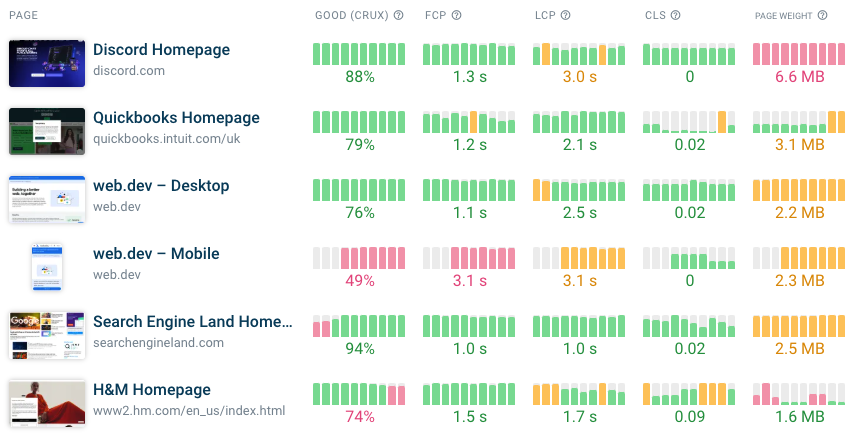
If you run an online website speed test with DebugBear you can see what resources text compression is applied to.
For websites that would benefit from better compression you'll see a "Compress text files" recommendation. After expanding it you can see the request URLs that you should optimize, with the "Encoding" column showing as "none".
Using Command Line Tools
You can use command line tools like curl to check if your files are being compressed:
curl -s -H "Accept-Encoding: gzip" -I https://example.com/ | grep content-encoding
If you run that command in your terminal, you should see: content-encoding: gzip in the output if compression is enabled.
Notice that we're sending the Accept-Encoding header with the value gzip. This tells the server that the client (curl in this case) supports gzip compression.
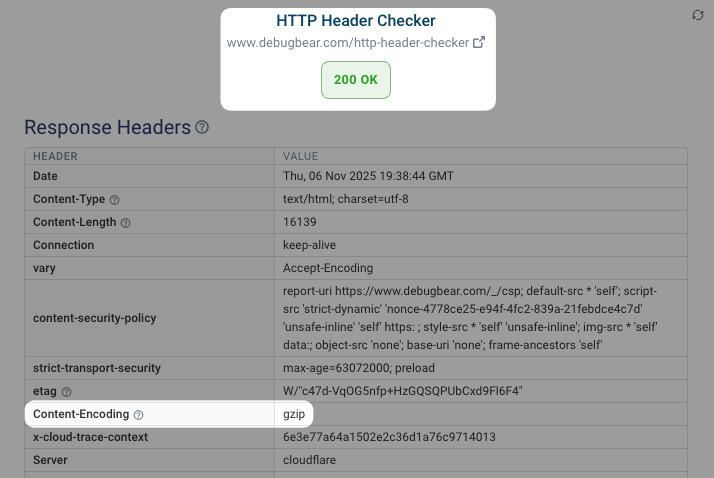
The Content-Encoding header is used to specify the encoding of the resource. This way, the browser, or any client, knows how to decode the file.
In this case, it is gzip.
Using Browser DevTools
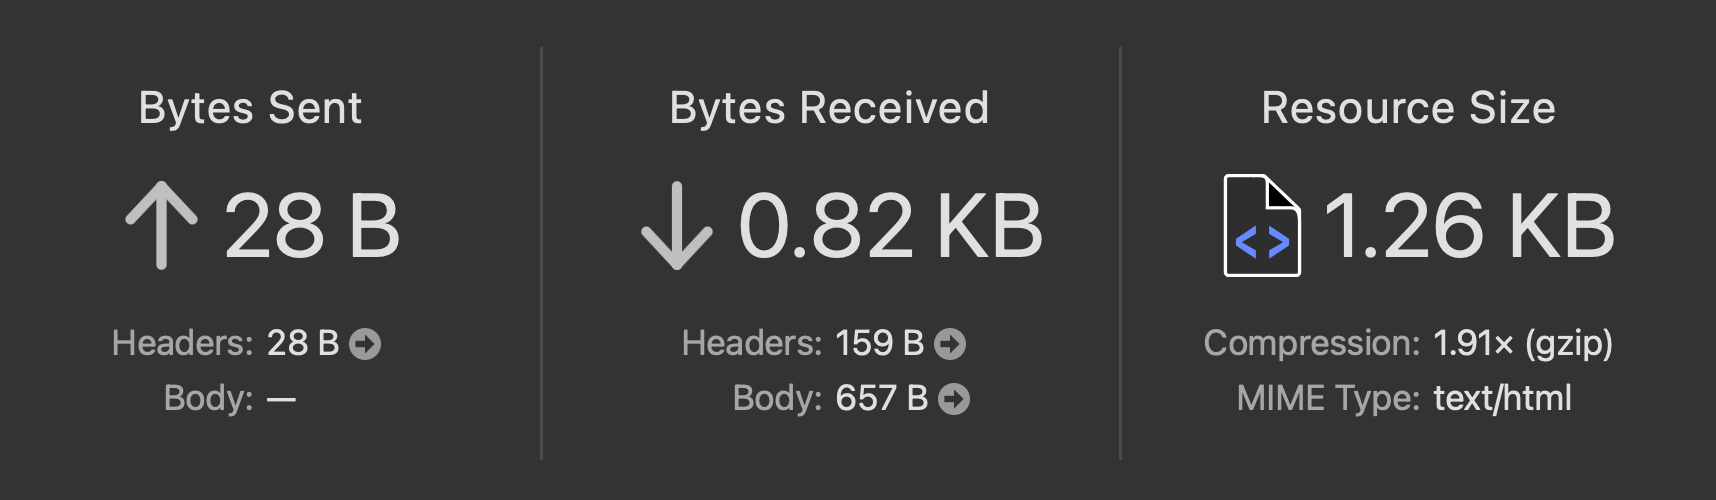
The Network panel in browser DevTools helps you see if your files are being compressed.

The previous screenshot shows:
- The size column, with two sizes for the same resource. The first size (669 B) represents the compressed size - the amount of data transferred over the network
- The second size (1.3 KB) represents the uncompressed size - the actual size of the file
- The Content-Encoding column specifies the compression algorithm used, in this case, gzip
We've documented how to check for compression in Chrome DevTools in a separate post.
Safari's developer tools also show the compression status in the Network panel:
A compression ratio (1.91x), and compression type (gzip) is shown in the Sizes pane of the Network tab.
Using PageSpeed Insights
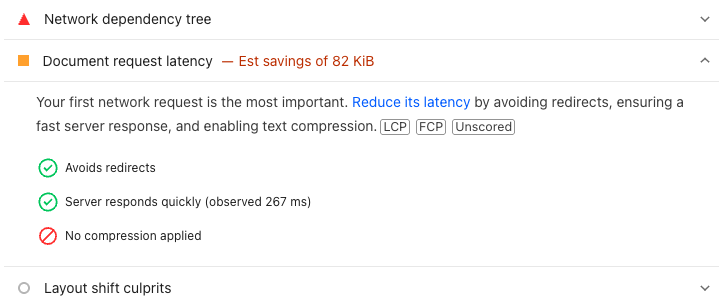
Google's PageSpeed Insights includes a document request latency audit that checks if the HTML document is served in a compressed way.
When that is not the case you will see a "No compression applied" message.
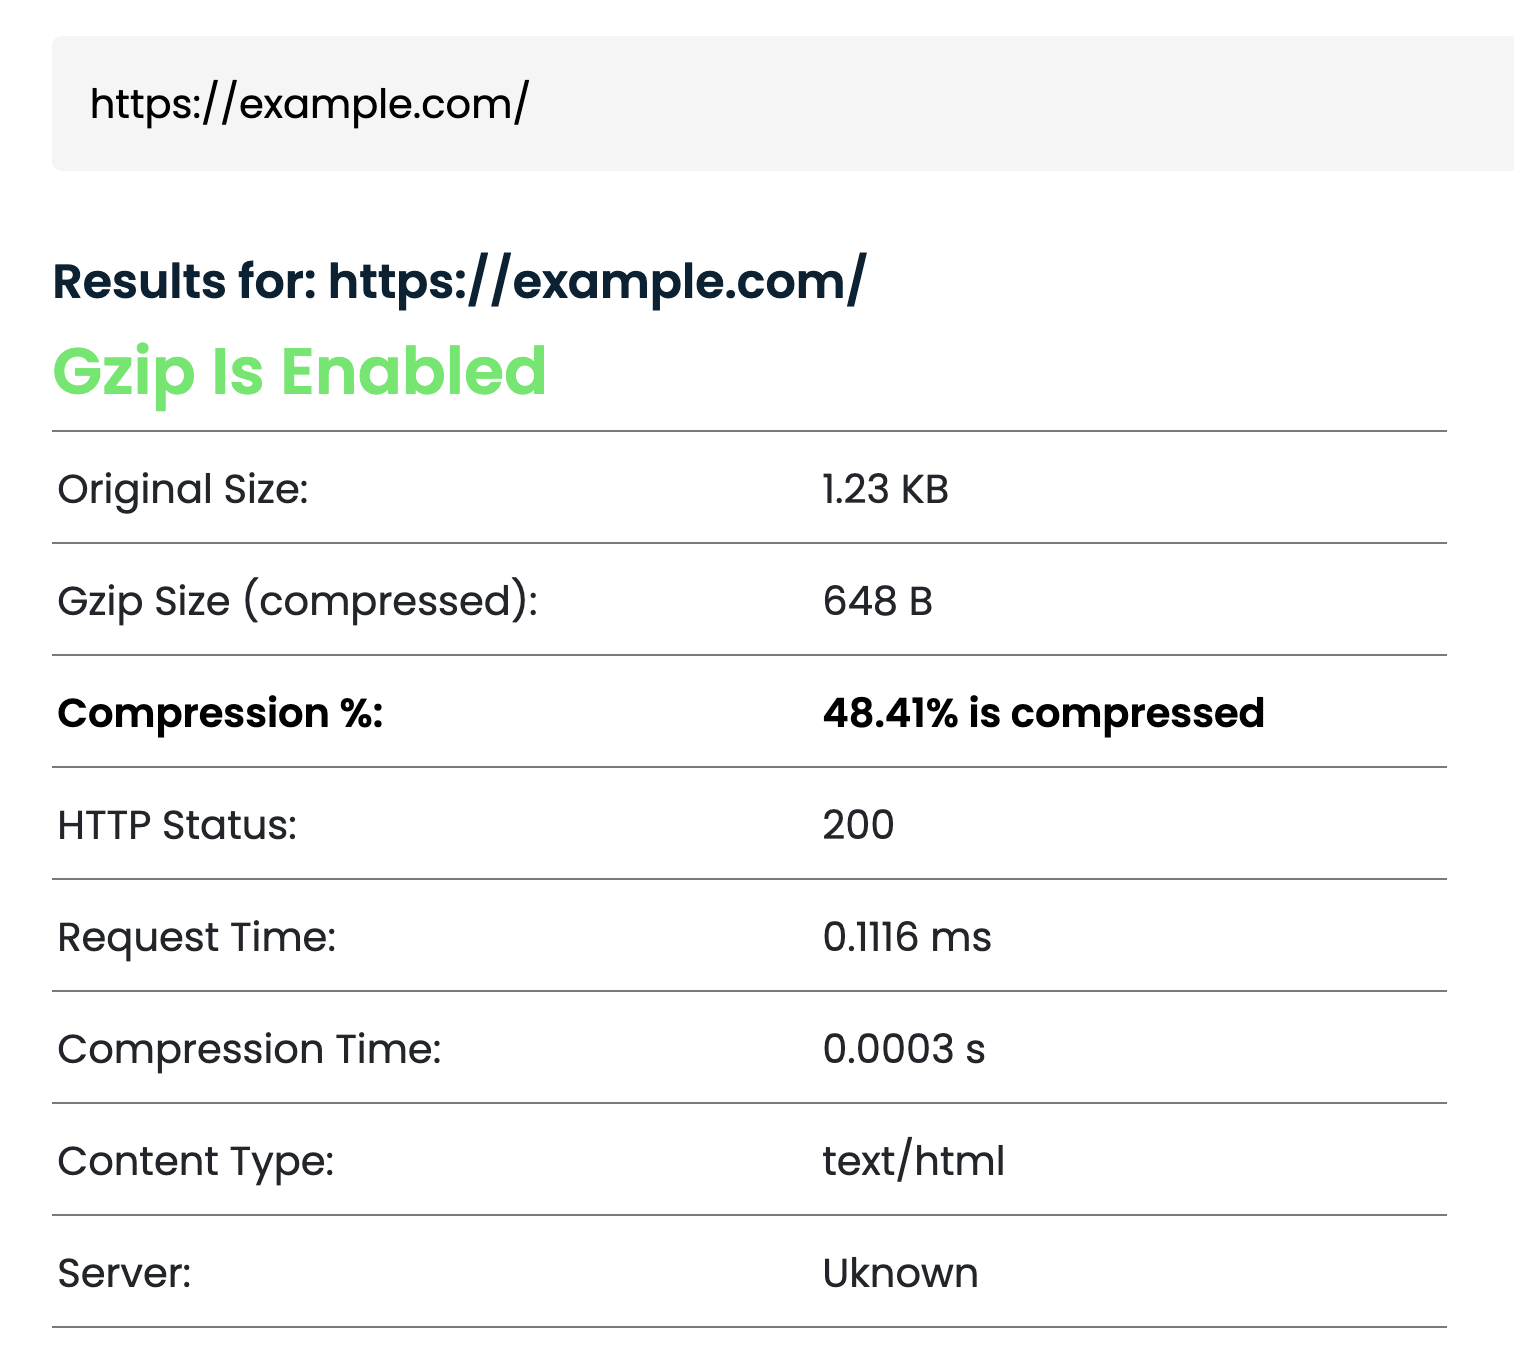
Using dedicated online tools
This simple Gzip/Brotli checker shows if your files are compressed and the amount of compression:
The HTTP header checker can also tell you what content-encoding header value a server includes with the HTTP response.
How to Enable Text Compression
Enabling compression is relatively straightforward on most servers. Here are a few examples:
Enable Compression in Nginx
For Nginx servers, you need to edit your Nginx configuration file to add this directive:
gzip on;
You'll also want to add additional configuration to specify which file types to compress:
# This is a non-exhaustive list of file types that can be compressed
gzip_types text/plain application/xml application/javascript application/json text/css text/html;
The configuration above enables compression for the most common text file types. If using Brotli, you might need to install the Brotli module separately.
Enable Compression in Apache
For Apache servers, add these lines to your .htaccess file or server configuration:
# Enable gzip compression
<IfModule mod_deflate.c>
  AddOutputFilterByType DEFLATE text/html text/plain text/css application/javascript application/json
</IfModule>

# For Brotli (if the module is installed)
<IfModule mod_brotli.c>
  AddOutputFilterByType BROTLI_COMPRESS text/html text/plain text/css application/javascript application/json
</IfModule>
And as with all code examples, be sure to test your configuration changes to ensure they work as expected.
Caddy
Compression in Caddy is fairly straightforward:
encode zstd gzip
Add that directive to your Caddyfile to enable both gzip and zstd compression.
Use compression middleware in Express.js
For Node.js applications using Express, you can use the compression middleware. This applies compression at the application level.
import express from "express";
import compression from "compression";
const app = express();

// Use compression middleware
app.use(compression());

app.listen(3000);
Both Gzip and Brotli encoding are supported by the compression middleware.
Use compression in Next.js
Next.js applies compression by default and if you're deploying to a service like Vercel, compression is automatically handled for you.
For completeness, here's the configuration to enable compression in Next.js. Within your next.config.js file:
module.exports = {
  // Enabled by default
  compress: true,
};
Applying Gzip compression from JavaScript
Client side JavaScript offers a compression streams API that allows you to compress and decompress data in the browser.
This will not impact your page load performance, and serves different use cases than server-side compression - which is what you should use for text-based resources.
While you won't use this for compressing files on the server, it can be useful for uploading compressed data to a server (e.g., large user-generated content, log files), or for working with compressed data entirely within the browser (e.g., in-browser data processing)
const text = "a".repeat(1000);
const originalBlob = new Blob([text]);
const stream = originalBlob.stream();

// Pipe the stream through the compression stream (gzip format)
const compressedStream = stream.pipeThrough(new CompressionStream("gzip"));
const gzipBlob = await new Response(compressedStream).blob();

console.log("New size:", gzipBlob.size); // 29
console.log("Original size:", originalBlob.size); // 1000
The significant reduction in size is because Gzip is very efficient at compressing repeated patterns, like the letter "a" in this example.
Measuring Compression Impact with DebugBear
At DebugBear, we provide tools to measure and monitor your website's performance, including the usefulness of text compression.
Checking Compression Status
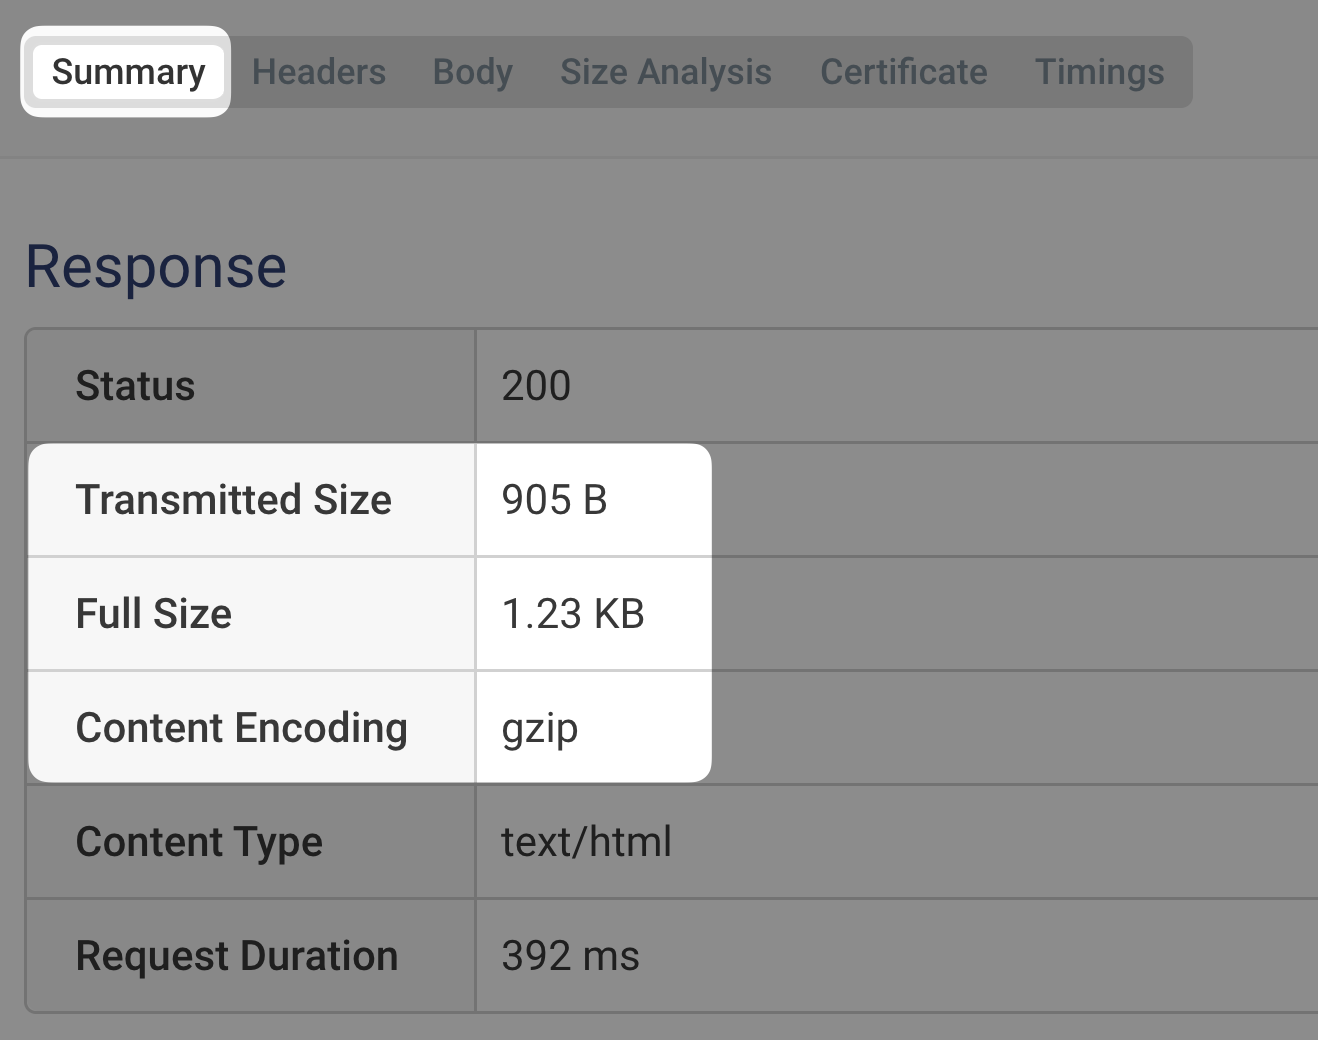
The request waterfall in DebugBear shows request headers, response headers, and general metadata for each resource. You can inspect the following fields to check the compression status:
- Content-Encoding: The compression algorithm used (gzip, br, etc.)
- Transmitted Size: The size of the resource as it was sent over the network
- Full Size: The actual size of the resource. If this is larger than the transmitted size, compression is working
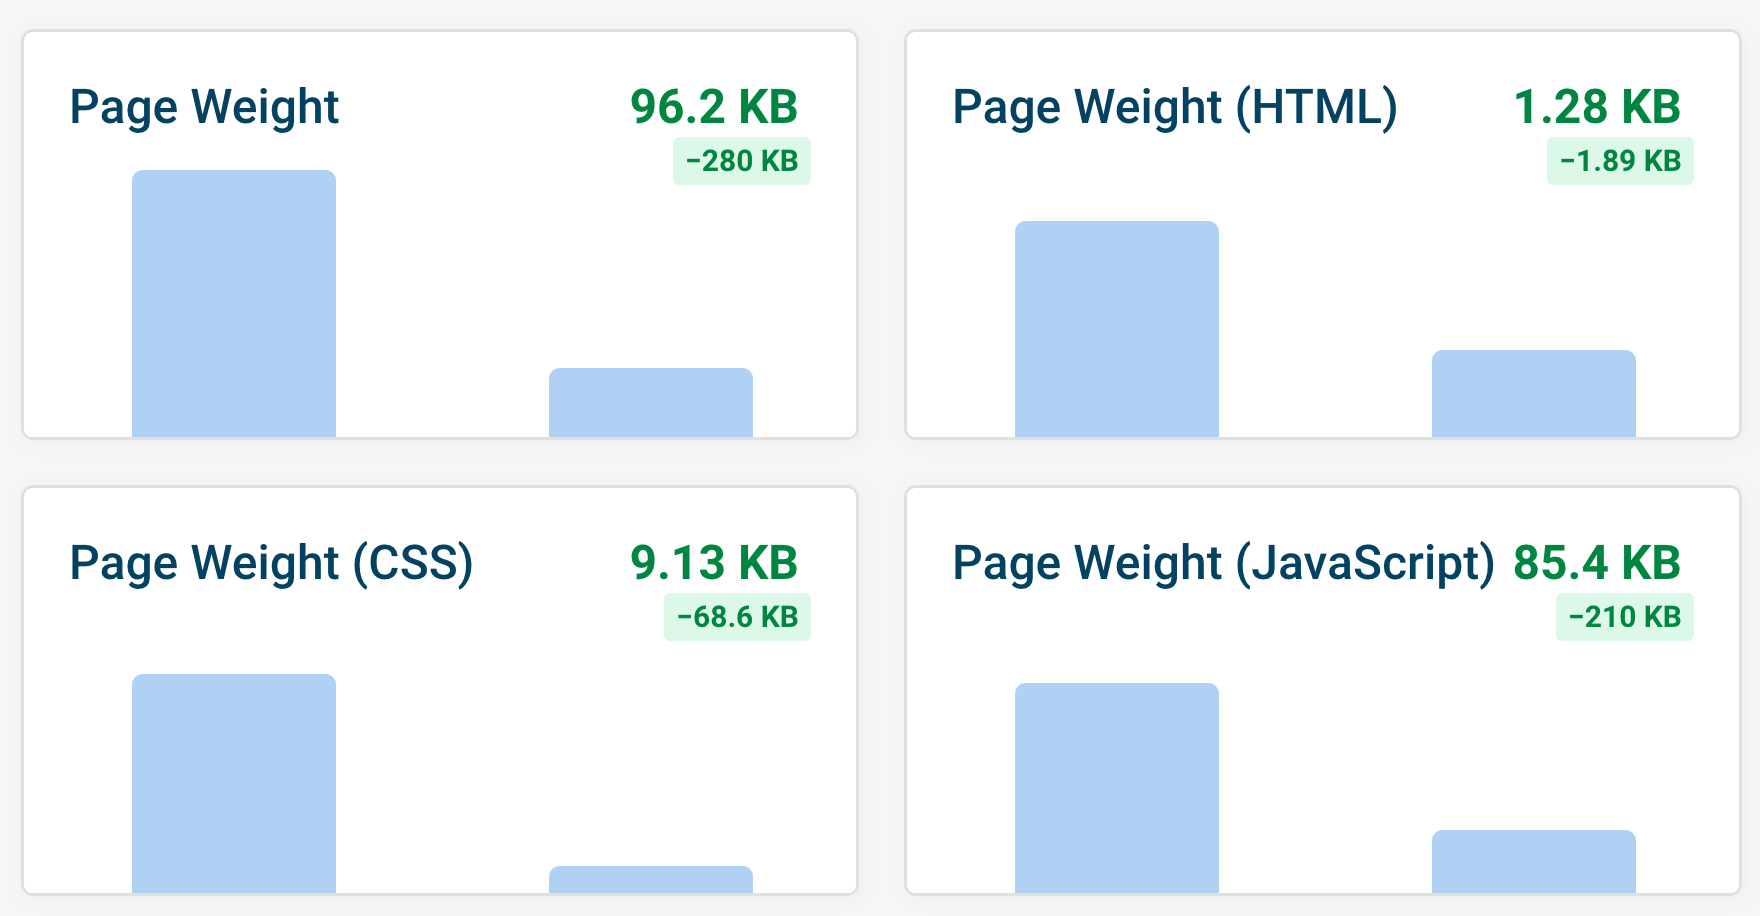
Measuring Before/After Performance
DebugBear lets you compare pages. The following screenshot shows the page weight (whole page, HTML, CSS, JS) before and after compression:
The request waterfall comparison shows two horizontal bars per CSS file and JavaScript file. The two bars within each pair represent the compressed and uncompressed sizes.

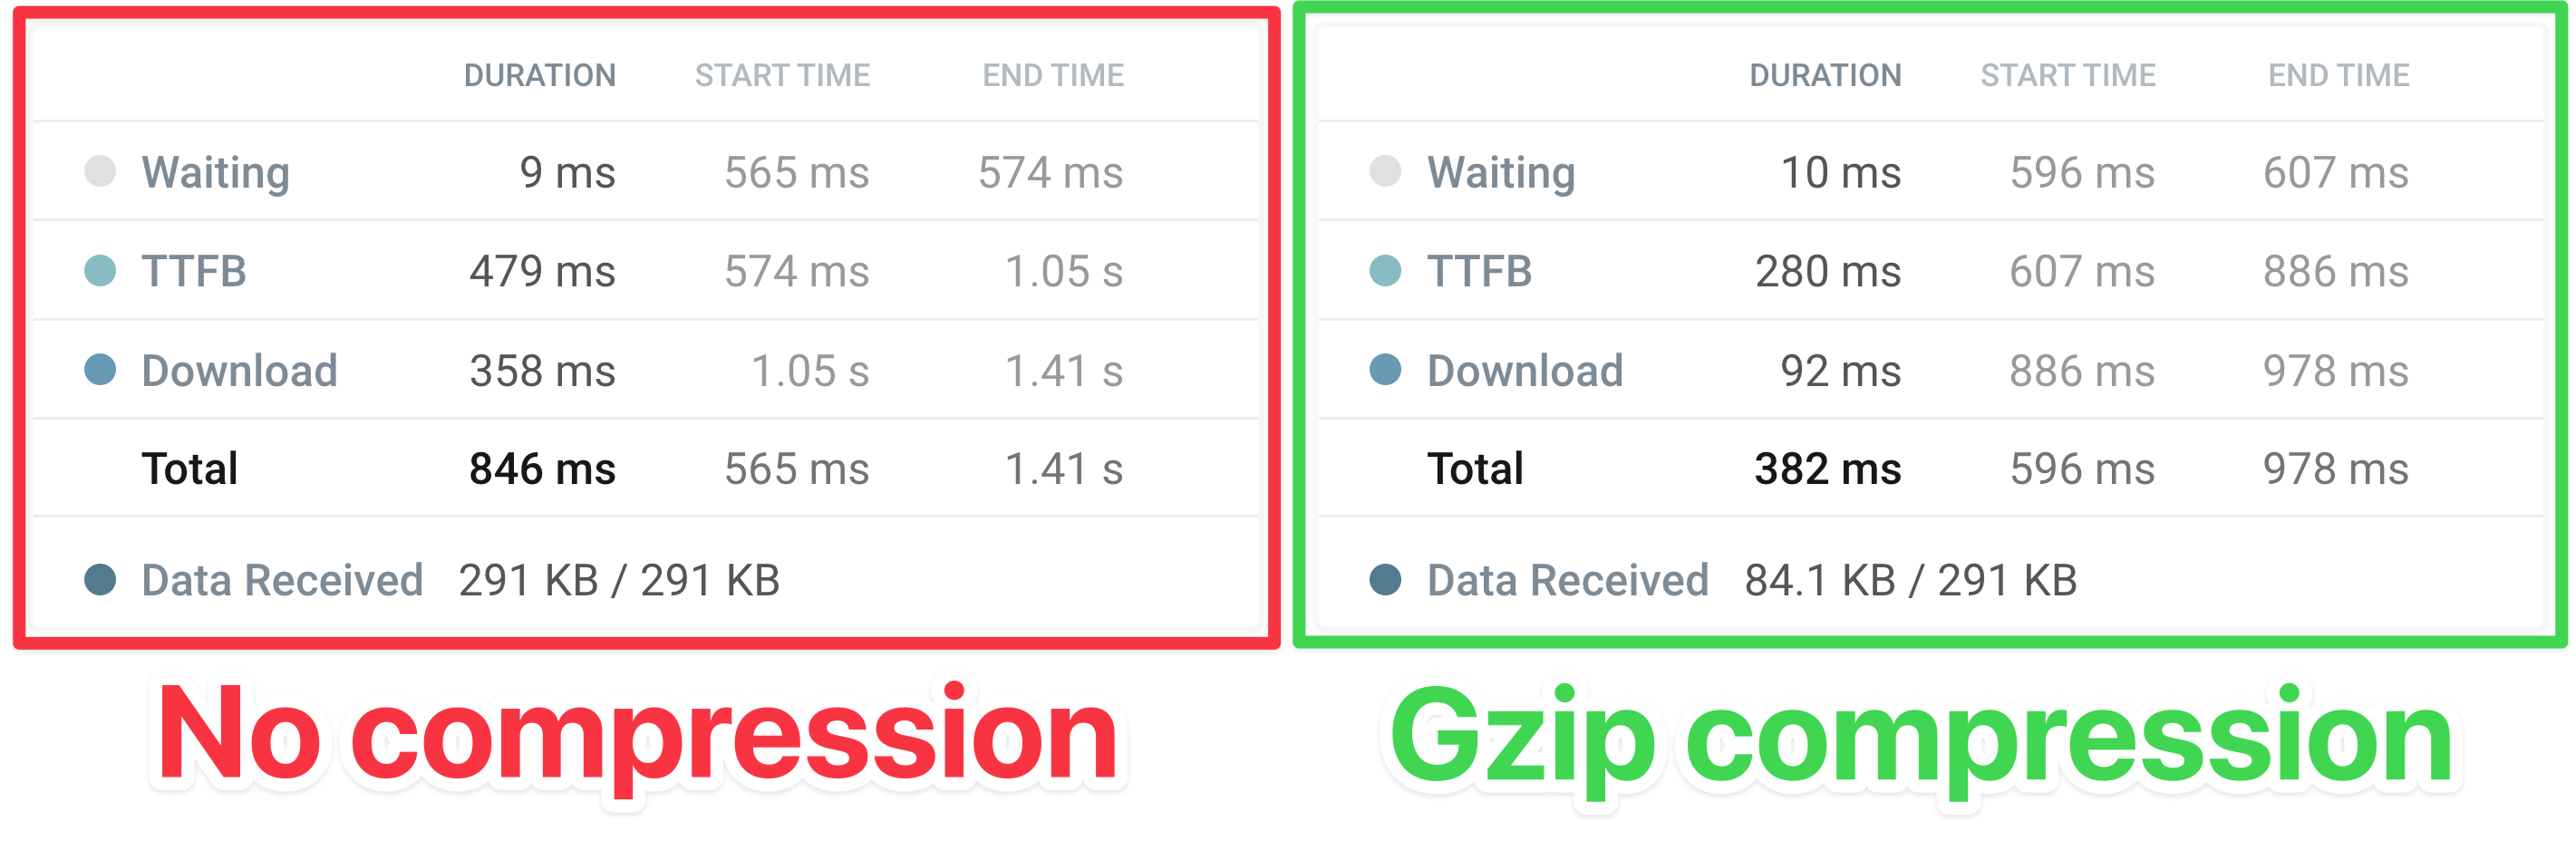
If you open up a specific resource in the request waterfall, you can view granular timing data for the compressed and uncompressed versions of the file.
Continuous Monitoring for Text Compression
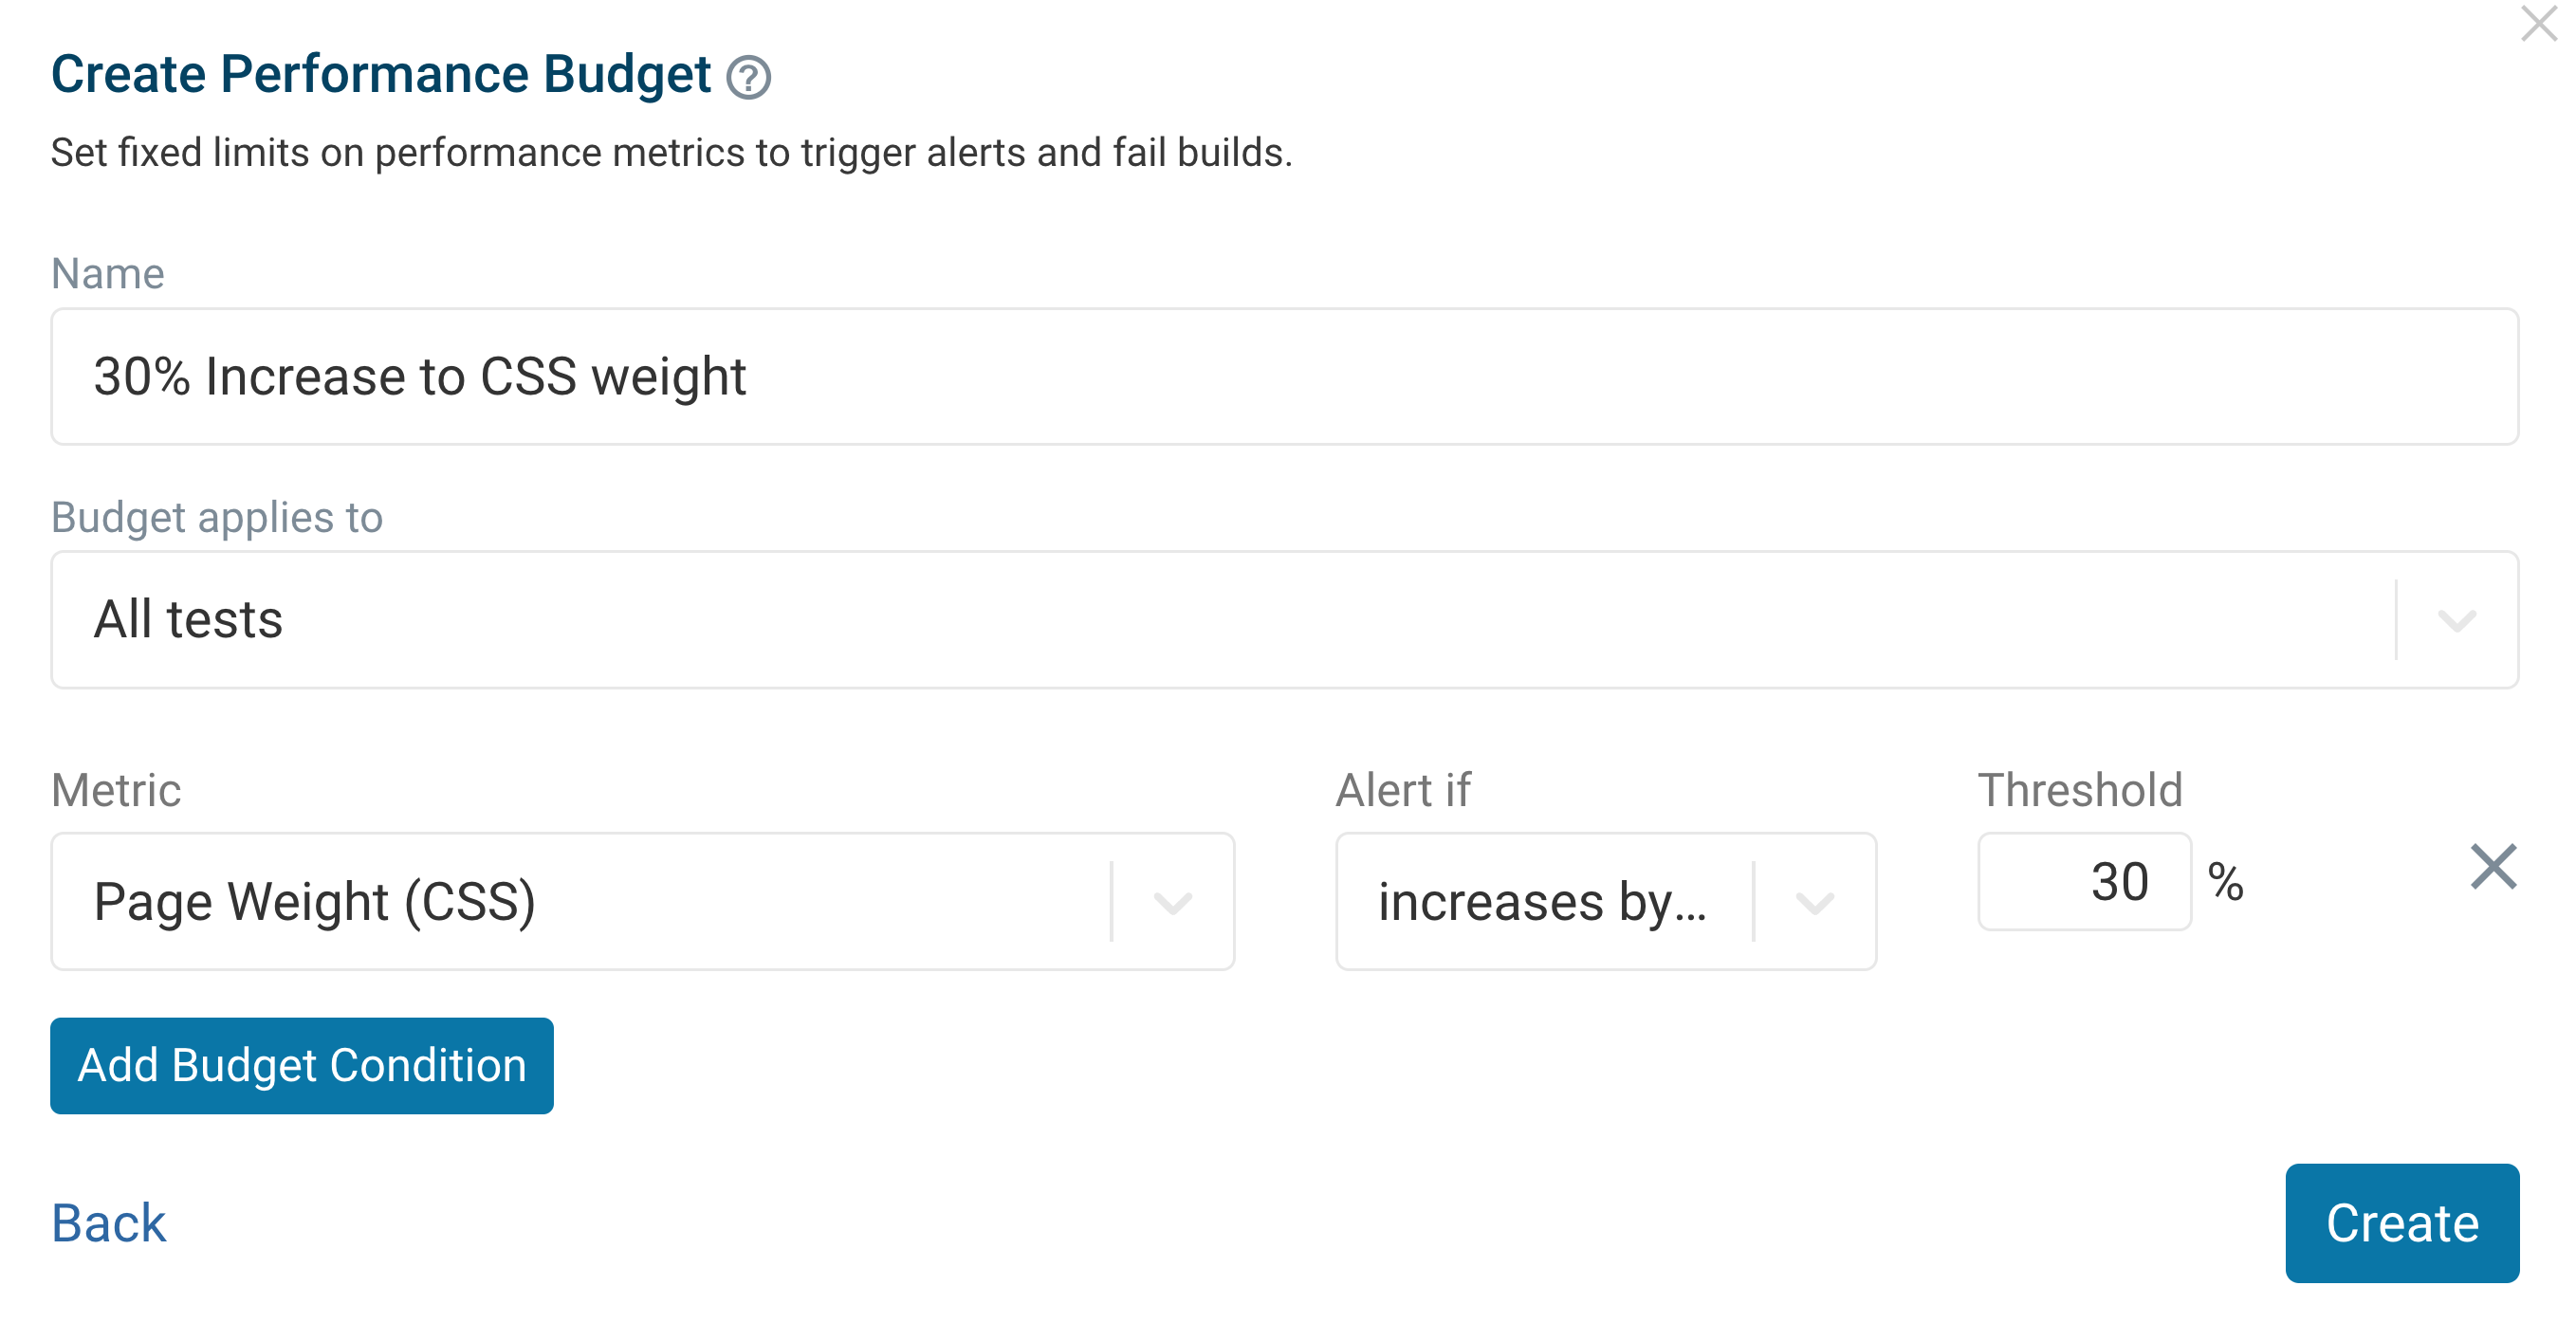
To monitor text compression, you can use DebugBear's performance budget to set a target for the size of your web page resources. DebugBear will then alert you if your resources exceed this budget, helping you catch issues with compression or other optimizations.
Conclusion
Enabling text compression is a handy way to make your website faster. By following the steps in this guide, you can reduce the size of your text resources, which helps with load times and bandwidth usage.
DebugBear is a website performance monitoring tool that continuously measures your website speed and identifies high-impact optimizations. Sign up for a free trial.


Monitor Page Speed & Core Web Vitals
DebugBear monitoring includes:
- In-depth Page Speed Reports
- Automated Recommendations
- Real User Analytics Data