
Caching is the process of storing copies of files in a cache, or temporary storage location, so that they can be accessed more quickly. When a browser caches a file, it stores a copy of that file on the user's device. This means that the next time the user visits the same page, the browser can load the file from the cache instead of downloading it again from the server.
How browser caching helps with page load
We made a video to help you understand how browser caching helps with page load, check it out:
The most performant request is the one not made.
When a user visits a website, their browser needs to download all the resources needed to display the page. This includes HTML, CSS, JavaScript, images, and other assets. If the browser already has a copy of a resource in its cache, it can load that resource much faster than if it had to download it from the server.
Here's a simple diagram that shows how a page is requested from a server. In this example, the user waits for over a second for the page to load.
Without caching:
And here's a diagram that shows how a page is retrieved from the cache, without contacting the server. In this example, the user gets the page instantly:
With caching:
In these examples, the cache, just like the browser, lives on the user's device. That's why it's so fast.
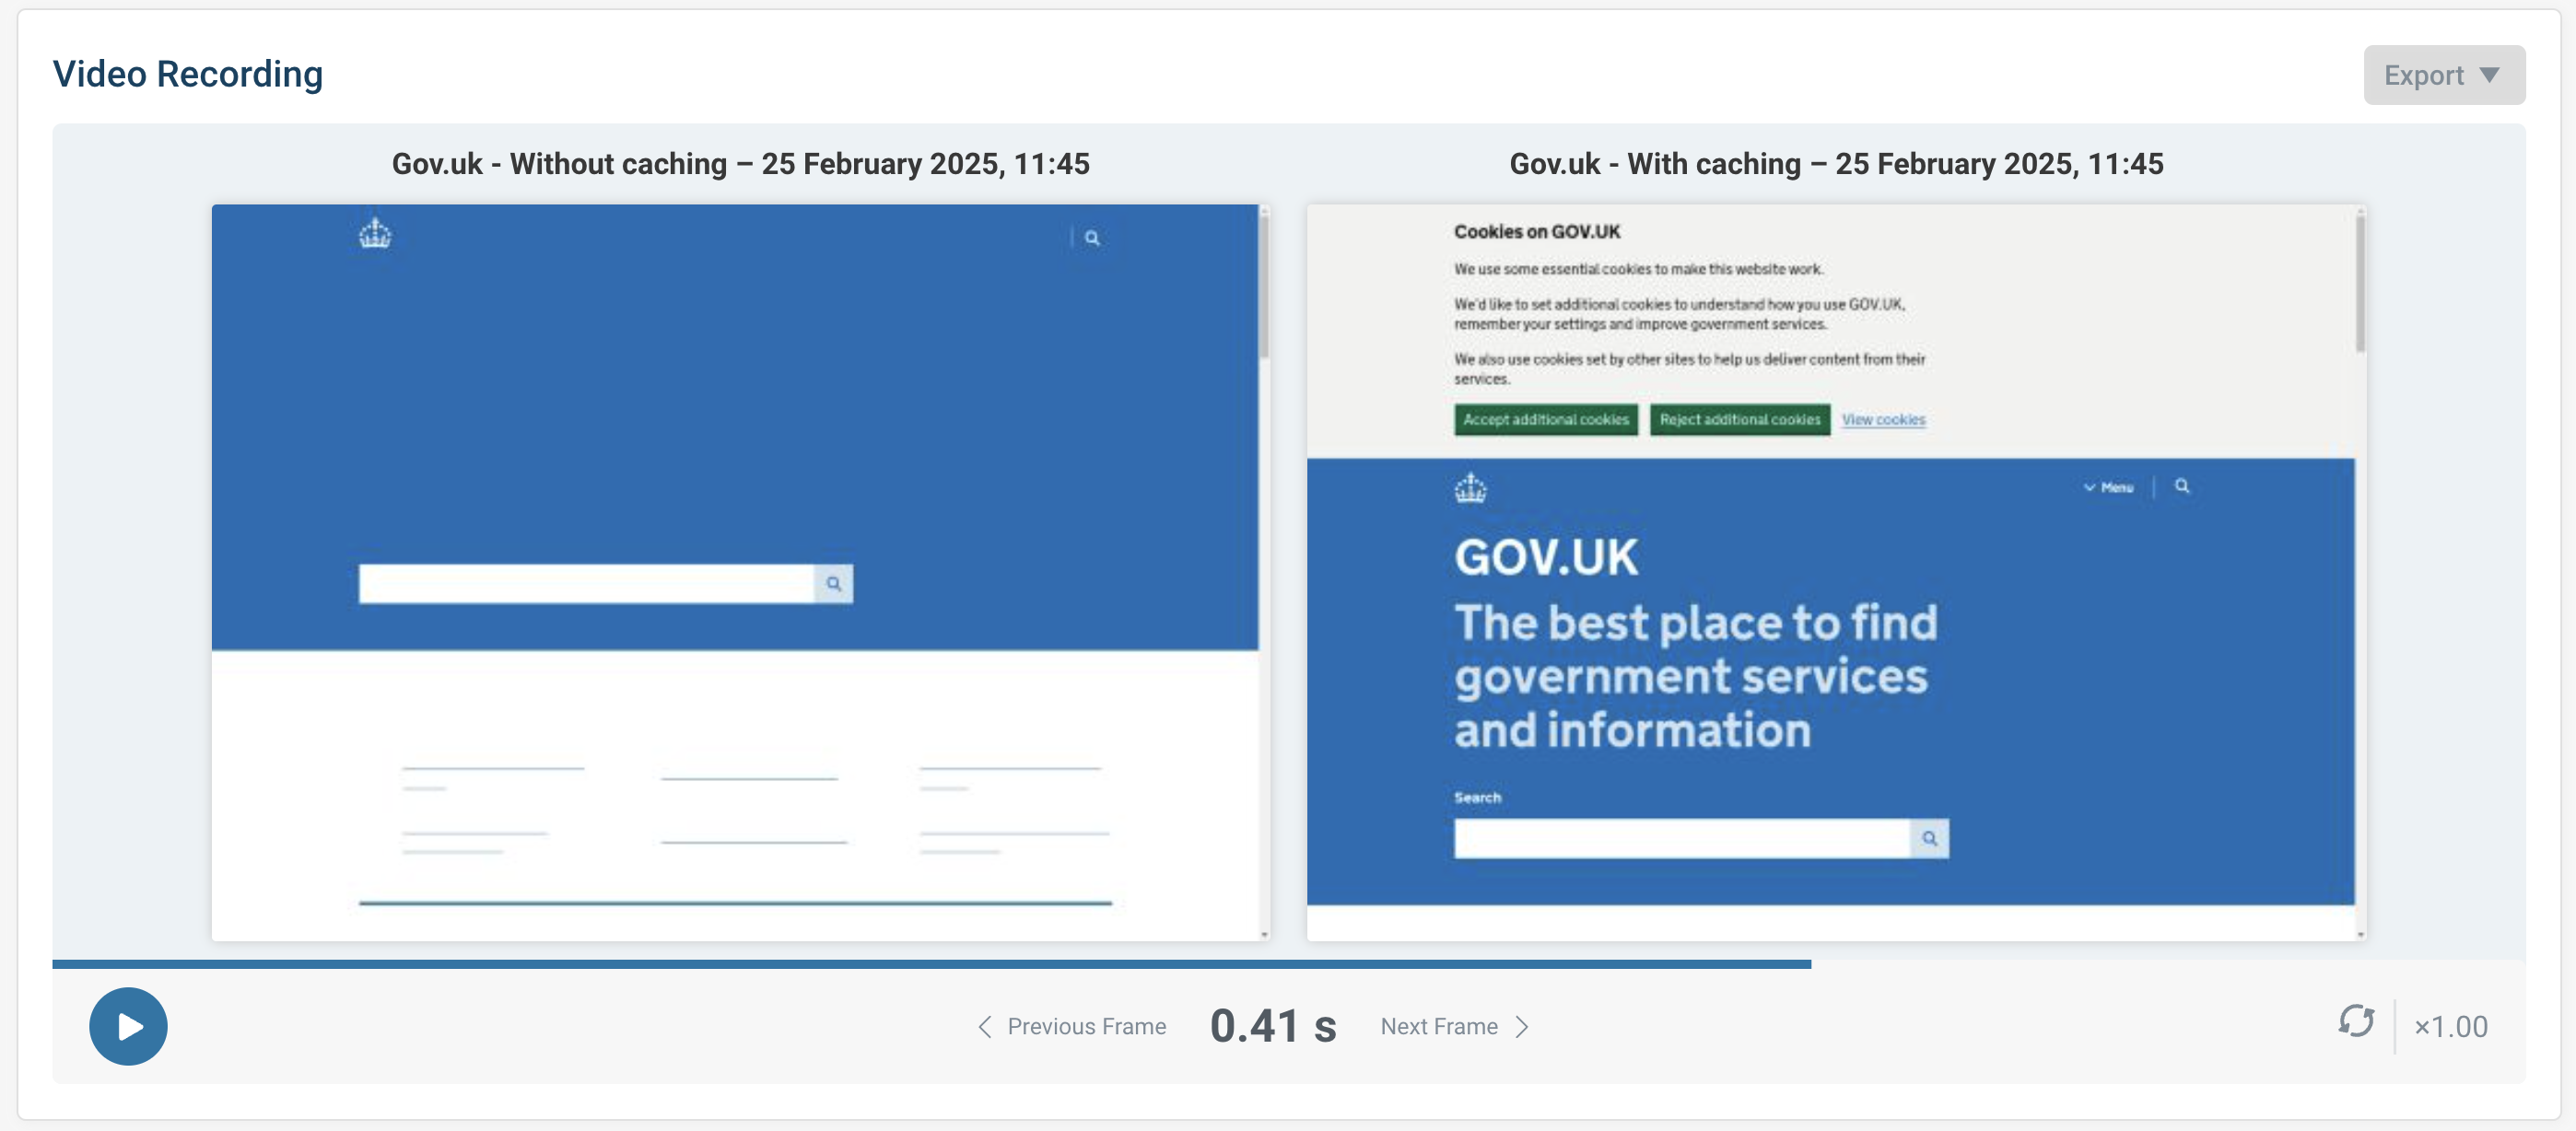
To give a practical example, here are two test runs showing the loading of an Amazon product page without caching, and with caching:
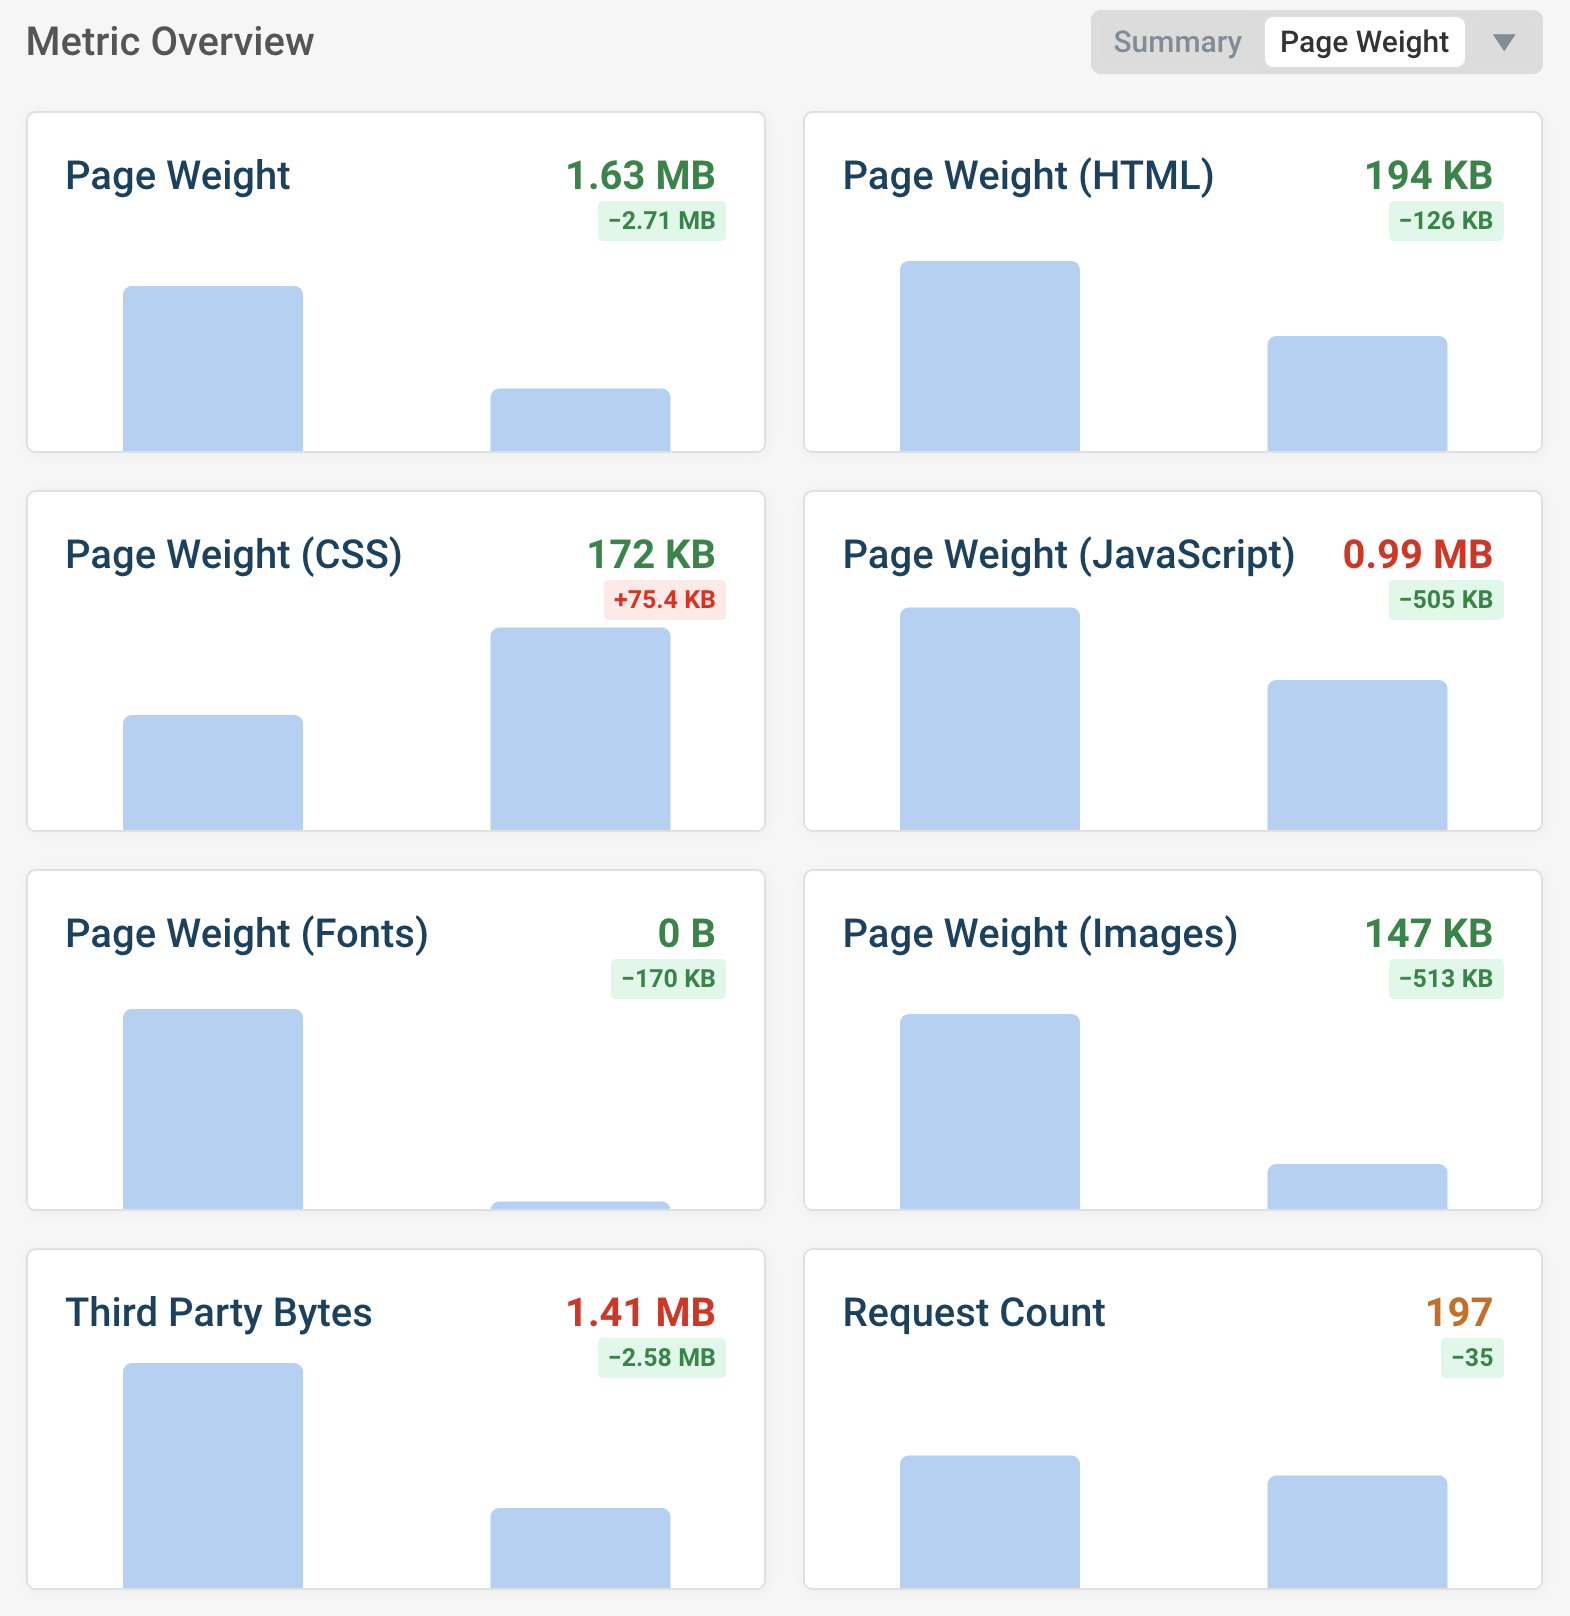
While there are many interesting metrics to look at, let's focus on the Page weight metric:
- Without caching: The Page weight is 4.34 MB.
- With caching: The Page weight is 1.63 MB.
This is a 62% reduction in page weight, which is a significant improvement in page load time.
For a resource to be cached on the users device, the user must have visited the page before. Therefore caching is most effective for subsequent visits to a page.
How browser caching helps with Core Web Vitals
Core Web Vitals are a set of metrics that measure the user experience of a website, and they can affect your website's search ranking on Google.
These metrics are important not just for the first visit to your website, but also for repeat visits. This is where browser caching comes into play.
When resources are cached in the user's browser, they load faster on subsequent visits. This can improve key metrics like First Contentful Paint (FCP) and Largest Contentful Paint (LCP).
Here's an example showing the impact of caching on the Apple home page:
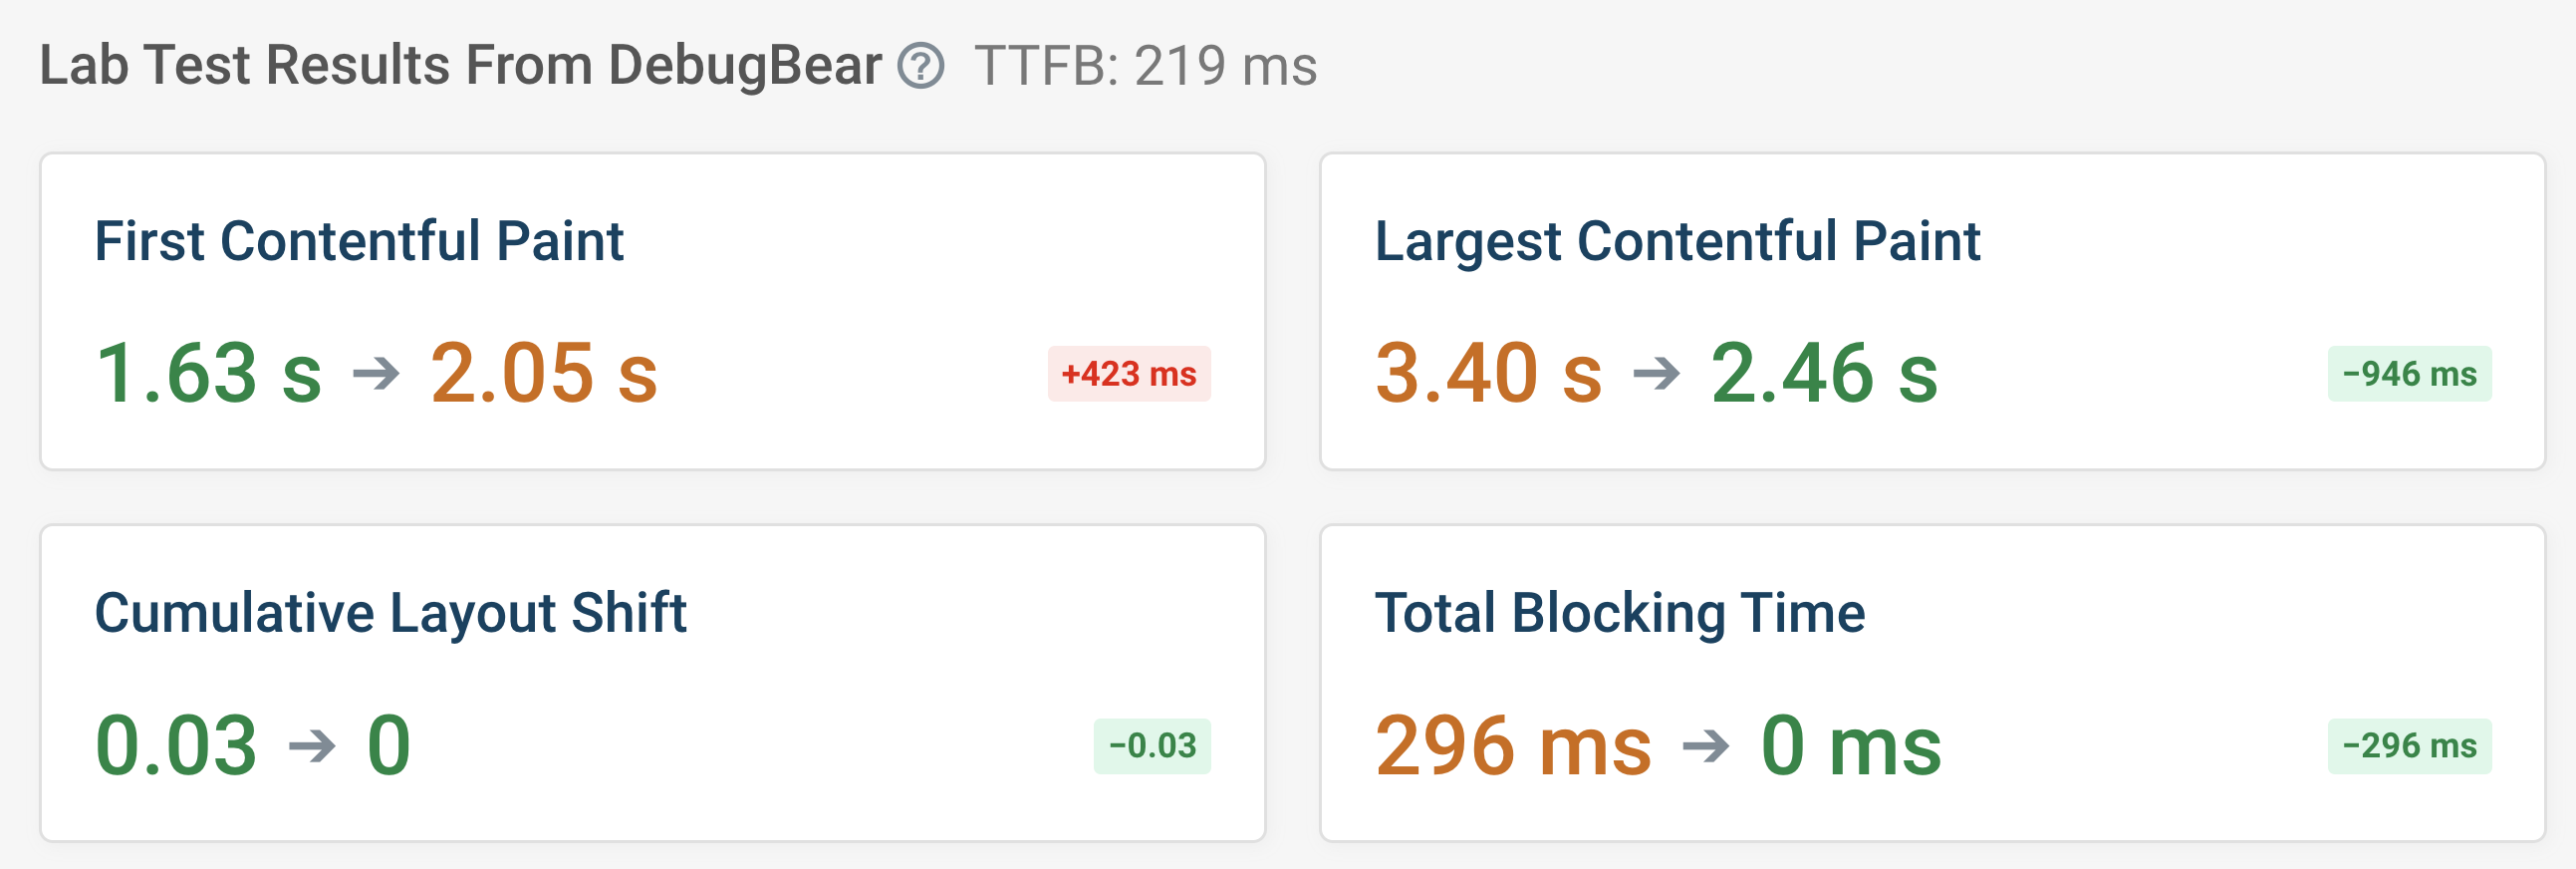
Notice that while the LCP score improved, the FCP score worsened. This underscores the importance of testing your website after implementing caching, as performance can vary. However, in general, caching tends to improve overall web performance.
Types of caches
There are several types of caches that store copies of files:
-
Client-side cache (or browser cache): Lives on your device, inside your browser. This includes specialized caches like Service Worker cache, back forward cache, and the Cache Storage API.
-
CDN cache: Located on a content delivery network (CDN), which is a worldwide network of servers positioned closer to users.
-
Proxy cache: Sits on intermediary servers between users and web servers.
-
Application cache: Built into the application itself to store essential data.
Not all caches are equally fast. A cache on your own device is the fastest option because there's no network delay. While a CDN cache still requires a network request, it's typically much faster than reaching all the way back to the origin server (where your website actually lives).
A browser cache is known as a private cache, whereas a CDN cache is known as a public cache.
This post primarily focuses on browser caching, note however that for browser caching to work effectively, the server must also be configured to send the correct caching headers.
What is client-side caching
Client-side caching is the process of storing copies of files on the user's device, inside their browser. This allows the browser to load resources more quickly on subsequent visits to the same page.
"Client-side" is a broader term that encompasses different types of clients, such as web browsers, mobile apps, and desktop applications. This post focuses on the browser as the client.
Use our website cache checker to check your cache-control headers and CDN cache status.
How does the Cache-Control header work?
The Cache-Control header is your main tool for telling browsers how to cache your website's resources. Without it, browsers will use their own rules for caching, which might not be what you want!
This header uses simple directives (instructions) that control caching behavior:
no-store: "Don't cache this at all" - useful for sensitive informationprivate: "Only the user's browser should cache this" - good for personalized contentmax-age=seconds: "Keep this in cache for X seconds" - the most common directivepublic: "Any cache can store this" - allows CDNs and other intermediaries to cacheimmutable: "This file will never change" - perfect for versioned assetsno-cache: "Cache this, but check with me first before using it"must-revalidate: "If it's expired, don't use it until you check with the server"s-maxage=seconds: "CDNs should keep this for X seconds" (separate from browser caching)stale-while-revalidate: "Use the old version while fetching a new one" - improves perceived speed
You can combine these directives to create a caching strategy for each resource on your site. For example:
Cache-Control: public, max-age=86400, must-revalidate
This tells browsers: "Everyone can cache this for one day, but after that, check if it's changed."
Examples of how to use the Cache-control header
For dynamic resources, like HTML pages (for example, https://example.com/shop), start out with:
max-age=0,must-revalidate,public
Explanation: This tells browsers to always check with the server before showing the cached version. The resource is cached (saving download time) but considered "expired immediately" so the browser must verify it's still current before using it. This is a safe approach for pages that change frequently like your homepage or product pages.
Take note that using max-age=0,must-revalidate,public does allow the browser to cache the resource, but it must revalidate it with the server before using it. In most cases, this is a safe approach to take, however there's a reason they say that cache invalidation is one of the hardest problems in computer science and it's not a coincidence that many large organisations request that users manually clear their cache when their users encounter issues.
For static versioned assets (for example, https://example.com/main.12345678.css), like images, CSS, and JavaScript, start out with:
public, max-age=31536000, immutable
Explanation: The browser will cache the resource for 1 year, and the resource is considered immutable, meaning it will never change.
If your assets are not versioned (e.g. they live at https://example.com/main.css instead of https://example.com/main.12345678.css), you should work towards versioning them before using this cache policy.
Check cache control headers for resources on your website
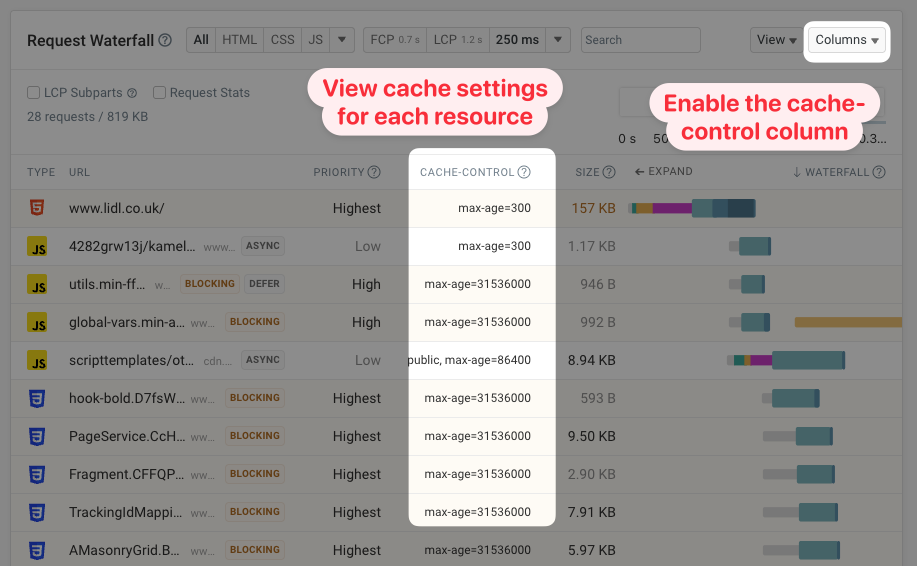
The DebugBear website speed test shows you what resources are loaded on your website and what their cache settings are.
Open the Columns menu and enable the Cache-Control column.
Cache revalidation: Checking if cached resources are still fresh
When a browser caches your website resources, it needs to know when to get fresh versions. This is where cache revalidation comes in - a smart way to check if cached content is still good to use.
How revalidation works in practice
Imagine your browser has cached a resource with max-age=10,must-revalidate,public. After 10 seconds, this resource becomes "stale". But instead of immediately downloading it again, the browser can simply ask the server: "Has this changed?"
This creates three possible scenarios:
1. Fresh cached resource (within max-age):
- Browser uses cached version directly
- No server communication needed
- Extremely fast loading
2. Stale resource that hasn't changed:
- Browser asks server if content has changed
- Server replies "304 Not Modified" (tiny response)
- Browser keeps using cached version
- Much faster than re-downloading
3. Stale resource that has changed:
- Browser asks server if content has changed
- Server sends new version of the resource
- Browser updates its cache
A real-world example
Let's see how this plays out:
First visit to a page:
- Server sends:
Cache-Control: public, max-age=10 - Server sends: 1MB of data
- Browser saves this in its cache
Second visit (within 10 seconds):
- Browser thinks: This is still fresh!
- Browser uses cached version
- No network request at all!
Third visit (after 10 seconds):
- Browser thinks: This might be outdated now
- Browser asks server: Has this changed since I last got it?
- Browser sends:
If-Modified-Since: 01 March 2025 18:30:00 GMTandIf-None-Match: W/"164-198173818fc" - Server replies:
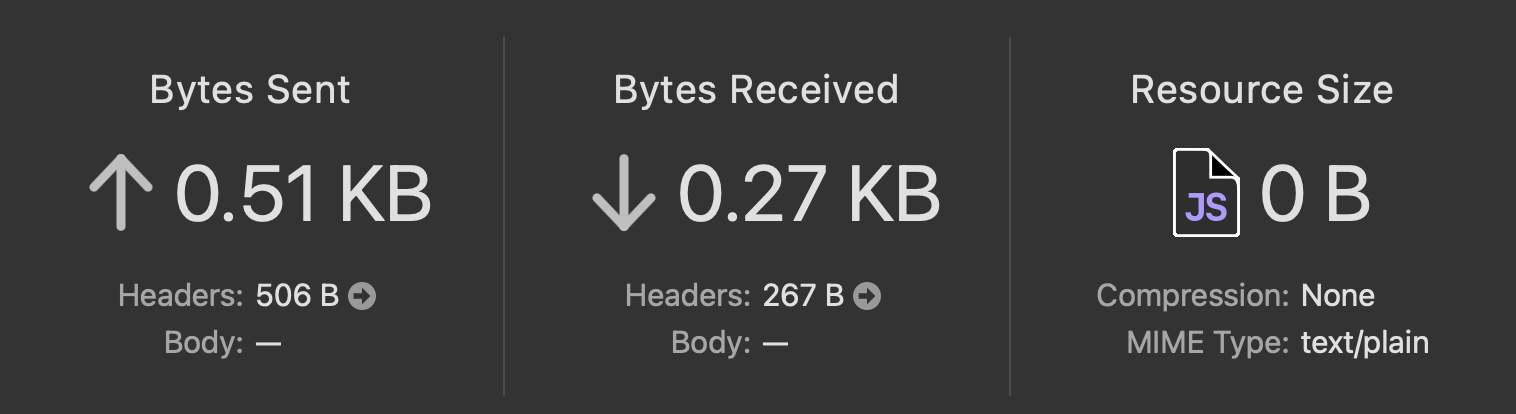
304 Not Modified - Only a few bytes transferred, not 1MB again!
ETags help with revalidation! An ETag is like a fingerprint for your content - if the content changes even slightly, the ETag changes too. The browser can send the ETag to the server to check if its cached version matches the current version.
Using cache settings in JavaScript fetch
When making fetch requests in JavaScript, you can control caching behavior:
// This tells the browser to always check with the server before using cached content
fetch("/api/data", { cache: "no-cache" });
This approach gives you control over how your web app handles cached resources.
Cache busting: How to cache bust your assets
Cache busting is a technique used to ensure the browser downloads the latest version of a file, even if it has been cached for a long time.
Imagine you have a CSS file with a caching header like max-age=31536000, which tells the browser to cache the file for a year. If you update the CSS file, the browser won't fetch the new version until the cache expires. This is where cache busting comes in handy.
A common method for cache busting is to use versioned file names. Instead of naming your file main.css, you could name it main.12345678.css. The version number is usually a hash of the file contents, so whenever the file changes, the hash changes too. This way, the browser recognizes it as a new file and downloads it.
Most modern build tools and frameworks support cache busting out of the box. To implement it, look up "cache busting" or "asset versioning" in your framework or build tool documentation. This will guide you on how to set it up in your specific environment.
Does Import Maps work with cache busting?
Import maps work nicely with cache busting. They allow you to define a mapping between a module specifier and a URL, and this can be used to refer to versioned files in one place.
Your other modules can then import the module specifier, and the browser will automatically fetch the correct versioned file:
HTML (index.html):
<script type="importmap">
  {
    "imports": {
      "utils": "https://cdn.com/utils.12345678.js"
    }
  }
</script>
JavaScript (main.123.js):
// No need for import * as utils from "https://cdn.com/utils.12345678.js";
import * as utils from "utils";

console.log(utils);
This approach works well, and mitigates the invalidation chain problem that would occur if the contents of main.123.js were updated to refer to a new version of utils. As in such a scenario, the browser would need to download both files again. Whereas with import maps, the browser will only download the updated file (utils).
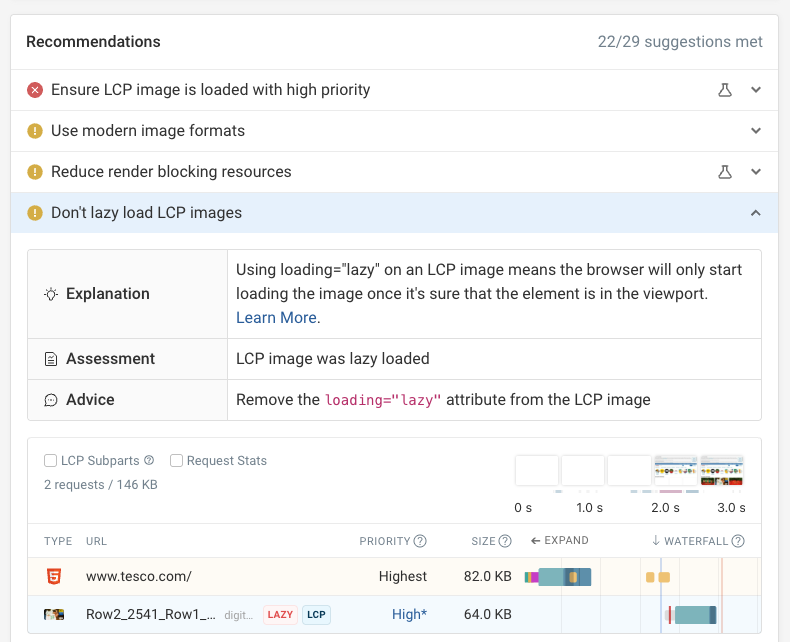
Serve static assets with an efficient cache policy
Serve static assets with an efficient cache policy is a Lighthouse audit that validates you are caching resources that are considered reasonable to cache.
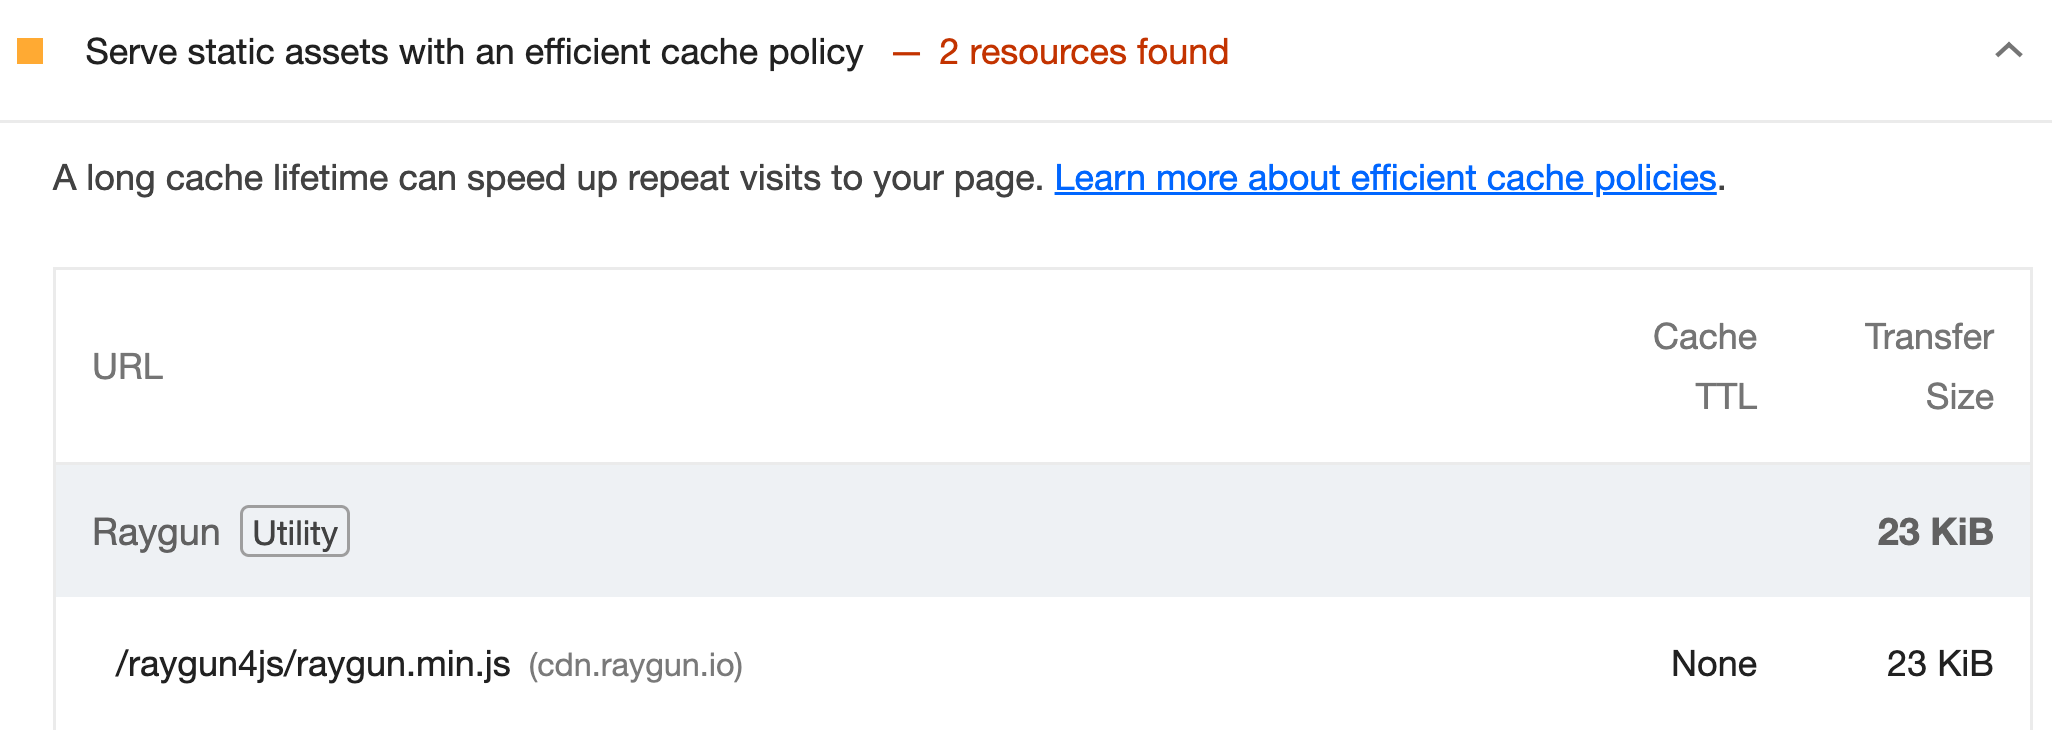
You can pass this audit by using the cache-control header with a suitable max-age directive, such as the ones discussed earlier.
How to disable the cache in DevTools
All modern browser developer tools expose some caching information. This section focuses on Chrome DevTools.
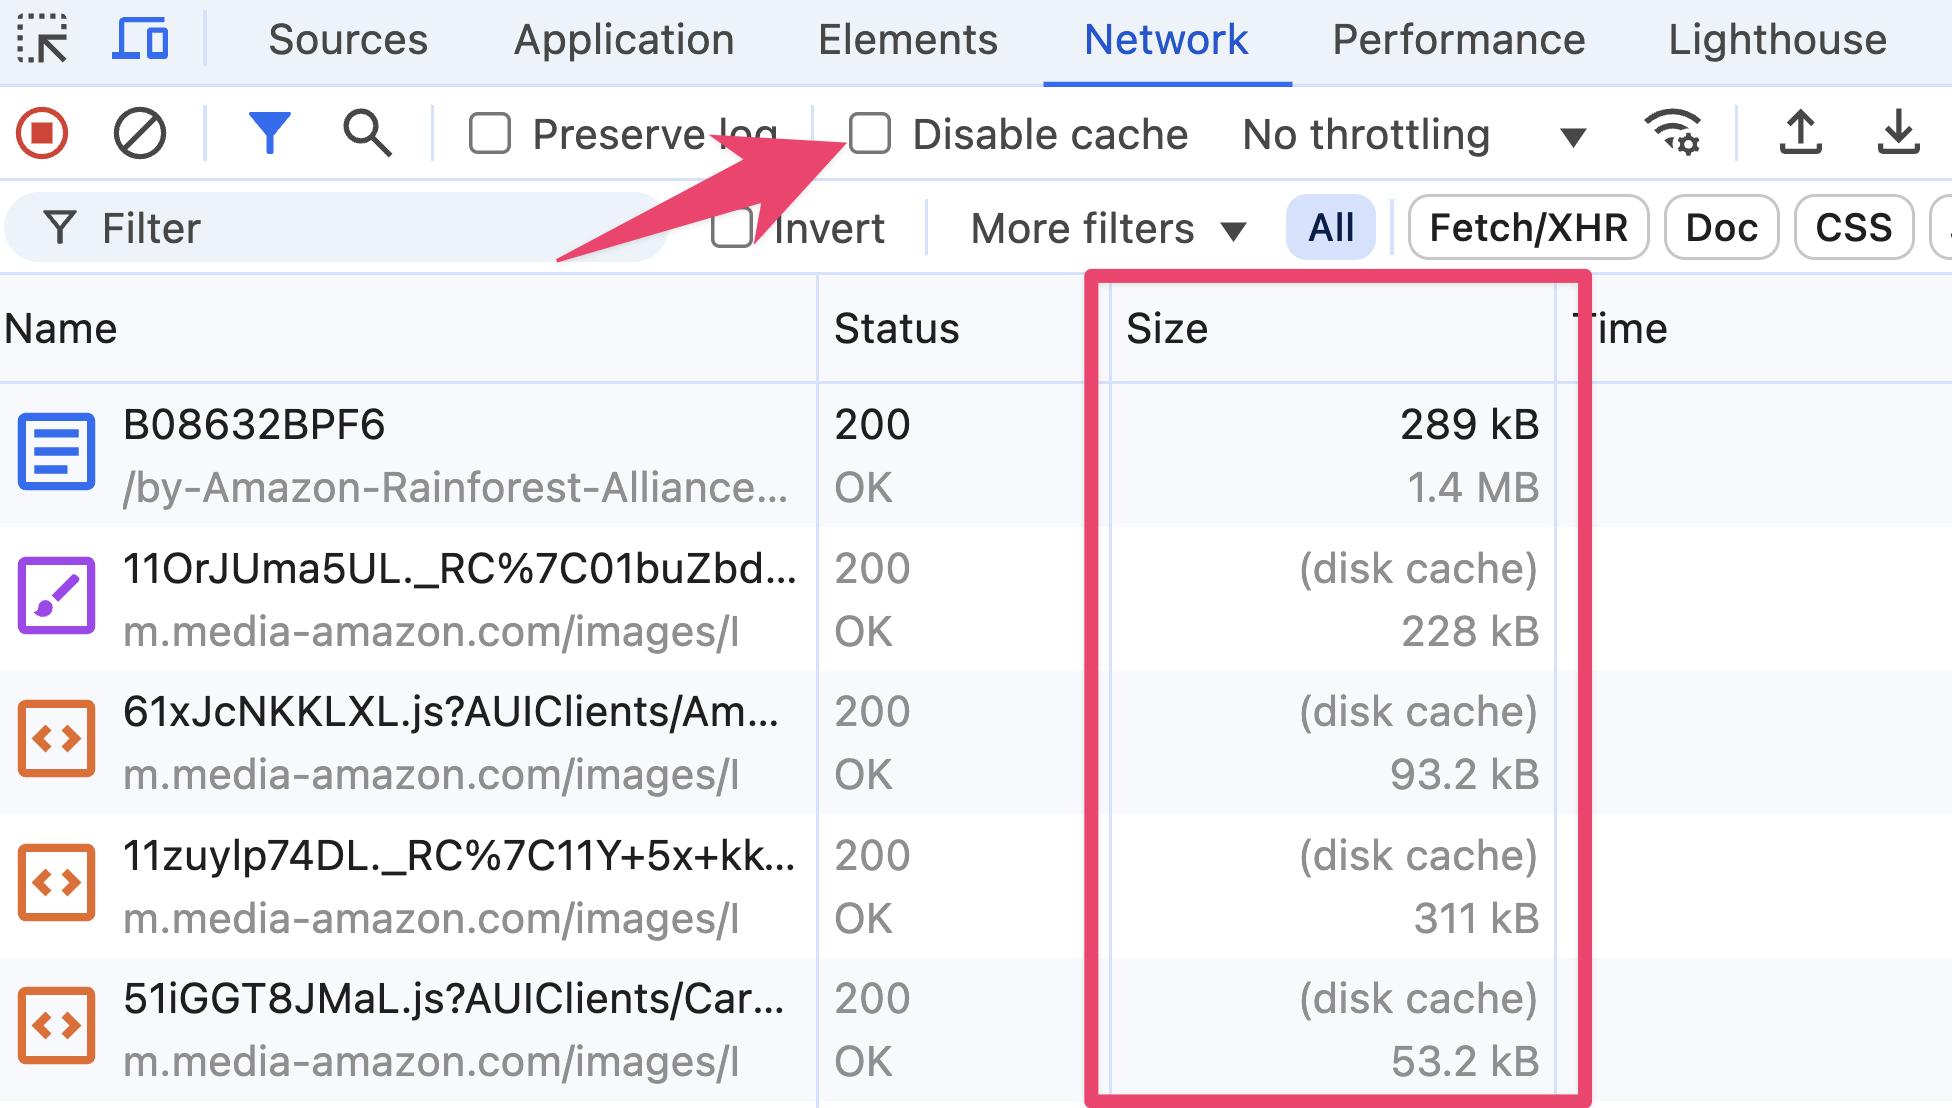
- Within Chrome DevTools (and there will be a similar setting for other browsers developer tools), ensure "Disable cache" is unchecked.
- This will ensure that the browser cache is used as it would be in a real-world scenario.
- Then, navigate to a page, and inspect the network panel.
- Reload the page - just click the reload icon to avoid doing a hard reload which may bypass the cache.
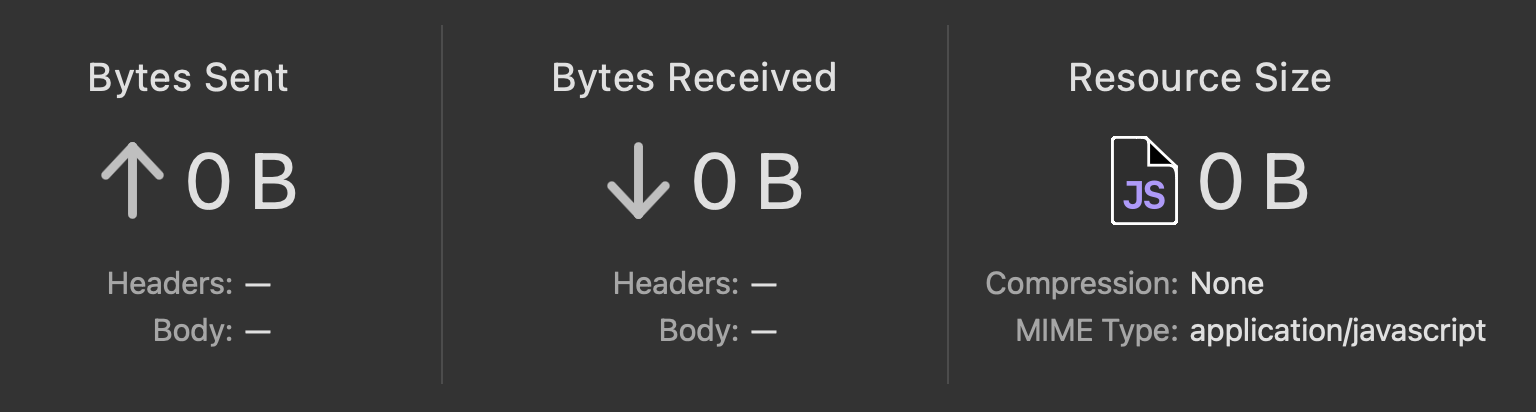
- Observe the network panel again. The "Size" column should show
disk cacheor similar for cached resources.
Clicking a network resource in the network panel shows you HTTP request and response headers, however for convenience, you configure DevTools to always show cache-related headers in the overall network panel:
- Right click on the network panel columns, and navigate to "Response headers".
- Check the options for "etag", "cache-control", and "last-modified".
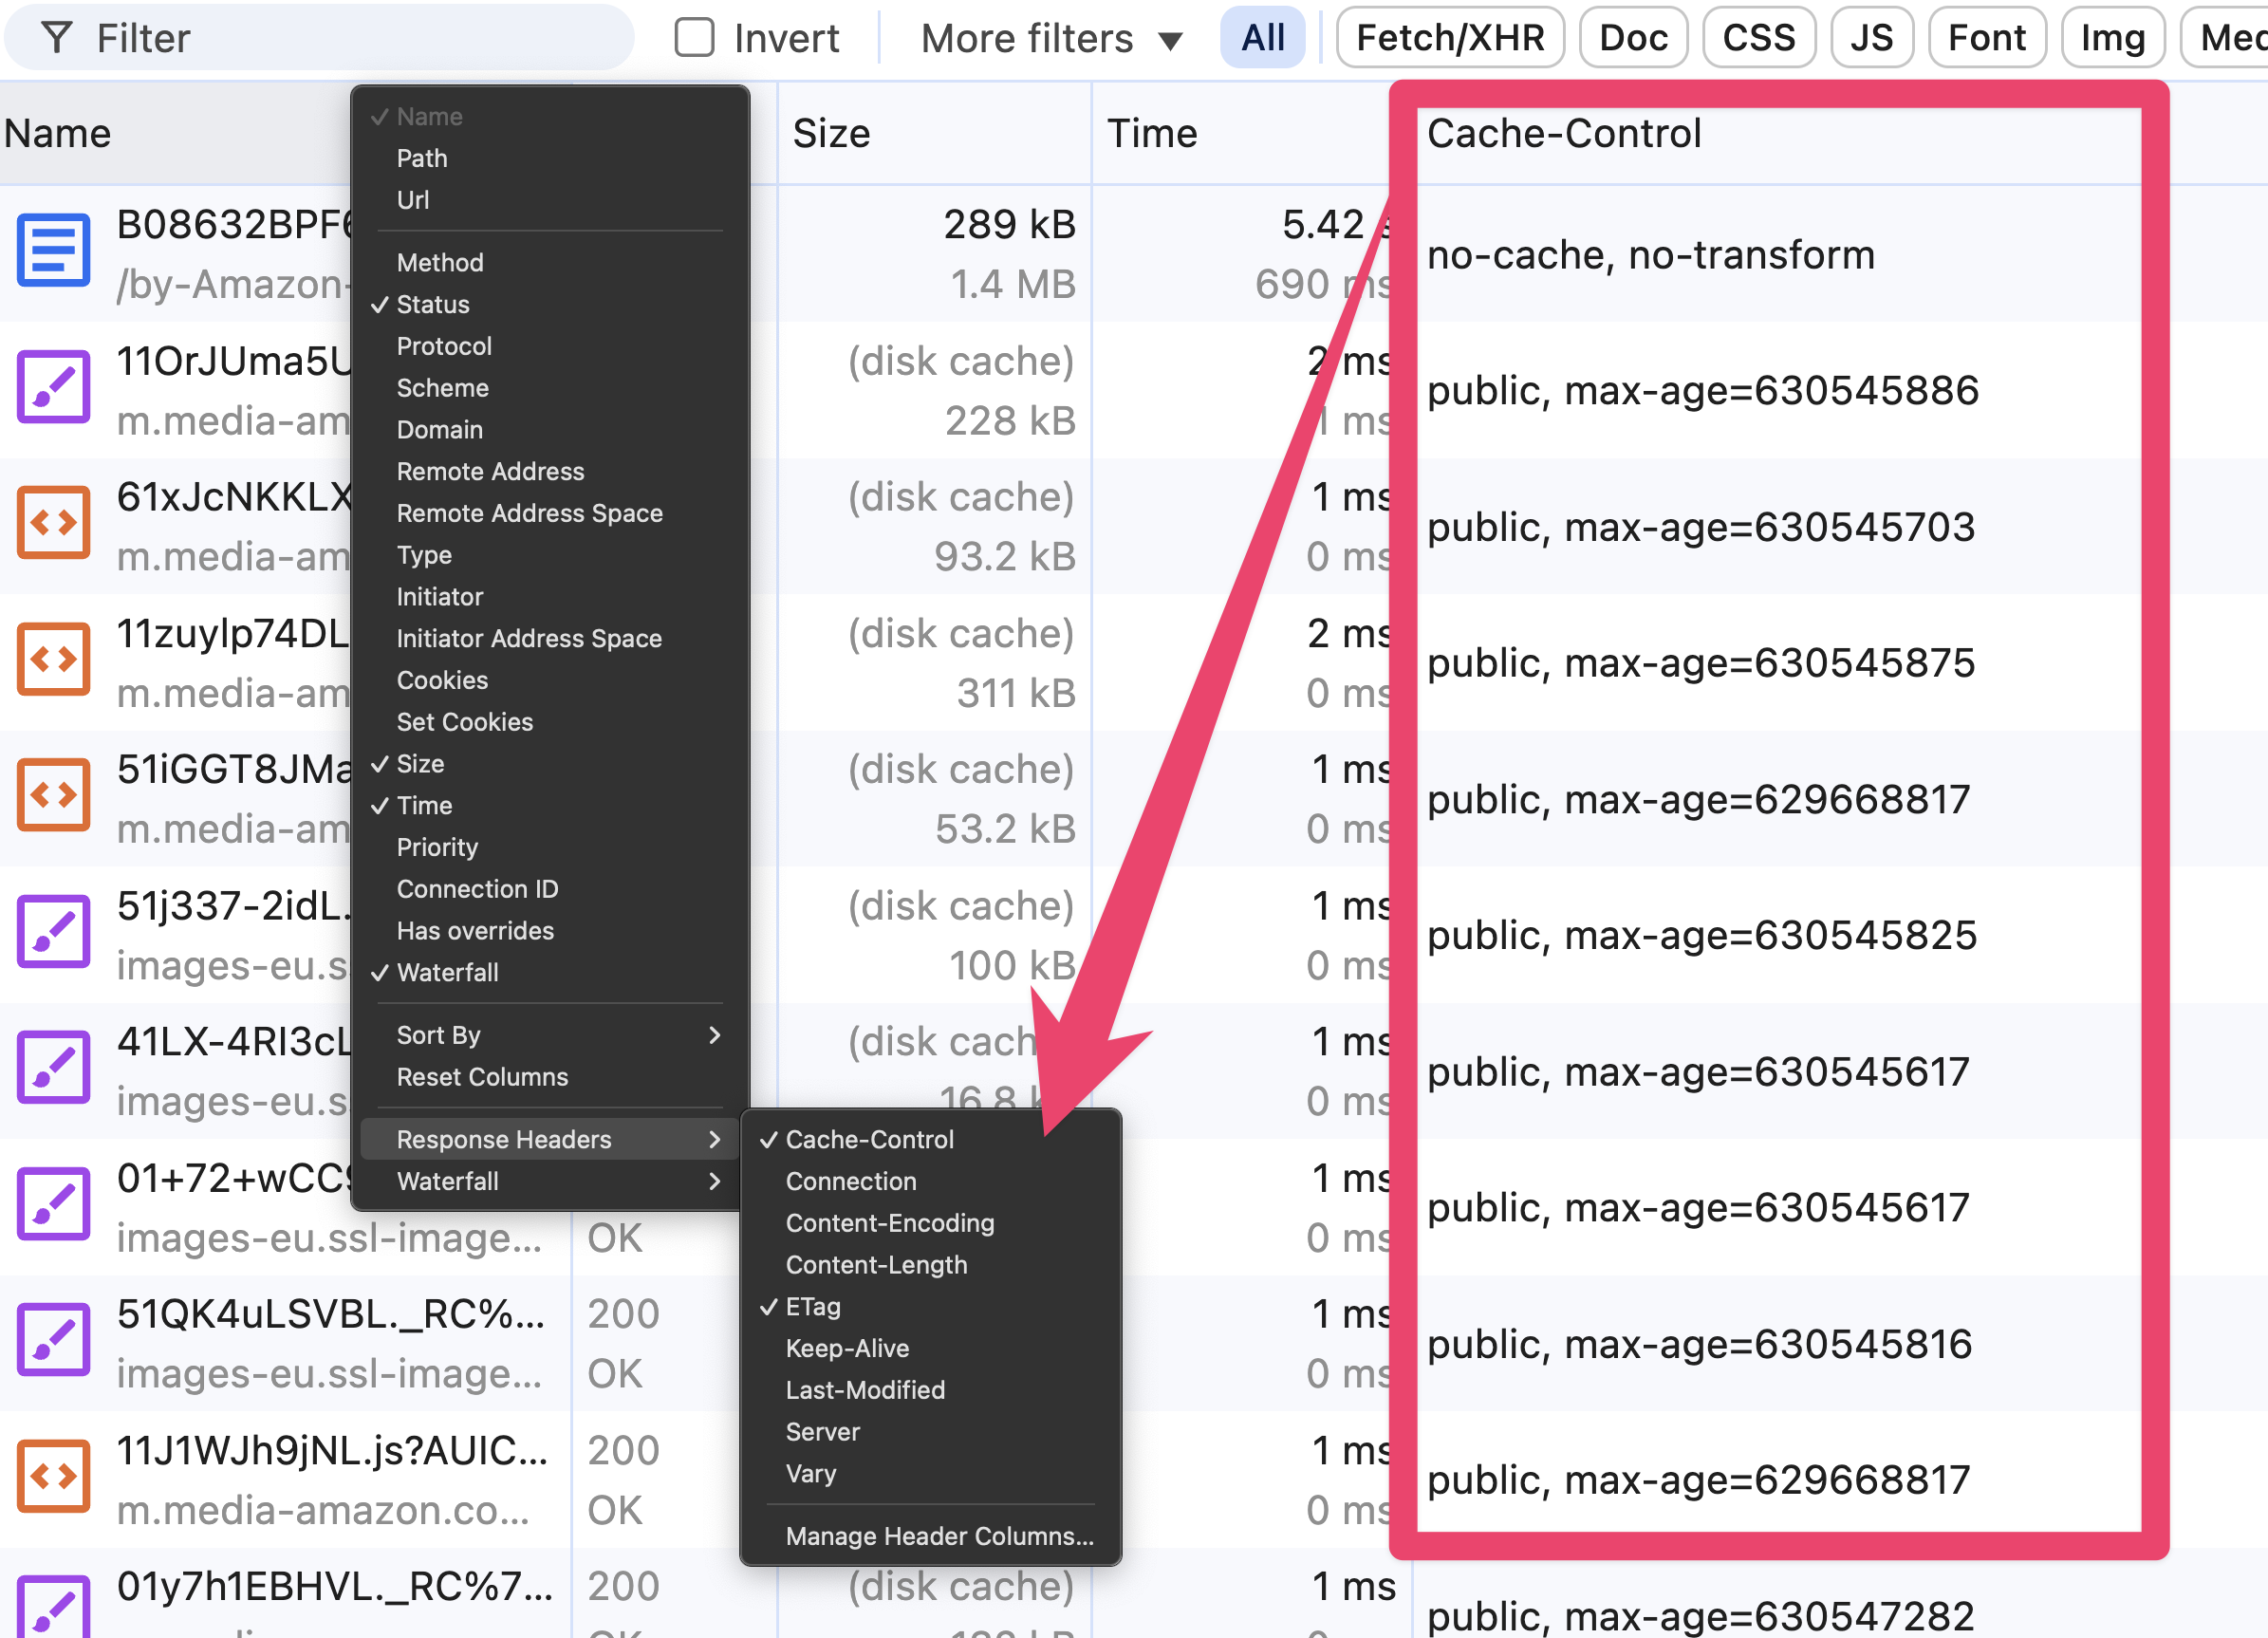
DevTools now shows you those network response headers for each request, without needing to click into each one.
Enable caching on the Caddy web server
Caching is a big topic, and implementation details are out of scope for this post. However, here are some resources to get you started.
These examples are simplified for the sake of brevity. You should always consult the official documentation for your web server.
These examples illustrate the basics of caching:
- For dynamic resources like HTML pages, always revalidate.
- For static versioned assets like images, CSS, and JavaScript, cache for a long time.
Caching with the Caddy web server:
# Dynamic content (HTML pages)
@root {
	path /
	not path /static/*
}
header @root Cache-Control "max-age=0, must-revalidate, public"

# Static versioned assets
@static {
	path /static/*
}
header @static Cache-Control "public, max-age=31536000, immutable"
Learn more about Caddy's caching directives here.
Enable caching on the Nginx web server
Nginx is the most popular web server that's known for its performance and scalability. Here's how you can enable caching on Nginx:
Caching with the Nginx web server:
location / {
    add_header Cache-Control "max-age=0, must-revalidate, public";
}

location /static/ {
    add_header Cache-Control "public, max-age=31536000, immutable";
}
Learn more about Nginx's content caching.
Enable caching on the Apache web server
Some systems still use the Apache web server, which is known for its flexibility and power. Here's how you can enable caching on Apache:
Caching with the Apache web server:
# Dynamic content (HTML pages)
<Location "/">
    Header set Cache-Control "max-age=0, must-revalidate, public"
</Location>

# Static versioned assets
<Location "/static/">
    Header set Cache-Control "public, max-age=31536000, immutable"
</Location>
Learn more about Apache's mod_headers.
How to enable caching on Cloudflare
Caching on CDNs is a big topic, and extensive implementation details are out of scope for this post. However, here are some resources to get you started.
We have an in-depth guide on how to configure caching on Cloudflare. But generally, to cache your website and assets on Cloudflare, you can use the following steps:
- Add your website to Cloudflare.
- Configure your caching settings.
- Test your website using DebugBear's Warm Load feature.
How to enable caching on other Fastly, Akamai and Vercel
Fastly, Akamai, and Vercel are other popular platforms that offer caching services. Here are some resources to get you started:
- Caching on Fastly: https://docs.fastly.com/en/guides/caching
- Caching on Akamai: https://techdocs.akamai.com/api-definitions/docs/caching
- Caching on Vercel: https://vercel.com/docs/edge-network/caching
Using CDNs can often carry their own edge cases. You may need to supply special cache-control directives to the CDN, or use a special API to purge the cache.
Be sure to consult the official documentation for your CDN.
Caching in web frameworks like Next.js, Laravel and more
Just like with CDNs, caching with web frameworks is a big topic, and implementation details are out of scope for this post. However, here are some resources to get you started.
- Caching in Next.js: https://nextjs.org/docs/canary/app/building-your-application/caching
- Caching in Ruby on Rails: https://guides.rubyonrails.org/caching_with_rails.html
- Caching in Express: https://expressjs.com/en/5x/api.html#res.set
- Caching in Laravel: https://laravel.com/docs/11.x/cache
- Caching in WordPress: https://www.debugbear.com/blog/speed-up-wordpress
Increase the chances of a cache hit
With browser caching, a cache hit is when the browser can serve a resource from the cache, without needing to make a network request. A cache miss is when the browser needs to make a network request to get the resource.
- Use effective cache policies: Use the
Cache-Controlheader to control how resources are cached, and be intentional about how long resources are cached for. The longer a resource can be considered fresh, the more likely it is to be in the cache. - Don't invalidate cached resources: If a resource hasn't changed, don't change the URL. If you end up bundling all your frontend assets into a single file, and one of those assets changes, the entire bundle will need to be re-downloaded.
- Don't forget the cache hit ratio on the CDN: If you're using a CDN, you'll want to read the CDN's documentation to understand how to increase the cache hit ratio in ways that are specific to that CDN.
How to clear your browser cache
Clear your own browser cache in Chrome:
- Click the three dots in the top right corner.
- Click Delete browsing data.
- Select the options you want to clear, and click Delete.
Here's when you should clear your own cache:
- When you're testing a new caching strategy.
- When you're testing a new version of your website.
- When you're debugging a caching issue.
- When you're making changes to your server's configuration.
How to clear the browser cache for your users
The Clear-Site-Data header can be used to clear the cache for your users. This is useful when you've made a change to your website that you want to ensure all users see.
Clear a cache for your users:
Clear-Site-Data: cache
This header can be used to clear the cache, cookies, storage, and other site data.
Here's when you should clear the cache for your users:
- When your users have received buggy or incorrect data.
- When you've made a change to your website that you want to ensure all users see, but you can't rely on the cache headers to do this.
Online tool to debug caching headers
If you're looking to quickly check the cache headers of a website, you can use DebugBear's free website checker.
DebugBear surfaces caching information in both Real User Monitoring (RUM) and synthetic tests.
Debug the caching experience from your users with RUM:
The page weight chart in the Page Views tab shows the cache ratio for each page view.
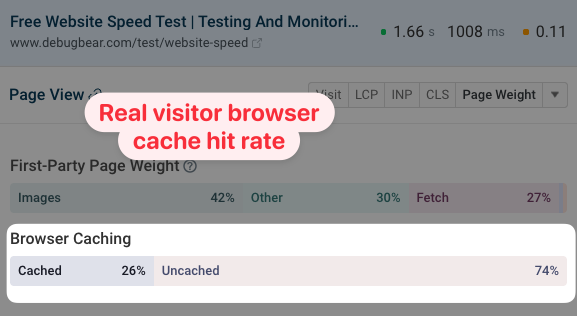
Also in the Page Views tab, you can click on a specific page view to see a network request waterfall. Cached resources are marked with a Cache badge.

Using RUM to identify cached resources gives you a definitive answer on how well your caching strategy is working for real users.
Don't underestimate the value of RUM data. Lab based tests run in a controlled and repeatable environment, but RUM captures the real-world experience of your users. This can be especially important for caching, as there are all sorts of reasons as to why caching may not work as expected:
- The user's browser may have a full cache, or limited disk space.
- The user may have disabled caching in their browser settings.
- The user may have a browser extension that interferes with caching.
- The user may be using incognito mode, which disables caching.
- The user may be connected to a network that modifies caching headers.
Compare a website with and without caching enabled
You can use DebugBear's synthetic testing feature to compare a website with and without caching enabled.
Once you've added your website to DebugBear, you can warm the cache in the test run settings

Finally, you should then compare the two test runs to see the impact of caching on your website. The request waterfall lets you drill down into the details of each request, and helps you verify whether:
- Cache headers are set correctly.
- Resources are being served from the cache.
There's also a video comparison feature that lets you see the visual difference between the two test runs.
Fix your website performance with caching and more
When it comes to caching, the key is to be intentional. Use the Cache-Control header to control how resources are cached, and how they are revalidated. Cache static assets for a long time, and dynamic resources for a short time, or not at all.
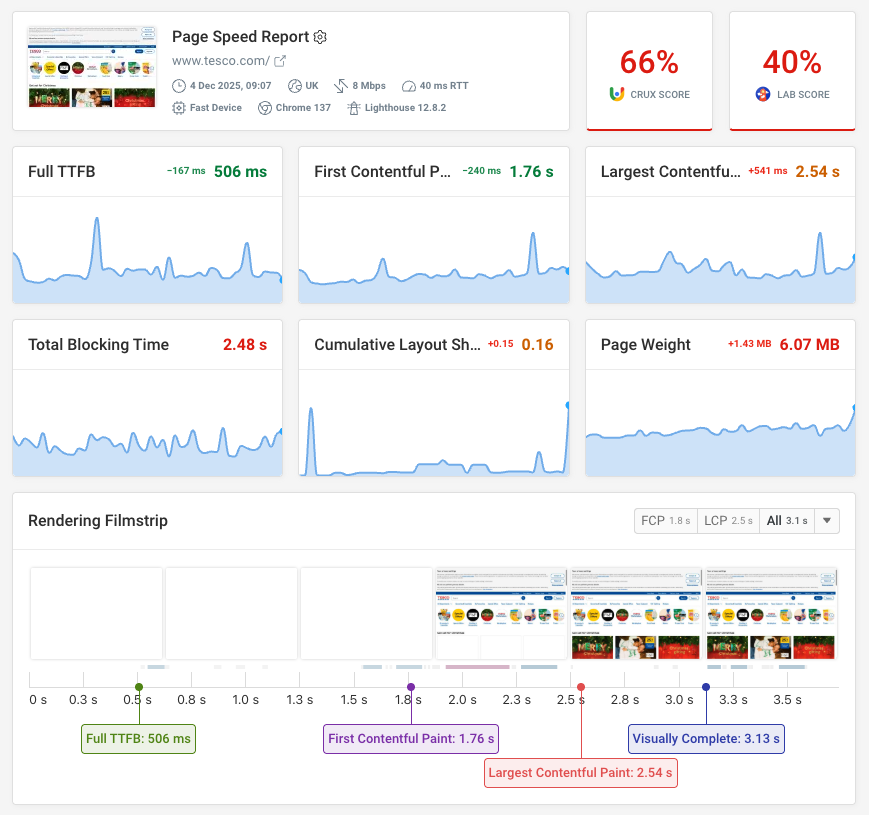
If you are looking for more ways to speed up your website, try the free DebugBear website speed test. You'll get detailed technical insights as well as custom recommendations. Try out fixes without deploying code using experiments.
DebugBear also lets you monitor page speed over time with scheduled synthetic tests and real user monitoring. Get alerted when there's a problem and compare before and after test results to see what change resulted in a metric regression.


Monitor Page Speed & Core Web Vitals
DebugBear monitoring includes:
- In-depth Page Speed Reports
- Automated Recommendations
- Real User Analytics Data